Iris folding scheme templates for birthday. Iris folding is a fashionable needlework technique with unusual effects. Iris folding: a step-by-step master class
Iris Folding(iris folding) - filling the picture cut out along the contour with multi-colored stripes. For technology there are many schemes, templates and pictures. Wherein schemes for iris folding it is enough just to make it yourself - you just need to know some principles of their manufacture.
Let's take a closer look at the irisfolding technique. Images made using this technique resemble a twisted spiral. The technique is very simple to perform.
To decorate the album, such interesting crafts will be interesting - using the iris folding technique. This technique is not as complicated as it seems at first glance. Just be careful and careful. Here in the photo gallery there are many interesting patterns and schemes. use them. Good luck and inspiration! 
Do a very interesting kind of creativity with your children - iris folding.
Iris folding originated in Holland. This technique is also called "rainbow folding". Its principle is as follows:

 There is a special paper designed for iris folding. But if you do not have it, then the usual color will do. Fabric, wrapping paper, pages of old glossy magazines, floral paper and much more can also be used for crafts. It all depends on your imagination. Before starting work, you need to learn how to build a template yourself or stock up on ready-made iris templates. You can use ready-made schemes.
Learning to build a template:
Let's learn it ourselves: to do this, you need to choose a geometric figure that is most suitable for your drawing - a square, a triangle, a rectangle, a polyhedron ... We arm ourselves with a ruler, pencil, drawing and get started! 
For example, we take a popular cartoon character - Krosh, a participant in the cartoon "Smeshariki".
Now, armed with a ruler and a pencil, we begin construction. We line the ears and paws of the animal with approximately the same step, in the order and direction in which this seems to us the most suitable option. Next, draw a square in such a way that each of its sides passes through the torso of our hero. Here the square turned out with a side of 10.5 cm. You can choose any other geometric shape - a triangle, a polygon - as you like.
 Next, on each side of the square, set aside the step width. Usually it is 10-15 mm, but you can vary it at your own discretion.
We connect the resulting points with straight lines.
We number the resulting segments according to the principle of twisting the spiral. This will greatly simplify our subsequent work. On the resulting small square, we again set aside the width of our step. And so on until a small square remains inside - the iris element. Here's what we got. 
The arrows on the ears and paws show the direction of the work. You can also do the opposite.
Prints it on the wrong (NOT COLOR!) side of thick cardboard. Then carefully, along the contour, cut out the pattern with scissors. We put our scheme below and fix two sheets with paper clips on the sides. Preparing strips of paper. You need to decide how many colors your little animal will have. Cut blue colored paper into strips equal to lat. step 2 . In our version, this is 15mm 2 = 30 mm. You need a lot of strips, so don't be stingy. The rest will definitely come in handy in future works.
 The length of the strip should be such that it goes through the entire pattern, with an overlap of about 1 cm at the top and bottom of the picture (so that it can be freely attached). Then fold each strip in half lengthwise, color side up. Now we need to decide what we will use as glue.
There are several options:
- The glue itself is PVA, casein, etc.
- Double sided tape;
- Regular tape.
As a rule, preference is given to the third option, because. excess glue quickly stains the outside of the craft, distorting all the beauty. We begin to fill the drawing with stripes, carefully gluing each along the edges with tape. Then glue the eyebrows, eyes, mouth and nose. And that's it.
The iris folding technique is the creation of a pattern using multi-colored strips of paper arranged in a spiral. The arrangement may be chaotic or have a certain sequence. It is also necessary to use schemes and templates, we will talk about them below.
Preparing the template for iris folding
1) To make a template scheme, you need to choose a geometric figure suitable for the intended pattern, in the form of a square, triangle, rectangle or polyhedron. For this drawing, you need to take a square whose side is 14 cm. For convenience, a checkered sheet is used. Set aside a 15 mm step on each side of the square.

2) Connect the obtained points with straight lines.

3) In the large square, another square of a slightly smaller size was obtained. In it, also set aside 15 mm on each side and connect the dots. In the new resulting square, again set aside the step width and so on until you get a very small square inside. Thus, a template scheme is being prepared.

For iris folding, special paper is used, but if there is none, ordinary color, packaging, pages of an old glossy magazine may be suitable. Pictures from corrugated or velvet paper will turn out to be more attractive. Depending on your imagination, you can use other materials, such as fabric.
The technique may seem complicated at first glance, but in fact it is not. You can understand how the process takes place by watching a master class on iris folding for children.
Iris folding: a step-by-step master class
A pattern twisting into a spiral will be obtained thanks to paper strips folded in half, so that they cover the figured slot. The strips must have a certain width, overlap clockwise at a certain angle. Sometimes it is enough to use one or two colors of paper, but to get a more beautiful original drawing, it is better to use 5 or 6 colors. In this case, a one-color duck model serves as an example.

To complete the work you will need:
1) Diagram of the drawing. The finished template can be printed from the Internet or drawn by yourself. The indicated numbers on the strips indicate in what order they should be laid out.

2) Paper strips that will need to be folded in half. For a more even fold, you can first draw a nail file in its place. To understand how wide to cut a strip, you need to measure it on the diagram and add 3 - 4 mm.
Then cut out all the strips at once or as you fold them.

3) Copy paper for transferring the drawing onto a sheet of cardboard. And scissors to make a curly cut. Place the chart on the wrong side of the cardboard.

4) Paper clips for fixing the scheme on the basis. Having cut out the drawing along the contour, you need to fold the front side of the base on the front side of the diagram.

5) Adhesive tape to secure the strips on the base. When using a glue stick instead of tape, make sure that it is applied only to the outline, as the picture may stick to the circuit. Strips with numbers corresponding to the numbers on the diagram are applied and fixed with adhesive tape or glue. It is important that the fold line of the strips coincides with the lines on the diagram.

1) Completely fill the shaped slot with strips. As a result, glue the remaining figure in the center of the pattern with a rectangle of paper of a different color.


2) Turn the work over and remove the diagram.

3) Finally, decorate the resulting picture with appliqué and decorative details.
This lesson presents the iris folding technique for beginners, it will help develop aesthetic taste, cultivate accuracy and patience, and teach you how to work according to a given plan.
Video on the topic of the article:
.
Introduction
For the first time, the iris folding technique (from the English. Iris Folding - translated from English means - folding the iris, iridescent folding) appeared in Holland. The Dutch masters used colored paper, which was laid out at a certain angle in the form of a twisting spiral on pre-prepared templates. The result is a very colorful work. The iris folding technique does not require special tools, which makes it accessible to everyone.
When performing this technique, attention, accuracy and patience are required. Thanks to this technique, there is an additional unique opportunity to decorate notebooks, collages, album pages and greeting cards with new bright decorative details and elements.
There are quite a few advantages of iris folding in the development of the child's creative abilities. Iris folding classes help to develop children's attention, observation, creative imagination and spatial thinking, while at the same time educating them industriousness, accuracy and accuracy in work, useful labor skills and creative independence. In parallel with this, the sensory development of children takes place in the process of getting to know the color, shape and size of the object.One of the advantages of iris folding is that children improve fine motor skills of the hands, the eye is trained. Iris folding develops constructive thinking and artistic taste, allows children to develop the ability to think logically.
Materials and tools
Template making - paper, graphite pencilHB, ruler.
Making iris - folding - cardboard, colored paper (foil, velvet, coated, etc.), fabric, glue (PVA, glue - pencil, adhesive tape), scissors, stationery knife, paper clips, oilcloth.
Safety instructions for using tools
Before you begin the task, remember that you can not swing the scissors, do not direct them towards your neighbor, keep them above the table with the blade away from you.
Use the cutter only on the board, do not make sudden movements during work, swing, after finishing work, push the blade.
Use liquid glue carefully, do not pour a lot on the product, but only a drop
Schema building
It is necessary to choose a geometric figure that is most suitable for your drawing - a square, a triangle, a rectangle, a polyhedron ...
The sequence of building the circuit:
Build a triangle of the dimensions you need.
Moving clockwise, set aside on each side of the top along the same segment. This segment is called a step, usually it is the same for the entire construction of the template. Most often it is 10-15 mm.

Connect the points marked on the sides with straight lines. You have a new triangle. On this new triangle, lay again segments of the same length, moving clockwise from the vertices.

Connect new dots. The result is a new triangle. Continue building in the same way.

As a result, at the end you will get a small triangle, and the constructed lines will create an interesting effect of twisting spirals.

Iris-folding technology
For work, we need: a template, thick paper or cardboard, which will be the basis for the work, and colored paper from which the drawing will be formed. Since it will turn out to be voluminous, the thinner this paper is, the better. Ideal paper for origami, colored paper for printing, wrapping paper. You also need a breadboard knife, scissors and glue or tape (not double-sided, regular).When creating a postcard or any other work using the iris folding technique, you will need a template, prepared cut sheets of paper or fabric, a substrate for decorating a cardboard outline, and glue.
Execution sequence (option number 1):
Prepare a diagram, ruler, scissors, sheets of colored paper for work.

Prepare colored stripes (the number must correspond to the fragments of the scheme).

Attach the colored strip with the reverse side to the diagram (make sure that the strip matches the diagram number).

Glue the strips one on top of the other according to the order of the diagram. Cut off the excess strip with scissors.

Glue the resulting "rainbow" to the cardboard base, insert the photo into the frame.

Execution sequence (option number 2):
Select the desired scheme, in this case it is the sheet scheme.

On the cardboard from the wrong side, using a template, we apply the outline of a maple leaf.

Cut out the circled shape to make a window.

We place the sheet scheme under the cardboard (face up), fix the template with paper clips.

We cut the selected strips of paper, bend them in half lengthwise.

We begin to glue the strips from the edge (from the number 1), place the strip with an edge (fold) to the line on the template. Glue is applied to the cardboard, it should not fall on the diagram.


We continue to stick strips, alternating colors. The remaining small window is sealed with a piece of paper.


Carefully remove the template. If necessary, put the finished work under the press and dry. The finished work can be framed.


Iris folding came to us from Holland. This technique got its name due to the fact that the finished product created with its help is visually similar in structure to the structure of the iris of the human eye or to the diaphragm of a camera. Initially, iris folding was used as one of the ways to decorate greeting cards. Gradually, this technique spread to many countries of the world and became more complex and diverse.
What materials and tools will be needed when working in the iris folding technique?
Paper, cardboard, magazine pages, cloth or ribbon. Now on sale you can find paper specially designed for this technique.
Templates for creating a picture. These templates determine the order in which paper or fabric strips are laid out, their color and location. There are many ready-made iris templates on the Internet, but it is not difficult to learn how to create them yourself - then the composition will be unique in the full sense of the word.
.jpg)


Stationery knife, scissors, ruler and pencils, glue, double-sided tape. When working with fabric, you will also need
What should be the order of work in the iris folding technique?

The beauty and originality of the apartment is created by the interior and unique design, as well as innovative decor. Do-it-yourself things look unusual, because due to their uniqueness they fit perfectly into the design of the room. One of the popular modern techniques for creating room decorations is a kind of application called iris folding. With this technique, you can make small paintings or small pictures and impressive panels.
Do-it-yourself things look unusual
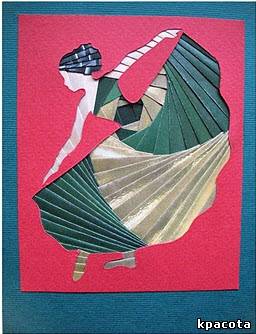
The iris folding technique allows you to create especially beautiful and original products. Experts also call such an application “rainbow folding”, since the plot in the picture is created from multi-colored stripes, neatly superimposed one on one in a spiral.
Simple work requires, however, special accuracy and slowness, but both a novice and an experienced designer will cope with such work.
- A template for a future product can be downloaded from the Internet; the sequence and color scheme of the technique are also marked on it.
- It is also easy to create templates on your own, especially since to create it you only need a piece of paper in a cage, a ruler and a pencil.
- To create crafts, you can use different types of paper: corrugated, velvet, shiny, but experts prefer to use paper that is special for this type of technique. Crafts from various fabrics look original, satin fabric looks especially advantageous and unusual.
- Strips of paper or fabric are glued strictly in a certain order according to a pre-compiled template.
- The wrong side of the product is sealed with a clean sheet.
- The finished drawing is complemented by details according to the preferences of the master, and is also complemented by various decorative elements.
This needlework will appeal to both children and adults. Kids, together with their parents, will be happy to make bright and unusual paintings for a gift or decorating their room.
Gallery: iris folding (25 photos)


Very beautiful and delicate card in the technique of iris folding for March 8 (video)
Iris folding for beginners: master class
A master class for those who have never made such crafts recommends starting to master the technique with the simplest geometric shapes: a square, triangle, rectangle or a bright heart.
The most popular and not particularly complex forms are the autumn maple leaf, the rose, the squirrel, the Christmas tree, and the vase.
For beginners, it is better to use a ready-made template for crafts: download from the Internet and print, you can do it yourself.
- The template is placed on thick cardboard, circled and cut out a heart in the center. The template is laid flat on the cardboard, fixed with paper clips.
- Three colors of paper are cut into strips 4 centimeters wide, each folded in half lengthwise - these are blanks for the future product.
- From the wrong side, the crafts begin to lay out strips alternately, according to the scheme: first lay out row “a”, then the following rows alternate with the second and third colors. Fix the strips with glue or tape.
- After all the stripes have run out, the middle is made in any color of your choice or a suitable color palette.
- The card is turned over, the front part is decorated at will and at your discretion, and the wrong side is sealed with plain paper.

A master class for those who have never been involved in the manufacture of such crafts recommends starting to master the technique from the simplest geometric shapes
Such a heart can be made in one color without adding other shades. You can also make crafts from multi-colored or plain fabric, corrugated or satin paper.
Crafts for the New Year using the technique of iris folding
Do-it-yourself souvenirs and postcards are considered a popular New Year's gift. Such gifts are unique and original, the giver in this way shows his respect and special disposition to the one to whom the gift for the New Year is intended.
You can prepare any New Year's gifts for a loved one, you can easily supplement them with hand-made postcards using the iris folding technique.

Do-it-yourself souvenirs and postcards are considered a popular New Year's gift.
The New Year and Christmas tree is easy to make: even beginners can make it, even children can easily master it.
- Paper of three colors is cut into strips 3 centimeters wide, the number of strips is adjusted in the course of work, so you should initially stock up about 10 strips of each shade.
- Each strip is folded in half lengthwise, after which five strips of different shades are cut out for the trunk, and they are also folded in half.
- A Christmas tree is drawn on cardboard, cut out along the contour with a clerical knife or scissors.
- Print and cut out the template, put it on a cardboard blank and fix it tightly with paper clips.
- The trunk is made first, laying the strips one on top of the other, fixing them with glue.
- Glue each strip according to the template, carefully applying them, fix with glue. The middle is made with a shade that is slightly different from the rest of the color scheme.
The finished product is turned over, the front side is decorated and decorated according to taste and choice, on the wrong side the product can be sealed with white paper. New Year's crafts are decorated with bright beads, sparkles, artificial snow.
Iris folding for children step by step
You can make creative crafts using the iris folding technique with children, gradually the baby will learn to work independently and will be able to make original greeting cards for the holidays using this technique.
In order to teach children how to work in the rainbow folding technique, materials should be prepared:
- colored paper and colored cardboard;
- a sheet of paper in a cage;
- scissors, ruler, pencil;
- glue.

You can make creative crafts using the iris folding technique with your children
Before starting work, a standard template is made with the child: a square with sides of 14 cm is drawn on a piece of paper.
- From each corner, they begin to lay 3 cells, the resulting points are connected with a ruler and a pencil in straight lines.
- On the resulting smaller inner square, 15 mm are again laid aside from each corner, connected according to the standard scheme, in this way a template is drawn until a small square remains inside.
- On the reverse side of a sheet of cardboard, a circle with a diameter of 12 centimeters is drawn, a circle is cut out and a template is applied with cardboard with the front sides, fixed with paper clips.
- Cut strips of colored paper 30 mm wide each, after which they fold each lengthwise in half.
- The strips are glued with a fold to the center along the pattern line until the pattern ends, the middle is glued with any color according to the color ratio.
The wrong side of the craft is sealed with any plain paper, the front is thematically decorated.
Iris folding fabric: master class
You can make crafts using the iris folding technique not only from paper, but also from fabric. In this case, the product is more original and voluminous. You can make textile panels for the living room or bedroom in this way.
To create a three-dimensional panel, you should stock up:
- a piece of thick cardboard;
- pieces of fabric, a sharp knife;
- template for the product;
- scissors, tape, pencil.

You can make crafts using the iris folding technique not only from paper, but also from fabric
Before starting work, a frame for the future panel is cut out of a piece of cardboard, removing a square from the center.
- The template is attached to the frame with paper clips, the fabric is cut into equal strips 45 centimeters long, 10 centimeters wide.
- Using adhesive tape, fabric strips are attached to the template, following the scheme, the middle is sealed with a square of any color.
- Turn the product over to the front side, decorate the frame, glue the panel with plain cardboard from the wrong side.
The frame will look original and aesthetically pleasing if it is decorated with leather or velvet fabric.
The nuances of making a fabric panel
When creating a textile masterpiece in the style of rainbow folding, you should take into account some of the nuances that help to make the product right.
- Thick fabrics, especially satin or velvet, are suitable for high-quality panels. Before attaching them to the template, carefully iron each strip folded in half with an iron.
- Strips of thin fabric before attaching to the template should be laid with a strip of thick cardboard laid inside - this will make the product voluminous.
- If, as planned, the spiral of the pattern should twist clockwise, then the independent production of the template involves drawing counterclockwise.
It is important to remember that the pattern is laid out strictly according to the pattern: in this case, the product impresses with the correctness of the shape and the perfection of the spiral.
New Year's card in the technique of iris folding (video)
Any craft using this technique plays a special role in decorating and improving the interior of a room, making the walls and the overall design colorful and formatted. ( 31 ratings, average: 5,00 out of 5)
 Environment and how to protect it
 Presentation on the topic "medieval literature and art" We work according to plan
 Abstract and presentation for the biology lesson "Tissue compatibility and blood transfusion" - Mazanko E