The best ways to dye fur at home. We dye natural fur at home Is it possible to dye fur
Fur products have always been distinguished by their invulnerability to high temperature differences and other environmental factors, but sooner or later the fur on them can fade, lose its former luster, become stained or simply shed. However, the loss of color in a fur coat is not a sentence at all, and it is possible to restore its former brightness without resorting to specialists. And today we will look at how to dye natural fur (for example, mink and arctic fox) and artificial fur in the most effective ways.
We paint fox fur products
In case of very strong contamination or discoloration, it is necessary to treat its surface with some kind of alkaline solution. Coloring elements do not get into the structure of oily or dirty hair. Therefore, to achieve an impeccable result, you need to make an appropriate solution. The cleaner is prepared as follows:
- 2 teaspoons of salt are added to 1 liter of water.
- 1 teaspoon of ammonia and the same amount of detergent.
- 2 teaspoons baking soda
The resulting substance should be applied to the fur with a brush. This product dries naturally.

When processing the inside of the fur coat, it should first be treated with glycerin or a fat cream. This is done to prevent it from drying out.

What color is better to choose?
The answer to this question is ambiguous. In any case, the final choice is yours. However, experts recommend painting the arctic fox in dark colors. If you want to dye your fur coat a lighter shade, pre-treat it with hydrogen peroxide.
Before dyeing the fur at home, you need to thoroughly moisten the fur coat in water. The usual hair dye is applied to the surface of the fur. It is not worth delaying the application of this substance. Do not forget about safety measures - use rubber medical gloves when working. They can be purchased at almost any pharmacy individually or in a package of 100 pcs. When applying paint to the fur, smooth the fur coat with your hand - so the substance will spread more evenly over the surface. After that, it is necessary to withstand the product for several minutes (as indicated on the paint instructions). Next, rinse the fur in warm water. It is best to add vinegar there. Now you can move on to drying. So that the fur does not “sit down” in the future, gently stretch it. Pin it with pins if necessary.

How to dye mink fur?
Mink fur is very similar in structure and appearance to human hair, so it should only be dyed with an aerosol or a spray gun at a distance of at least 50 and no more than 80 centimeters from the surface. In order for the paint to be well absorbed into the material, you need to carefully comb it after each application of a new layer. With the help of a comb, the paint is more evenly distributed over the surface of a fur coat and other fur products, as a result of which they will look fresh and attractive. As we noted earlier, mink is very similar in structure to human hair. Because of this, it is necessary to select a paint for it that would not harm its qualities. It is best to use a material that has been tested on your curls, that is, ordinary hair dye. This is sold in almost every supermarket and market. The range and variety of colors will satisfy even the most capricious fashionista, so choose the appropriate option, and then feel free to apply paint on a fur coat.
Drying
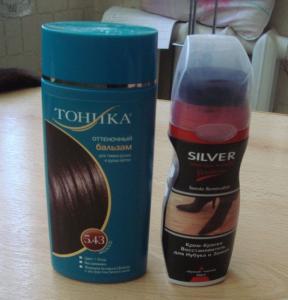
As for drying, such restored products can be processed with an ordinary home hair dryer. In this case, you should periodically comb the fur so that in the future it does not fall off. To add shine to the coat, use a hair balm. It will soften the fur well and make its color more saturated.
How to dye faux fur?
First of all, you need to decide what color you will paint this fur. Although, in general, the principle of work does not differ from whether you repaint the fur coat radically or process its surface only partially. The difference is only in time.
How to dye faux fur? As in the case of natural, hair dye will be the best remedy. If you want to make the color of your fur coat dark or light (that is, one that is very different in shade from the true one), use resistant options. If you are going to process the fur only partially, a regular tinting shampoo is quite suitable for such purposes.
So, you bought the right paint. What to do next? Before dyeing the fur at home, you need to thoroughly degrease the surface of the fur coat and remove all dirt from it. To do this, use a cotton swab previously moistened with detergent or shampoo. And one more thing - before staining, it is better to check the color of the paint in advance on a piece of paper. Sometimes it happens that the bottle does not match the specified shade. Or you just don't like it. Then you will have the opportunity to change it, and meanwhile the fur coat will not suffer from double "torture".
How to dye fur at home? When applying the material to the fibers, make sure that the fur is evenly placed on the surface. To avoid unpainted areas, use a comb (same as with natural products). The material itself is applied with a brush in the direction of the fibers. Thus, the paint will capture not only the upper part of the fur coat, but also its fabric base.

Wait a few minutes until all the pigment is absorbed. The exact time of each paint is different, so always follow the application instructions. After the paint is well absorbed into the fur, rinse it off with water, shampoo if necessary. If the fur coat is easy to wash, you can put it in the washing machine. After that, comb the fibers with a comb and let the product dry. Comb again after drying. If the fabric base of the fur coat is not washable, remove the remaining paint from it with pieces of a cotton swab soaked in warm water.
Conclusion
So, we found out how to dye fur at home, as well as what tools you need to have available for this.
In the process of long-term wear, a fur product may lose its attractiveness only due to the fact that the fur has faded either from the sun or from exposure to precipitation. In this case, there are two ways to restore. Specialized companies that provide dry cleaning and painting services are able to do it efficiently. But you can give a “second life” to your favorite thing at home. Following the instructions and applying a share of your own imagination, you will be able to create a unique work of art.
If the age of the fur product is indicated by its color, then you can update the appearance with the help of painting.
For gray astrakhan, only black or brown is used. The mink is dyed in native colors in order to restore faded shades. Mouton products are suitable for black or brown pigment. Fur things in beige tones are dyed in all shades of brown to enhance the intensity of the native color. Choose a paint one or two shades darker for work.
The main condition for high-quality and uniform dyeing is clean fur. The best cleaning agent proved to be an alkaline solution, its composition is as follows:
- soda (dessert spoon);
- salt (dessert spoon);
- ammonia (a teaspoon);
- about 15 drops of detergent
- 1 liter of water.
Lightening yellowed white fur is an additional element of color restoration. To do this, use a solution with hydrogen peroxide (a teaspoon) and ammonia (10 drops). This tool can remove yellowness from silver fox fur. In the process of processing with such a composition, deep soaking should be avoided. First, a test is made on an inconspicuous area of \u200b\u200bthe product. 15 minutes is enough for lightening. It must be remembered that A longer process will make the tips brittle.
Chalk and starch help to remove yellowness on the fur of a gray rabbit for a while. The powder is evenly and with little effort rubbed over the top of the pile and shaken off. This method will not harm the product, so you can use it often. Gray rabbit fur is dyed with hair pigment. There is also an absolutely safe method, in which an aqueous solution of blue is gently applied to the entire surface of the product with a brush. The composition should be light blue.
To ennoble faded raccoon fur, hair dye is used with a brightening effect, as a result of which the product will look gold or silver plated.
You can update the fox fur with thick potassium permanganate. Treat it gently with a sponge, not allowing things to get wet.
The faded ends of the fur are dyed with suede spray paint. Spray the product slowly, keeping a distance of about 70 centimeters between the fur coat and the sprayer.
How to dye fur with hair dye?
For dyeing polar fox or mink on your own, hair dyes are suitable. This method has been tested in practice and always gives positive results when painting not too old things. It is better to check the effect of even high-quality products on a small inconspicuous area of \u200b\u200bthe product.
To dye fur at home, you will need to follow these steps:
- Straightening the strands of natural fur, apply a thin layer of oily cream or glycerin to the mezra.
- Gently moisturize the entire fur surface.
- Apply the product as carefully as when coloring hair.
- Leave for a while. Duration of staining - according to the instructions on the package with the dye.
- To enhance the effect of the paint, a saline solution is evenly applied to the entire surface.
- Wash off the paint under the stream of water from the shower.
- Excess is removed with a rag or blotting paper.
After drying, the fur is combed, observing the natural direction of the pile. Such paint lasts up to six months on a fur product, and this is often enough to make the thing look updated.
A simplified version of tone saturation is coloring with tinting shampoo (in accordance with the instructions on the package).
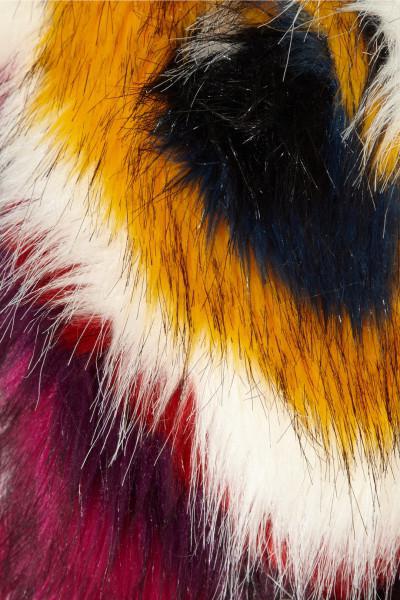
For coloring with multi-colored paints, home-made stencils are used. The spots are painted alternately.
Faux fur is easier to dye. You can use toning shampoo and hair dye. The sequence of actions is as follows:
- Before staining, the product is fixed.
- Apply the agent in the direction of the fibers.
- Leave the paint to soak in. The time must match the instructions in the instructions.
- After the procedure, the fur is washed, dried and combed.
Experts do not recommend experimenting with staining new things.
Home or professional dyeing extends the life of the fur product for a short time. After some time, the pigment comes off, and the thing becomes faded again.
When a woman is puzzled by a question "How to update faux fur", this means one of two things: I want to return a decent look to a fur coat (or handbag) and continue to wear a refreshed little thing; or paint and cut nafig into pieces for needlework. Well, both options have the right to exist). To implement the first, it is enough to wash Eco-fur. The second one is a little more difficult, but I will try to help you dye Eco-fur quickly and easily. This will be discussed below.
We paint and wear)
Be patient, be careful and careful, follow the paint manufacturer's instructions and in the end you will get a fashionable updated wardrobe item right at home.
We paint faux fur. Preparatory stage.
- In order for the product to receive an even color, it must be clean and dry. If this is a small thing, like a bag or a hat, wash the product completely () about a day before dyeing. If washing is not possible or if it is an oversized coat or jacket, simply dry clean. All dirt and grease must be removed. By the time of painting, the thing should be completely dry.
- The wrong side of the fabric side of the "experimental" smear with cream(for hands or face) or glycerin. The fabric will become softer and more elastic, which will prevent possible tears.
- So that the thing does not sit down, does not stretch and is dyed evenly, it must be fix on a table, wooden cutting board or chair(depending on the size), having previously covered them with a dense film. You can buy it in garden stores or hardware stores. Use clothespins or office clothespins, or buttons. If you have done the previous step with smearing the wrong side, you can not be afraid.
You need to prepare not only the thing, but also yourself.
- Wear clothes that you don’t mind getting dirty, remove your hair, put on gloves, if the smell of paint is pungent, use a respirator.
- Cover the floor oilcloth or newspapers in those places where you can inadvertently drip paint.
- Get your pets out of the room and ask your pets not to disturb you.
- Prepare the necessary tools: flat wide synthetic brushes, a container for paint (not metal!), Sponges, rags, a flat comb or clothes brush.
What paints are needed for Eco-fur?
To choose the right staining method, you need to know what your coat is made of. For different compositions, there are different colors. The information must be on the manufacturer's label. Most often it is acrylic and / or polyester.
If you want to paint a thing once and for all, then use these methods.
Hair dye
The most popular way is coloring with it. She easily picks up fur of any kind. Make it no harder than your own hair.

Choose your brand
The only difference is that it is more convenient (you can't remove your head and put it on the table) and more difficult because of the amount of work. In the rest - everything is as usual.
- If you want to repaint, completely when changing the color, choose colors brighter and darker than the current color of the product.
- If you just toned or just to refresh the color - see tint resistant paints that are close to the tone of your item.
- Necessarily buy good quality paint. Test by painting a small piece in an inconspicuous area or on a piece of similar material. If the color suits you - go ahead).
- Dilute the paint according to instructions, then carefully paint the fur layer by layer. Move the brush along the pile, pressing lightly to get to the base. It also needs to be dyed.
- Leave the product for the right amount of time so that the pigment is fixed in the fibers.
- Then wash off the paint and dry the fur. Here is a detailed video on how to dye fur at home. It is with the participation of natural fur in the main role, but with the same success it can be replaced with eco-fur)
- The advantage is that you will definitely know the color(it is on the package) and this is a familiar procedure for many women.
Paints for cold batik or acrylic in alcohol solution.
The composition is simple: 70% vodka, 30% water and as much paint as you want. Soaking the fur in the resulting solution for 10-15 minutes under pressure. You need to constantly check the color. When he triples you - rinse with the addition of table vinegar to the water.

The intensity of the color depends on the amount of dye and the exposure time.
Special paints for synthetics.
Just do everything according to the instructions on the package.
It is important that the composition of the base and villi of your fur coat is included in the list of allowed for painting, otherwise you can ruin everything. note that paints must be suitable for water 40°C, maximum 50°C, Synthetics cannot be processed in hot solutions! If you did not find paints suitable for these conditions, use other methods, for example, folk ones.
Folk methods of persistent dyeing Ecofur. Fukortsin, Zelenka and Iodine.
I came across information that craftsmen dye artificial fur with the Fukortsin pharmaceutical product in order to get pink or burgundy shades depending on the concentration of the solution. It is a dark red antiseptic liquid for external use. They write that the color keeps well, is not washed off.
- Water not warmer than 40 ° C is taken into a large container, like a basin, so that the product does not deform.
- Next, pour the right amount of Fukortsin into the water from a consumption of about 1 jar per liter of water.
- Fully we immerse the product in a basin with a coloring liquid, and put oppression on top, which is not a pity, so that each hair of the product is in solution. Check color every 5-10 minutes. When it completely suits you, pull out the thing and start rinsing gently in plenty of water at room temperature. To fix the color in the last rinse, add a tablespoon of 6% or 9% vinegar to the water.
Fukortsin takes anything and almost instantly, so that the intensity of the color is directly related to the time spent in the pelvis. After about 1 minute, white will already be pale pink, after 5 - pale fuchsia, after 15 - red and so on.
Interestingly, if you add brilliant green to the Fukortsin solution (about 0.5 tsp per liter of water, again “to taste”), then you can “take away” the color from the red in lilac and even purple shades. And if you use only brilliant green or only Iodine, you can achieve emerald and yellow-brown shades, respectively.

A little iodine and white will turn into ecru)

A lot of greenery and a stylish coat is ready)
Before painting I would tested for color at least on a white cloth (cut into small pieces) from the same composition as the thing being painted.
Due to the "corrosiveness" of the dye, use a basin, tools, gloves, containers, who do not mind, because they will also be colored.
pros such coloring are obvious: it cheap and the funds are sold in any pharmacy. You can control the saturation and hue of the color yourself. These funds can be mixed, getting amazingly beautiful shades.
But there is also minuses: In the reviews there were complaints about uneven staining. I think it depends on the fabric - once and perhaps the thing was not completely in the water and therefore dyed with stains and gaps. I strongly recommend doing experimental dyeing on fabrics similar in composition.
The advantage of these colors is that it once and forever- painted once and forgot. You can not be afraid to get caught in the rain - nothing will flow and will not be smeared.
Temporary staining - toning.
As for "professional" means - this is tinted tonics and shampoos for hair. Everything is done in the same way as with hair dye.
The folk way is blue coloring.
It must be chosen carefully. Good blue does not dye and does not shed, otherwise, it is better not to go out in the rain in such a product. The instruction is the same as for Fucorsin with Zelenka: soak in a dye diluted with water, constantly monitoring the color.
The final stage of all procedures is rinsing, applying balm and drying.
- Remove the retaining buttons and clothespins.
- Use large amount of water to wash away the remnants of unnecessary dye. Don't forget to add some vinegar to keep the color and shine of the fur in place.
- If the product is not allowed to be washed, stock up on sponges and, without removing the clips, begin to carefully wash off the paint from the fixed product. It will take time, but it's worth it.
- Apply a balm or hair conditioner to the fur, distribute it with massage movements and leave for 3 minutes.
- Wash the fur completely. Do it gentle blotting movements, avoiding friction of the villi.
- Furs do not squeeze out and do not twist! To remove excess water, wrap the product in a large terry towel and gently squeeze. The towel can be squeezed out and repeated.
- Fasten again already clean wet fur on the surface and comb your hair his comb with rounded teeth. While the thing is drying, periodically approach it and comb it so that the pile is smooth and fluffy.
- You can finally remove the product “off the hook” only after complete drying so that she would not be “led” to some side that we do not need. This is the golden rule - dried up, then unfasten it from the table.
Useful notes.
- It happens that the first time it was not possible to paint as desired - either the color is not the same, or the coloring did not lie flat.
If this happened - repeat staining after 10 days, this time it will definitely work, because now you already have experience) - If you are a sophisticated fashionista and a simple solid dyeing of faux fur is too simple or boring for you - arm yourself with narrow sponges, thin brushes and stencils. Follow the dictates of fantasy, create your masterpiece, even if it's just colored spots.
By the way, drawings can be applied and alcohol marker.
- It happens that the first time it was not possible to paint as desired - either the color is not the same, or the coloring did not lie flat.

Though in a speck, even in a stripe)
- And if you tie some parts of the product with strong nylon threads when painting, then in the end you will get a very spectacular drawings. My parents (if not grandparents) also dyed jeans and T-shirts in this way. Such a trick will pass if the paint is initially darker than the thing being painted by several tones.
- Another option for creative painting of Ecofur is from a distance of 40-70 cm (the distance is determined independently, “to your taste”). Then only the tips will be painted, and the base itself will remain the same. Comb the fur immediately after dyeing so that the tips do not stick together - the paint dries quickly!
And finally, one interesting question.
And what if you suddenly want to bleach dark fur, that is, lighten it. Let's say there was a brunette fur, and I want a blond one. Is it possible to use hair brighteners Or is it dangerous for synthetics?
Maybe then it is better to try bleaches specifically for synthetics? Still, a specially designed product should not damage artificial fur, because, as a rule, these are delicate bleaches.
There were two questions, yes) But the meaning is the same - how to make white out of black .. well, or at least gray. Is it possible? Who has any thoughts on this? Maybe there are lucky ones who succeeded?
Write in the comments, we will discuss)) I rub my hands in anticipation).
Readers rate the article on
In order for the paint to lay down evenly and reliably color the fur, the product must be prepared for coloring. To do this, the fur surface must be cleaned of grease and dirt with special means.
Before painting, it is necessary to prepare the fur
For cleaning you need:
- Before that, you need to prepare an alkaline solution of ammonia, salt, soda and dishwashing detergent (you can use washing powder).
- The resulting slurry must be spread evenly on the surface to be treated with a clothes brush.
- After some time, wash off the product with running water.
An alternative cleaning solution can be a liquid of alcohol, vinegar and water, which is applied in the same way as the first option.
Such cleaners are suitable for processing the fur of arctic fox, mink, silver fox and rabbit.
Usually, standard hair dye is used to renew the fox. The fur is quite dense, and therefore it will take several packs so that the resulting color is saturated and uniform.

Use hair dye
In this case, you need to choose a paint one or two tones darker than the original. This will avoid unpainted areas and make the thing brighter.
Before covering the entire area with paint, you need to try to process a small area. This will allow you to see how the color will change under the action of chemicals.

Before full dyeing, check how the fur reacts to the paint
In case of color fading (especially the ends of the pile), it is better not to dye the fur, but to lighten it. The main thing in this procedure is to correctly choose the composition for staining. For this, hydrogen peroxide and ammonia are used, taken in different proportions.
Tinted hair balm is an alternative to permanent dye.

Toning with tint balms
It will help to gently color the pile, providing the necessary care for fur products. However, this method of solving the problem is not durable, since the balm is gradually washed off when precipitation in the form of snow and rain enters, and it can also pollute light things that are in close proximity to the fur.
Things made of fox fur often lose their attractiveness due to yellowing of the tips of the pile. In this case, there is no need to paint the entire product. It is enough to use an aerosol can for processing suede.

Aerosol spray for painting
Before dyeing fox fur at home, you need to choose the right shade and spray it on the surface at a distance of about 70 cm. To prevent sticking of the pile, you need to constantly move the can. After applying the paint, the fur must be combed with a special brush for suede. And this must be done immediately.
In specialized stores, it is fashionable to purchase special paint in spray cans for fur care. With their help, you can quickly update the shade, making the product brighter.

Professional paint for fur
However, she also has some drawbacks: in contact with white things or a light fur coat, the dye can be transferred to lighter products. And the color itself will lose its luster and brightness after a few months.
Since mink products are considered quite expensive, the dyeing of such fur should be done as delicately as possible.
Before that, you need to check the degree of contamination of the pile. For this, a regular hair dryer will do. A jet of air must be directed to the pile: if the villi crumble, cleaning is unnecessary. However, if the villi roll over from one side to the other, sticking together, cleaning may be required.

Mink fur dyed with hair dye
Step by step procedure
The sequence of actions in both cases is identical:
- To start staining, you need to put on gloves and take a brush. After that, apply paint to the surface and smear it in such a way that there are no bright spots left.
- After enduring the time indicated on the packaging of the product, the product must be washed with water at room temperature with vinegar. To fix the pigments and make the pile shiny and soft, you need to use the balm that comes with the paint.
- Then it must be washed off and dried.
- Only a cleaned product can be dyed so that dirt and grease do not prevent the pigment from penetrating into the villi.
- When preparing the product for staining, the wrong side of the skin must be covered with cream (or petroleum jelly) to prevent the surface from drying out.
- Fur can only be dyed if it is not too old. Otherwise, it may be damaged during color change. In addition, the risk of mechanical damage to the product will increase significantly.
- You should choose a dye tone darker than the natural pile. This will help to hide minor skin defects and give a natural shade.
- To renew fox fur, you can use a manganese solution diluted to a dark brown tint. You need to apply it on the pile with a sponge, without affecting the core (skin). If you neglect the care, you can damage the base of the fur, which will lead to rapid wear of the thing.
- Since the skins can shrink after dyeing, you need to place the product on a flat surface and secure it before applying the dye with pins or thin nails.
By applying some fur care tricks, you can provide an attractive look to the product and extend its wear life.
Happy owners of fur things know that they fade over time. To restore the color, it is not necessary to seek help from professionals - this can be done at home. Knowing how to dye fur, you will give the product a second life at minimal cost.
Training
Before proceeding directly to painting, the fur must be prepared. Thoroughly clean it of dust and dirt so that the paint fits well. For these purposes, you can use an alkaline solution.
Per liter of water you need to take the following components:
Mix all the ingredients to get a homogeneous mass. Easy to apply with a brush. Be sure to rinse off. You can use another composition: combine water, vinegar, alcohol in equal proportions.
The wrong side, the core, also needs to be processed. It is necessary to apply glycerin or a greasy cream on it.
This will prevent deformation of the skin. The fur needs to be attached with pins on a board so that the thing does not lose its shape during the dyeing and drying process.
If the mezra is poorly dyed, it will “shine”, creating the effect of rare villi. It can be tinted from the inside out. How to paint the mezdra of fur? You can use a special tool or apply hair dye, having previously tested it on an inconspicuous area.
Using hair dye
It is often used to color fox. It is quite dense, so it is better to buy two or three packs so that the color is saturated and uniform.
Before applying the composition to the entire surface, test it on a small piece.
You can see how it "behaves" when interacting with chemicals. Choose a paint one or two shades darker than the natural color - it will make its color more saturated.
If the thing turned yellow, it is better not to color it, but to lighten it. This can be done with hydrogen peroxide. Only after that it is necessary to apply the coloring composition of the corresponding shade.
How to apply paint?
Spray paint
Owners of things made of fox fur sometimes notice that the tips begin to turn yellow. To restore the original look, it is not necessary to paint the entire product, it is enough to use paint for suede from an aerosol can.
Can mink products be dyed?
Natural fur is always in fashion. But over time, stylish mink items lose their rich color and luster. How to dye fur at home? This is not difficult if you follow the basic rules.
Often, women dye their mink with regular hair dye. Before applying the composition, mink fur must be prepared in the same way as fox fur. To facilitate the procedure, you can use an aerosol or spray bottle. Spray the product at a distance of about 70 cm. Do not forget to comb the hairs with a brush or at least rub them with your hands. You can use a hair dryer to dry or let it dry naturally. Shine and softness will give hair balm applied to the surface. Be sure to rinse it thoroughly.
We paint faux fur
Products from it are very popular due to their attractive appearance and reasonable cost. But over time, faux fur needs painting.
- If you want to radically change the color of the product, choose a hair dye with a high degree of durability. In order to refresh the shade, a tinting shampoo is suitable.
- Pre-clean the product from dust and dirt with a swab dipped in shampoo. Apply the coloring composition to a small area to evaluate the result.
- In order for the entire surface to be well painted over, the product must be well stretched and fixed. Swipe the brush in the direction of the fibers, grabbing the fabric as well. Keep the staining time indicated in the instructions and rinse the fur thoroughly. Comb the wet villi with a brush and let the product dry.
If you know how to dye real or fake fur, your clothes will always look fresh and tidy.
 What is CPA Marketing and CPA Networks?
 Programs for registration, mailing to bulletin boards and posting links and free messages on the Internet How to send an ad
 Under the gun: Publer review - a service for monitoring VK advertising posts, community analytics and teaser networks