Mimi photo studio. Life hack: how to make a photo studio at home. How to open your interior photography studio from scratch
One of the main problems faced by a person trying to start making money in the world of photography is the organization of his own photo studio. After all, high-quality subject photography is simply impossible without the correct setting of lighting. The problem is that professional photo studio equipment is not only expensive, but also very bulky and inconvenient in everyday use. For those people whose work or hobby is closely related to photography, today there is a great alternative.
These are compact, portable photo studios, which are mobile lightboxes that are equipped with several lamps, a backdrop and reflective panels. Such a set is quite enough to organize the right lighting and shoot almost any subject in professional quality. Among the various models of such mini-photo studios currently on the market, Simp-Q mobile photo studios (simply - "simple" and quality - "quality") have recently become widespread. We will tell about them today as an example of the Simp-Q Mini model, which came to us for testing.
Under the Simp-Q brand, different models of light boxes are produced today. There are six of them in total, and half of them are stationary and quite large in size. They are designed for photographing fairly large objects and for portrait photography. The other three models of Simp-Q mini-photo studios are precisely mobile, portable equipment that turns into a compact case in a matter of time. Such a case can be safely hung on your shoulder and carried anywhere.
Mobile mini-photo studios are focused on shooting small items, such as watches, small household appliances, a collection of shoes, household goods, tools, toys, food and other things.
Stationary mini photo studios Simp-Q
First, let's talk about stationary (large) Simp-Q mini-photo studios, which are quite large in size and have more serious functionality. This is, in particular, a spacious Simp-Q Super mini-photo studio, the design of which includes fourteen fluorescent lamps (5500K, 12W), two reflective panels, six diffusers and multi-colored background rolls.
The dimensions of this mini-photo studio allow you to shoot fairly large objects and things. The light box is installed on a stationary place and allows you to place various objects inside to build the right lighting and photography. Moreover, photographed objects can also be suspended thanks to a special bar. This is not so mobile option (the weight of the Simp-Q Super mini photo studio is 30.5 kilograms), but with a sufficiently large amount of space for shooting.
When photographing objects, you can ensure the correct distribution of light by switching the overhead light, center area, left and right light provided within the structure itself. The multi-row arrangement of lamps and the use of special light diffusers contribute to the reduction of glare, reflections and shadows on the subject. The Simp-Q Super Mini Photo Studio comes with two multi-colored paper rolls for the perfect backdrop. All in all, the Simp-Q Super fixed light box is a great alternative to a professional photo studio.
Another model of a stationary mini-photo studio is Simp-Q XL. This model includes sixteen constant light lamps that allow you to organize the right lighting for product shooting to get high-quality photos without resorting to the services of a professional photographer. Photos are always crisp and free of nasty blur.
Simp-Q XL light boxes can hardly be called portable (weight - 41.95 kg) and budget option, however, they are the best solution, first of all, for stores selling a variety of goods - both small and large enough in size . In a short time, with the help of Simp-Q XL, you can shoot groups of goods of different sizes.
 The largest and most expensive of the Simp-Q mini-photo studios is the Simp-Q photo studio No. 8. It allows you to photograph not only objects of various sizes, but also people. Model Simp-Q No. 8 is a large light box that includes thirty-two fluorescent lamps (5500K, 16W) at once, giving a constant light, two reflective panels and six light diffusers, as well as a black and white background.
The dimensions and design of this studio are such that they allow models up to 185 centimeters tall to feel comfortable inside a lightbox. Simp-Q Mini Photo Studio No. 8 is quite versatile, offering the photographer five different sets of lighting with individual switches. The ability to play with light allows you to embody a variety of author's ideas during shooting. The total weight of the structure is quite significant - 77.8 kilograms. Such a light box for shooting large objects may be of interest to shop and boutique owners, advertising agencies, professional photographers and designers.
Mobile mini photo studios Simp-Q
Among the mobile mini-photo studios, the Simp-Q Large model can be noted, which, when assembled, looks like a stylish, portable case made of waterproof material, a convenient top handle and side pockets in which you can put various photo accessories. The portable design of the Simp-Q Large light box consists, among other things, of two fluorescent lamps, five reflective panels and a diffuser. The package also includes spare fluorescent lamps, a bar for which objects can be attached, various clamps and a background (black and white).

It is enough to place objects in this light cube and you can play with lighting, combining the arrangement of panels and building an optimal lighting scheme. This model weighing 7 kilograms is quite convenient to use, it can be easily stored and carried. It is suitable for shooting small objects or compositions of several things. The collapsible design allows literally in a couple of minutes to transform the case and turn it into a ready-made photo studio.
The Simp-Q No. 5 portable mini photo studio is even more compact in size and relatively light in weight (only 2.6 kilograms). At the same time, it is equipped with all the necessary tools for professional quality shooting of small items, such as costume jewelry, jewelry and small souvenirs. Simp-Q Mini Photo Studio #5 has 2 continuous lights, 3 reflectors, 1 diffuser and 2 rolls of background paper. In addition, the package includes a cross bar for hanging subjects if necessary.
All in all, this mobile light box is ideal for product photography. When folded, the Simp-Q Photo Studio No. 5 takes up so little space that it is extremely convenient to transport and store. To use Simp-Q No. 5, no deep knowledge of photography or any professional skills is required; even a novice photography enthusiast can handle setting the right lighting here.
Simp-Q Mini
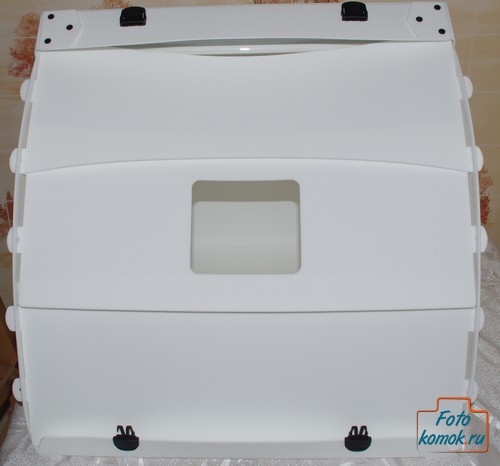
 Simp-Q Mini is the most affordable and at the same time has good functionality. It is highly portable, mobile and easy to carry. When folded, the Simp-Q Mini Photo Studio is an elegant white plastic mobile case. The case has a shoulder strap, which allows you to freely carry the photo studio with you, especially since the total weight of the structure does not exceed three kilograms. The Simp-Q Mini light box is very convenient on long trips - it takes up much less luggage space. With the Simp-Q Mini mini photo studio, you can organize full-fledged outdoor photo shoots.
The design of this lightbox includes two fluorescent lamps (12 W) with a constant color temperature of 5500K, three reflective panels and one diffuser. The kit also includes a background (black and white), spare lamps, clamps and a user manual.

The box of this studio is made of a translucent material, which makes it possible to take subject photography using only natural bright sunlight, which gives soft, even illumination and a minimum of reflections. Thus, you can do without electric lighting and shoot even in places where there is no power supply.

In order to transform the structure into a ready-made studio, it is only necessary to open the case, fix the box, then fix the reflector with clamps and turn on the fluorescent lamps. Now you can place your subject inside the lightbox and start shooting. This whole procedure takes a matter of minutes.
The compact Simp-Q Mini Photo Studio delivers 3D, even light distribution, resulting in crisp subject photos without glare, harsh reflections or harsh shadows. Professional-level product photography can really be done with such a small and lightweight design. At the same time, working with the Simp-Q Mini light box is incredibly convenient and pleasant. The Simp-Q Mini Studio is designed for shooting small subjects. It can be various souvenirs, watches, stamps, coins, badges or small gadgets. Thanks to well-distributed light, photographs always turn out to be of high quality and pleasing to the eye.

Test photos:


Images are high quality with minimal shadows. Photos are very easy to edit in the editor.
However, it is worth noting that the mini-studio's own lighting is not enough for full-fledged photography. At a minimum, a pair of side lamps is missing.
As an example, to understand what the use of a mini-studio gives, below are test photos taken at home using a plastic background and a standard camera flash as an illuminator:


Images taken without boxing have uneven backlighting (traces from the flash), shadows, which are much more difficult to process in the editor.
conclusions
Benefits of using Simp-Q Mini Photo Studios:
Firstly, it is high portability in comparison with professional photographic equipment. When assembled, the Simp-Q light box is just a simple case that you can take with you to any shooting.
Secondly, mini-photo studios allow you to quickly resolve any issues related to the setting of light, without requiring the use of additional light sources. The collapsible lightbox provides even distribution of light and the ability to apply different lighting schemes, so you can get better quality photos than using only the camera's built-in flash and background.
Thirdly, Simp-Q mini photo studios are convenient to use. It is enough to spend a little time to install the photo box, choose a suitable background, place the subject in the center of a special area and press the camera shutter button. All of this takes minutes and results in professional-quality shots of objects such as jewelry, food, crockery, china, stationery, computer accessories, and more.
Finally, mobile lightboxes are much more affordable than professional photo studios, which is especially important for those photographers who are just starting their creative career. However, Simp-Q mini-photo studios may be of interest not only to enthusiastic photographers, but also to professionals in the field of design, photography and advertising, as well as to collectors and owners of online stores.
Disadvantages of mini photo studios Simp-Q Mini:
- The mediocre workmanship of the mini-studio itself, the poor fitting of parts, the black plastic rivets on the white plastic of the box are very surprising 🙂
- A little lack of lighting in the workspace. It is desirable to increase the number of lamps or their power.
The Simp-Q Mini Lightbox can be recommended to enthusiast photographers who specialize in still photography, professionals who are interested in a lightweight, mobile photo studio, and online store owners who need a complete product catalog with quality photos.
Having your own studio is the cherished dream of any photographer. Today we will tell you how to get closer to achieving it and not go broke.
What is photography without?
There is a proven question with which venerable photographers baffle beginners. It sounds like this: “Without what is photography impossible?”. There are various answers, quite logical at first glance: “without a camera”, “without a photographer”. Only a few answer correctly: "Without light."
Indeed, it is easy to do without a photographer, using a computer and setting a shooting program. You can also do without a camera, an example of this is the camera obscura (the predecessor of the camera) and scanography, which is gaining popularity. So the main thing in photography is light. And in this regard, the photographer is very dependent on the vagaries of the weather, if he focuses on natural light. You can fully control the process only in the studio.
What is a photo studio
Firstly, this is a sufficient amount of usable area (high ceilings are better - from 3.5 square meters), suitable for photo shoots and the presence of a certain minimum of professional equipment. What is included?
Equipment
- Professional camera
Tripod
Lighting equipment
Reflectors
nozzles
Background
Optional interior
Necessary themed accessories
Computer
The necessary minimum for a comfortable stay in the studio

Kinds of light
- Drawing light. The main light source, it is he who defines the shape of the subject and emphasizes the details. brighter than other species.
Fill light. Needed to soften hard shadows. Removes excessive contrast. Equipment: softbox and reflective panel.
Back light. Separates the object from the background, creates light accents, emphasizes the texture. A hard light source behind the model.
background light. Works with the background, creating various lighting effects. Allows you to simulate various effects of natural light.
directional light. Illuminates only surfaces that face the source, the rest of the parts are usually in the shade. It shows the volume of the image well, but the shape comes out a little blurry. Gives a glare effect and denotes pronounced highlights and shadows.

Types of lighting schemes
Asking the question “How to make a photo studio at home”, you need to study such an important issue as the types of lighting schemes. It is the control of light that makes a photograph a masterpiece.
It is important for a novice photographer to master the first two schemes, after which it will not be a problem to learn how to work with other options as they become more complex (and more powerful).

Option 1. It implies the use of one source (monoblock and dish) and a white background.
We get clear transitions between light and shadow, that is, the maximum rigidity of the picture. The model stands close to the background so that a dense short shadow is cast from the frontal light source.

Option 2. This scheme also implies the use of one light source. Components: monoblock and white umbrella + dark background. We get depth and expressiveness. This time the model is standing some distance from the background.
Making a studio at home
Let's move on to the most interesting part of our article. To create a mini photo studio at home.

Space
As we have already said, the first and most important component of the studio is space, and there is definitely not much of it.

If you have the luxury of having a separate room, great! free it from furniture and everything that takes up space. More air, more light! After all, objects have the property of absorbing light. We understand that this is not always possible. Therefore, compromise options are possible.
Light
The next step is to ensure that the light is controlled, regardless of the time of day or night. Natural light may also be needed, but you should be able to completely block out the natural light with a "flick" of your hand.

Temperature
Neither heat, nor cold, and even more so drops will not benefit professional equipment. And the model, wet from sweat or shaking from the cold, does not contribute to a successful photo shoot.
Soundproofing
This item is important if you are going to shoot video in addition to photography.

Making a softbox
A softbox is a fixture worn over a light source to produce soft light without glare.

- We will need: a cardboard box, Whatman paper, a halogen lamp, a piece of translucent fabric, wooden slats, clothespins, wire, a cutting tool, a set of nuts and bolts, a set of hairpins.
Components: frame (any cardboard box can be adapted. One cover is cut off. The next item is a layer that reflects. We take white paper (or foil) and carefully glue it. Next, a light and translucent fabric is taken to create a reflective screen and glued with it side without lid.
Any softbox has a two-color cover: black on the outside, metallic on the inside. The opposite side of the screen should have a hole for a lighting fixture (a halogen spotlight will do). You can attach it using wire
If there is a need for a large softbox, it can be made from slats and wire knitting needles. The frame for the screen should be much wider than the frame for the projector. A cover is pulled over the frame. Separately we fit the walls with clothespins. To mount the softbox, you can use a microphone stand or a table lamp leg. To avoid excessive heating of the equipment, turn it on only when you are actually shooting.

When wondering “how to equip a photo studio at home”, it is important to consider everything. But this is impossible, so we take into account the most necessary, the rest is acquired as needed. In addition to the equipment that we talked about at the very beginning of the article, you cannot do without: a beauty dish, reflectors, an umbrella, reflectors, color filters, tubes, honeycombs.
Background reflector

The function of the background reflector is to evenly illuminate the background. It provides the hard light you need for any shoot.
The beauty dish is positioned in front of the subject. Thanks to her, the photographer receives a soft concentrated light, complemented by diffused light. For this, you need a softbox with an umbrella.

The lamp is placed directly behind it or used as a reflector (if a white cloth is placed on the inner surface). Today, the softbox remains the most common nozzle.
Softboxes are divided into octoboxes, which are great for group shots, and long rectangular ones (streepboxes), which are suitable for shooting portraits and if you are going to shoot models in full growth.
With a sync cable. This method is inconvenient because it gets underfoot.
After synchronization, switch the camera to manual mode. Exposure is measured using a histogram or a flash meter.

Conclusions on the topic
As you probably understand, it is problematic to reveal such an extensive topic as "Photo Studio at home from improvised means" within the framework of one article. We talked about the main components of the studio, the role of light, what color schemes you need to know initially, how to make a softbox and how to furnish your studio inexpensively.
Sooner or later, there will be a return on the invested efforts and money, and you will remember with gratitude the day when you decided to take the first step in this matter. We wish you good luck in your endeavors and thank you for your attention to our portal. On the site you can also find other articles on photography.
But there is a device that makes life easier for the photographer. This is a lightcube, it is also a photobox, it is also a shadowless tent. On sale, of course, there are ready-made solutions, but the lightcube is such a thing that it is much easier to do it yourself.
Structurally, the device is a frame covered with a diffused fabric with a background inside, and illuminated by 1-3 light sources. The simplest lightcube can be made in just twenty minutes from a cardboard box and "cigarette" paper, but if you want something more solid, you will have to work hard. Fortunately, detailed instructions have been published on various photoblogs.
Most of the authors recommend making a frame from PVC "cable-channel" boxes. Ok, Bartimaeus told himself and went to the hardware store.
So in the beginning I had:
- sheet of whatman paper size A1.
- PVC box 16x16 - 4 pieces, 2 meters each;
- jointing bar 15x20mm - 6 pcs. 1.2 meters;
- spunbond, aka geotextile - 1 pack vka, 1.6 x 10 meters.

I cut 12 pieces of the box 35 cm long. In four of them I made a slot on the side, in another four I spread the "ears". Looking ahead, I note that this is a very clumsy work. The cable channel is generally not intended to create structures from it, and it does not forgive such an attitude.

To cut the box, I thought of using a garden pruner. :) And for the connection - use the Lacrysil "Cooler than nails" construction adhesive, in the hope of compensating for profile irregularities and cutting flaws. Looking ahead, I note that the hopes were justified only partially.

Nevertheless, pretty soon I became the owner of two frames 35x35 cm. It remains to connect them into a cube, with "eared" pieces.

The task turned out to be so difficult that ordinary liquid nails had to be called in to help...


Who whispers "nightie" there?? Leave the audience, prankster! :))

Forgotten something? Surely! The most important thing is the light!
This is how the lightcube "in combat positions" looks like. I used two table lamps for lighting. Ultraflash UF-301. These are the first pictures. As you can see, they look more than decent. Despite the fact that it was not possible to completely get rid of the shadows (the spunbond is still too thin, at least two layers are needed), the quality of the photo is an order of magnitude higher than those that I took in the light from the window.

However, when the first excitement died down, I wanted to ... make a 2.0 version. For in the process unfortunate design flaws were revealed.
I was already thinking about buying a box and connecting it correctly, cutting off all the bumps and adjusting the details as accurately as possible, when I saw THIS during another meditation in the construction market.
Remember and don't say you haven't heard! The best material for a lightcube frame is a PVC "corner" profile, white, 20*20 mm, thickness 1.5 mm. Sold in pieces of 2.7 meters, it costs a penny, in any case - cheaper than a box. And it's tough enough to build a cube even 60x60x60 cm. ...

Perfectly cut with a hacksaw...


My lightcube 2.0 is a parallelepiped 30x35x45 cm. Looking ahead, I note that I missed a bit - the length of the module had to be 42.5-43 centimeters. Why - I will explain below.

I made another important addition to the design - I pasted an LED strip on the inner surface of the upper corner. For front lighting. I spied this decision from the Chinese from aliexpress.
Tape power - 14.4 watts / meter, with a piece length of 35 cm (these are 7 LED modules, each 5 cm) the power consumption will be 5.04 watts, with a supply voltage of 12 volts, the current will be 420 milliamps. That allows you to use a conventional 12 V DC unit with a current of 500-700 mA for powering!
While the glue dries, you can build diffusers. According to the new concept, they should be removable. I made 2 subframes from a jointing bar. 30x35 cm and 1 piece - 35x45cm. On the sides I pulled the PONGS ceiling fabric, and on the top - two layers of spunbond. For fastening, I used power buttons with caps, but regular ones will do.

As you can see, this time all efforts paid off. A piece of drawing paper lay inside like a glove, if my photo box was shorter, 43 centimeters, then I could easily use the ready-made A2 format. The ceiling fabric diffuses the light well, despite the fact that I screwed powerful Gauss 15W bulbs, 1400 lumens each, into the "tabletops". For the top lighting, I used a clothespin lamp"Svetkomplekt" E50N with a lamp of 590 lumens, although a regular cartridge on a tripod will do.As you can see, the results have been achieved. Highlights and shadows are gone, the only thing that needs to be worked on is white balance correction, but that's another topic.

A visual demonstration of the results of backlighting with LED strip. The option "without illumination" is on the left. As you can see, the result is very much worth a couple of extra rubles spent on the tape and the block.

Summary. Lightcube is an effective tool for a subject photographer. It is easy and simple to make it with your own hands, the main thing is to determine the dimensions and choose the right material for the frame.
P.S. It remains to wait until Santa Claus brings me an "adult" camera, and I can try my hand at photo stocks...
P.P.S. The original article was originally posted on the Otzovik website, but due to the policy of the administration, it had to be moved here.
For shooting at home, you can really come in handy with a home mini photo studio. This is a great item that will be very useful for any photographer, beginner or more advanced, to capture all sorts of small things, food, when you are shooting in macro mode. Having learned the cost of such a photo studio in a store, you are unlikely to want to buy it, but after analyzing the macro box itself, you can make it yourself.
Necessary materials
Here is a list of materials you will need to create a macro box:
1) Box. The box can be absolutely any size, the main thing is to take one that would be more convenient for you to work with, and also think about the size of the things that you want to photograph in it. You can simply ask for such a cardboard box in one of the grocery stores, or you can find a box left over from purchased office equipment at home. If you try very hard, you can make it yourself, not from cardboard, but from chipboard, it will be more reliable and last longer.
2) Textile. It can be any fabric. In the example, plain white fabric was used, which can be purchased at any needlework store.
3) Adhesive tape. Adhesive tape, or adhesive tape, is needed if you want to try taking pictures with different backgrounds, so you can always replace the fabric with another one, if your plans do not include all possible experiments with backgrounds, then you can fix the fabric on something stronger, for example, on furniture clips, or glue.
4) Glue. Glue will be needed in order to glue the bottom of the box.
5) Paper. This sheet will be located on the back of the box in a semicircle and will serve as the main background. The paper should be relatively thick, but not so thick that wrinkles and cracks appear when bent. You can buy several sheets at once, in different colors in a regular art store.
6) Lighting. For the normal operation of your photo studio, you need to organize proper lighting for it. Without it, you won't get the image you want. As a lighting device, a table lamp with a daylight bulb is suitable.
7) Other materials. For work you will need scissors, a ruler and a pencil.

Macrobox manufacturing process
Now that you have all the necessary materials, you can get to work.
Step 1. Take a box, a pencil and a ruler. Mark points on the box with a pencil, which will become its borders, then draw lines with a ruler. The boundaries are marked.

Step 2 Cut out the excess, strictly following the marked lines, so that you get a box with windows. Leave one side intact - this is the bottom of the box.

Step 3 Take the paper prepared for the background and fit it to the size of the box, insert it inside the box and secure it. Remember, the length of the paper must be greater than the height of the macrobox.

Step 4 Take your fabric and cut out rectangles to cover the windows in your photo box. Stick this fabric with adhesive tape. Your task is to cover three side holes and one top hole with a cloth.

Ready!
Well, congratulations, your photo box for subject and macro photography is ready. Take pictures to your heart's content.

The process of working with macrobox.

There are many options for how to work with a product photo box. If you have unwanted shadows, illuminate with an additional flashlight from the right side. If you want to get a vignetting effect, place the lens in the box as far as possible. You can always come up with something new, play with lighting and backgrounds.
It's much easier than it looks
The thought of setting up a photo studio with the right lighting, background, and all, in the comfort of your own home is often daunting and seems out of reach. But rest assured, the portrait lighting equipment you'll need has become much cheaper and easier to use. In addition, it does not require a lot of space.
The beauty of a home studio, especially for portraits, is that you have complete control over the light sources. And also decide what accessories you need and where to place them.
You decide what equipment to buy, focusing only on your preferences and budget. Get by with a foam panel as a reflector, or shell out for a full-size softbox? You decide.

If you want to save money, you should pay attention to sets of studio equipment for beginners, equipped with 2 pulsed light sources. At a cost in the range of 15 - 25 thousand rubles, you can purchase a kit suitable for the first time.

Newcomers to studio photography often wonder how to control exposure when the scene is lit by flashes. It is possible to evaluate the intensity of light using a hand-held flashmeter using the "shooting" method. But you don't have to use this rather outdated method.
The histogram is ideal for checking and adjusting exposure. The histogram can be displayed on the camera screen for any shot taken. Using the histogram, it is enough to check that the tones of the image are evenly distributed within its boundaries.
The following shows what the three exposure states can be - normal, over- and under-exposure - which histograms correspond to each of the states.

By decreasing or increasing the aperture value, you can control the amount of light passing through the lens. This is the best way to work with exposure. Or try adjusting the power of the light pulse on the lights to increase or decrease the light intensity.
Add some drama
Most beginner studio kits include an umbrella that reflects light. This is a very useful accessory. It is very convenient to put two umbrellas "on reflection" on both sides of the model. They create soft, evenly covering and pleasant lighting.

However, "energetic" lighting was used to create the shot above, creating deep shadows. This was achieved due to the fact that only one source was installed with an umbrella to the right of the model and above the level of her head.
Due to the proximity of the source to the right side of the face, the largest "portion" of light falls on the model, and the opposite side of the face is less illuminated. Shadows were deepened by a black foam panel mounted to the left of the model.


There are no rules that define your camera settings for a studio portrait. But there are parameters, adhering to which, you can get better results. Let's start with ISO. It should be minimal so that digital noise is weakly manifested in the images.
It's best to shoot in manual mode. In it, you control the aperture value and shutter speed. In automatic and semi-automatic modes, the camera takes over these duties.
Shoot in RAW format. Even if you follow the exposure on the histogram on the camera screen, you can miss a slight “overexposure” in certain areas of the image. Shooting in RAW format will allow you to correct the pictures taken in the photo editor.

If you shoot at a shutter speed faster than the sync speed of your camera, then you will see a black bar on one side of the frame in the photographs. This strip is the “curtain” of the shutter, which is still moving at the moment the pulsed light source is triggered.
Obviously, a picture with a black stripe is a marriage. To avoid this, just set the shutter speed to be longer than the sync speed. Most modern cameras have a sync speed of 1/200 second. Some cameras can sync with flashes at 1/500th of a second.
One of the most useful studio accessories is the radio synchronization kit. With it, you can remotely control the moment of operation of pulsed light sources. Connect the receiver to one of the sources, install the transmitter on the “hot shoe” connector, which is located on the top of the camera. Now you can take pictures without worrying about wires or inadvertently knocking over the light stand.

You should also purchase a large softbox. This versatile item can be used to create a variety of lighting effects.
Take a few shots, then move the source. Place it on different sides, at different heights. Also, try lighting the model's face on one side to get dramatic shadows on the other side.
As you can see, today it is not difficult to create a photo studio at home. So if you have enough space at home - go to the store!
 Profitable business ideas from scratch with minimal investment
 Life hack: how to make a photo studio at home Let there be light
 Life hack: how to make a photo studio at home