How to make architectural projects in Photoshop. Processing of architectural photographs. How to create a basic sketch
In this tutorial, you will learn how to create a stunning effect architectural sketch... I will explain the process in great detail, so anyone can repeat it, even those who opened Photoshop for the first time.
1. Let's get started
First, open the photo you want to work with. To do this, click File> Open(File> Open), select a photo and click Open(Open). Now, before we get started, check out a few things:
- Your photo must be in color mode RGB, 8 bits per channel. To check this, click Image > Mode(Image> Mode).
- For best results, choose an image that is approximately 2000/4000 in width / height. To check this, clickImage > Image Size(Image> Image Size).
- Your photo should be a background layer. If not, clickLayer > New > Background from Layer(Layer> New> Layers From Background).
2. How to create a background
Step 1
In this section, we will create the background. Click on Layer> New Fill Layer> Solid Color(Layer> New Fill Layer> Color) to create a filled layer, name it Background Color(Background color) and select the color # f0f0f0 as shown below.

Step 2
Right click on this layer, select Blending options(Blending Options), select Gradient Overlay(Gradient overlay) and set the layer style as in the image below:

Translator's note: layer style settings in the screenshot: Blending mode: Soft light; Opacity: 50%; Gradient: Black, White; Inversion; Align to Layer; Angle: 90 degrees; Scale: 100%
3. How to create a basic sketch
Step 1
In this section, we will create a basic sketch. Select the background layer and press Control-J on your keyboard to duplicate it. Then drag this layer up in the layers panel.

Step 2
Now press Control-Shift-U on your keyboard to desaturate this layer. Next, click Image> Adjustments> Levels(Image> Adjustments> Levels) and enter the values from the screenshot:

Step 3
Name this layer Temp(Temporary) and press Control-J on your keyboard to duplicate it.

Step 4
Now press Control-I on your keyboard to invert this layer and change its Blend Mode to Color dodge(Lightening the base). Next, click Filter> Other> Minimum(Filter> Other> Minimum), change Radius(Radius) by 2 pixels and Preserve(Save) on Squareness(Squareness) as below:

Step 5
Hold Control and click on the layer Temp(Temporary) to select both layers at the same time. Then press Control-E on your keyboard to merge the two layers into one.

Step 6
Multiply(Multiplication) and call it Main Sketch(Main sketch).

4. How to sketch in perspective
Step 1
In this section, we will create a perspective sketch. Select the background layer and press Control-J on your keyboard to duplicate it. Then drag this layer up in the layers panel.

Step 2
Now press Filter> Stylize> Find Edges(Filter> Stylize>

Step 3
Click on Filter> Blur> Motion Blur(Filter> Blur> Angle(Angle) 90 degrees, and Distance

Step 4
Now click Filter> Sharpen> Smart Sharpen(Filter> Sharpening>

Translator's note:
Step 5
Click on Filter> Filter Gallery> Sketch> Photocopy(Filter> Filter Gallery> Sketch> Detail(Detail) by 2, and Darkness(Darkness) by 5.

Step 6
Change the Blend Mode of this layer to Multiply(Multiplication) and the opacity is 40%. Then rename this layer to Perspective_Sketch_1(Perspective_Sketch_1).

Step 7

Step 8
Brush

Step 9
Now select the background layer and press Control-J on your keyboard to duplicate it. Next, drag this layer under the layer Perspective_Sketch_1(Perspective_Sketch_1) in the layers panel.

Step 10
Click on Filter> Stylize> Find Edges(Filter> Stylize> Edge Selection) and then Control-Shift-U on your keyboard to desaturate this layer.

Step 11
Click on Filter> Blur> Motion Blur(Filter> Blur> Motion Blur), change Angle(Angle) by 0 degrees, and Distance(Offset) by 1200 pixels as shown below:

Step 12
Now press Filter> Sharpen> Smart Sharpen(Filter> Sharpen> Smart Sharpen) and enter the settings from the screenshot below:

Translator's note: settings in the screenshot: Set: Custom; Effect: 500%; Radius: 64 pixels Reduce noise: 10%; Remove: Gaussian Blur; Shadows: Reducing the effect: 50%; Tone Range Width: 50%; Radius: 50px Light: Reducing effect: 50%; Tone Range Width: 50%; Radius: 50px.
Step 13
Click on Filter> Filter Gallery> Sketch> Photocopy(Filter> Filter Gallery> Sketch> Photocopy), change the setting Detail(Detail) by 2, and Darkness(Darkness) by 5.

Step 14
Change the Blend Mode of this layer to Multiply(Multiplication) and Opacity(opacity) - 55%. Then rename this layer to Perspective_Sketch_2(Perspective_Sketch_2).

Step 15

Step 16
Change the foreground color to #ffffff, grab the tool Brush(Brush) (B), select a soft brush and drag it where you want to show the vertical lines of perspective.

5. How to create text
Step 1
In this section, we will create the text. Choose a tool Horizontal Type(Horizontal Text) (T), change the font to Hijrnotes, size 80px, left alignment, color # 000000. Next, click anywhere on the canvas and click Type> Paste Lorem Ipsum(Text> Insert Lorem Ipsum) to insert a random piece of text. You can also use your own text and font settings.

Step 2
Double click on the thumbnail of this layer to make the text editable and delete part of it. Then, select the tool Move

Step 3
Now rename this layer to Text_1(Text_1). Then press Control-J on your keyboard to duplicate this layer.

Step 4
Double click on this layer's thumbnail to make the text editable, press Control-A to select all the text, and then hit Type> Paste Lorem Ipsum(Text> Insert Lorem Ipsum) to insert a random piece of text. After that delete some of the text, select the tool Move(Move) (V) Click and drag anywhere on the canvas to position the text as shown below:

Step 5
Name this layer Text_2(Text_2) and drag it under the layer Text_1(Text_1) in the layers panel. Then press Control-J on your keyboard to duplicate this layer.
Creating an image is a whole process and for me pressing the shutter is only a small part of the way to a photo of sufficient quality for publication. In this article, which is part of the second, continuing material, I will show my process of processing photos.
All photographers are faced with challenging high dynamic range scenes. Landscape and architectural photography is no exception. I shoot as many frames as necessary to cover the entire dynamic range of the frame. For architecture and interiors, 3 frames are enough for most situations.
The photo above required 9 photos - with exposure bracketing -2, 0 and +2, as well as an additional series for the lower half of the room and for the ceiling. Additional shots also help me get rid of people in the frame.

You must not forget ...
- Shoot in RAW to preserve maximum source flexibility; we are not sports photographers taking a stream of images where JPEG is much more appropriate.
- Keep your ISO low.
- Use one white balance setting for the entire series of photos.
- Use your heaviest tripod and remote release, wired or wireless.

The photo of the Canary Wharf subway station above is a composite of three frames. The goal was to get a well-exposed dark interior, a bright metal escalator and a surprisingly bright dome in this shot. Each layer contains a correctly exposed portion of the composition.
Main camera

With tasks in architectural and landscape photography my Canon camera 5D Mark II with 17mm TS-E tilt-shift lens. I use exposure bracketing in large part because the front lens of my lens is convex and prevents filters from being used. I always have EF24 f / 1.4 and EF50mm f / 1.2 lenses in my bag. My tripod is a little odd - Gitzo legs with Manfrotto ball head.
Computer and Monitor

I do all my imaging work on a dual-core Mac Pro with 24GB of RAM. I often work with images over a gigabyte, so a lot of RAM is a must. I have a Dell 27 ″ Ultrasharp monitor that is calibrated with a Spyder 3 Elite.
Before any important imaging work, I calibrate the monitor.
Importing images

I understand that many of you use a variety of automation tools like Lightroom, iPhoto, Picassa and others. Call me a luddite, but I hate being out of control, so I use a completely manual import procedure.
At the location, I merge photos onto 2 hard drives and upon my return, I copy about 100 gigabytes of information at a time to a pre-prepared location. The folder structure shown on the left has served me faithfully for 10 years.
You may notice that my finished files are prefixed with the size in pixels for different sites; for 500px it is 900px wide, and for 1x.com it is 950px wide. I also add "bw" to the black and white file names. This naming system makes it easy to find the images you want on the hard disk.
Selection

Of the many photo applications I have installed, I use Adobe CS5 every day. It is a solid workhorse for imaging.
Previewing and culling is fastest in Bridge. On the right, I select the images that interest me. When satisfied with the selection, I use the filter in the left pane to show only the selection.
Camera raw

If you are like me, then all your camera settings are off or set to 0. Here in Camera Raw, I make a few settings for all photos to compose a single image.

- Make sure to import your photos in the same color space as in the camera. In my case, this is Adobe RGB, which is wider than the Internet standard sRGB. Work with the highest quality source, and then convert to the target format, for example, for the Internet.
- Edit photos in 16-bit mode
- Choose the best and most correctly exposed frame and set the white balance on it
- If hot pixels are present, use the Recovery slider to compensate for them. Press + at the same time while moving it and you will see the position of these points on a black background!
- If the "Return" slider had to be moved too much - compensate this with the "Exposure" slider by pressing the + button again.
- The same combination can be used when correcting the black level - raise the black level so that there are no overhangs.
- Then select all images and sync white balance for all images in the series via the menu in the upper left corner.
- Then open all images in Photoshop
Working in Photoshop
I have a fairly strict workspace in Photoshop and the editing process is pretty straightforward.
I have a number of actions (actions) for different tasks, such as resizing, color space, etc. The individual tasks I perform can be divided as follows:
- Combining Exposure Bracketing Images into a Single Layer
- Joining the images that make up the panorama
- Saving the Composed Image to a Photoshop PSD File
- Use masks to highlight parts of an image that require separate color, contrast, or exposure adjustments. An example would be processing the sky separately from the building in the foreground.
- Save this image with all layers created
- Merge layers and crop as needed
- Sharpening
- Save a new version of the finished image in Photoshop PSD format
- Resize for intended use, e.g. 900px for 500px.com
- Conversion to sRGB color space and 8bit color depth
- Saving in JPEG format. Be sure to add the "900px" prefix to the filename for easier searching later.
Manual blending of layers

First, place your differently exposed footage in one project as layers. You can do this automatically via the menu File - Scripts - Load files into stack(File> Scripts> Load Files Into A Stack).
Many Photoshop users are intimidated by the use of masks, selections, and the like, but it's actually quite simple. I will show!
Choose a selection tool of your choice. I used the Quick Selection tool marked on the left in the picture. Then press to add a selection and press to delete. As you can see, I have highlighted the correctly exposed dome of the Canary Wharf subway station.

This selection is very uneven and it would be better if we made it smoother and more elegant. To do this, click on the button Refine Edge(Refine Edge), also marked at the top of the picture above.

The red mask is very handy for viewing selected and unselected, but you need to enable this option. Click on the dropdown menu "View"(View) at the top of the dialog Edge Refinement and select "Overlay"(Overlay).
![]()
We use the Refine Radius Tool brush indicated on the left. It will draw the edge of the selection and Photoshop will refine the boundaries of what should and should not be selected.

Increase brush size in option "The size"(Size) and generously paint over the border area. Walk along all borders!
The edge of the mask looks much more gradient now! Click "OK" to save this selection.

Now we need to create a layer mask. The mask will make part of the layer visible and other parts invisible.
Click the button Add Vector Mask(Add Vector Mask) indicated in the figure.
You can see a black and white thumbnail appearing next to my layer thumbnail (below). Black is invisible. It's simple. Anything non-black will skip the image of the corresponding layer. In my picture, the dome mask is white, so only the dome will be visible. This is good because the layers below will remain visible in addition to the dome from that layer.

I went ahead and repeated the steps to create the mask for the escalator and the surroundings of the dome, as you can see in the image below. The layers at 100% visibility are too hard, so I reduced the opacity of the dome layer to 80% and the escalator and dome environment layer to 70%. This takes a little more time, but is a very flexible method to represent the wide dynamic range of the frame.

An important takeaway from this section is the strength and flexibility of layers and masks. I will handle colors and contrast in the same way in the next section.
Merge your differently exposed layers across Layers -> Merge Layers(Layer> Flatten Image) and save as a Photoshop document. You now have a properly exposed version of your shot. A base to return to. This is useful if you then want to convert the photo to black and white.
Editing: colors and contrast
I'll demonstrate this work with a shot from Kolmanskop, Namibia. I have overlaid the processed frame over the original to show the advantages of RAW format for processing.

If you were trying to process a given frame as a whole, it would probably be messy and improving the color and contrast in one area would worsen them in another. Working with individual parts of the image is closer to me and is achieved again with the help of layers and masks.
Create image layers using masks.
- Select part of the main layer.
- Refine the edge
- Copy selection
- Paste on a new layer, name it something clear
- Repeat for all areas requiring special attention

I will show my process for color and contrast processing using sand as an example.
Saturation
Select the layer you will be editing. I selected the "Sand" layer. Add an adjustment layer Hue / Saturation like on a picture.

Check the box next to (Use Previous Layer to Create Clipping Mask) to restrict your edits to the Sand layer only. You will get a new layer with a small down arrow to represent this.


I selected the preset option "Increased Saturation More"
The sand should turn warm orange, so I'll add another Adjustment Layer - Photo Filter(Layer> New Adjustment Layer> Photo Filter), first selecting the "Sand" layer and not forgetting the checkmark Use Previous Layer to Create Clipping Mask(Use Previous Layer to Create Clipping Mask).

I selected the Warming Filter (85), setting its density to 50 for a fuller effect.

Finally, I added a curves layer for contrast. Select the "Sand" layer and from the already familiar menu add a curve layer with the "Strong Contrast (RGB)" parameter (Layer> New Adjustment Layer> Curves ... - select "Strong Contrast (RGB))
At this point, you should save the file with all the layers in the Photoshop Document format.
Alignment

I have 2 ways. Using the ruler shown on the left is very convenient and quick. It is enough to highlight an important horizontal or vertical line in the image. Or it can be done using the rotation mode - "Edit" - "Change" - "Rotate"(Edit> Transform> Rotate)
Cropping
Simple task, but difficult to undo after saving the image. So my advice is to save the file before cropping.
Sharpness
On the question of choosing the best sharpening method, many copies were broken and I personally tried all the methods, but in my opinion the most elegant method is the "High Pass filter" color shift method. The result is sharp, but without artifacts and unevenness. I don't sharpen after resizing.

- Duplicate the layer through Image - Duplicate(Image> Duplicate) ...
- Apply a color shift filter. A radius of 1.0 is sufficient for a well-focused image on the order of 10-20 megapixels. Filters - Others - Color Shift(Filter> Other> High Pass) ...
- Set the blending mode to "Overlay"(Overlay).
Preservation
"Merge Layers" in the "Layers" menu (Layer> Flatten Image) and save as new document Photoshop with an appropriately named.
You now have your edited image at full resolution. When you prepare a photo for publication or for participation in a competition, then it is to this version that you will return to resize, save in JPEG format and transfer.
Change of size
I reduce JPEGs to various sizes for Blogs, Flicker, 500px and 1x sites, and contests.
Preservation
Final JPEG conversion requires conversion to sRGB and 8-bit. These attributes are standard on the Internet. If you don't, your images simply won't look the same to other people as you prepared them on your computer.
- « Image "-" Mode "-" 8 bit / channel "( Image> Mode> 8 Bits / Channel)
- "Edit" - "Convert to Profile"(Edit> Convert to Profile) ...

That's all, such is the general outline my photo processing process.
I am about to prepare part 3 on professional black and white conversion, so stay tuned!
 Where to get money for business?
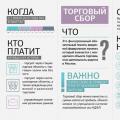 Trade tax or "rent tax
 Background Open un contour elba