Recommendations for creating a composition of the frame. Position of the model within the frame Position of the person in the frame
Below we will show you a few photos, the composition of which can hardly be called successful, and then below we will show you a different version of each image, the composition of which makes the plot more interesting. Each type of image is accompanied by recommendations on how best to proceed in this case.
Object in the center
To draw attention to the main subject, do not place it in the center of the frame. Before you press the shutter button and take a photo, look around and take the most interesting shot.
Shooting with a wide-angle lens indicates that a large area will get into the frame. Thus, make sure that there are no uninteresting objects in the foreground.
Horizon in the middle of the frame
Placing the horizon in the middle of the image is generally not recommended. The horizon in the middle of the frame divides the image in half, creating two equal-sized regions. Equal-sized areas make the photo look static and less interesting. Better to place the horizon at one third of the frame, at the top or bottom of the image.
Littered horizon
If the horizon is clearly visible in the frame, then it must be horizontal. Getting the horizon accurately with the viewfinder can be tricky. Many cameras provide a grid for this, which can help you create a flat horizon line.

Using a few simple compositional rules will allow you to create truly powerful and interesting photographs. So in the shot above, we see an interesting foreground that complements the frame, a well-placed main subject and an attractive horizon line.

Subject in frame is too small
If the area around the subject does not complement the image, then it is best to focus as close to the subject as possible without cluttering the area around.
Extra objects
No matter how impressive and beautiful the subject of your shooting would be, if there are a lot of unnecessary objects around it, the frame will turn out to be unsuccessful. Try to take such a photo so that as little excess as possible gets into the area of the picture, in addition, the background in such images should be blurry and not distracting.
Object in the middle of the frame
Just as the horizon should not be in the middle of the frame, the main subject should not be in the center. Such a photo will turn out to be boring, static and uninteresting. The rule of thirds and the rule of the golden ratio have been discussed many times on the Internet and on our website, so take a little time to study them.

How to correctly photograph a person or a group of people? At home, on the street, or in the studio? .. These questions often occupy the thoughts of novice photography enthusiasts, and in this article we will try to answer them - as briefly and simply as possible.
In this article, we will give a few basic principles - tips for photographing people, which are often used by many "advanced" amateur photographers and professionals.
So, what are they - the secrets of beautiful photography? What points can you highlight - and use yourself?
Location, background.
Most often, the background for photography is chosen based on the following considerations. The background should be as "not catchy" as possible, not shading your model. Tree foliage, grass, or ocean waters are classic options. If your model has a good tan, you can try to find an even darker background - than skin texture, in order to draw attention to, in fact, the model's face. The background for a classic portrait is recommended as simple as possible - with a minimal color gamut, you can only introduce some landmark into the frame - an object characteristic of a given area. For example - the Eiffel Tower in Paris, or the Kremlin walls in Moscow, craters on the moon ... - then the frame will turn out to be more informative. Be sure to look for a beautiful background - in your area!
Lighting when shooting / photographing people.
If you are a photographer - the sun should be behind you and a little on your side ... If you are a model - get ready for a blinding light :) If the sun is shining too bright and too "hard" - it is permissible to place the model in the shade, while, if necessary - you can even light up your face a little with flash fill light or reflector.
If you decide to photograph your model in natural light, then it is best to choose sunrise or sunset - at this time of day the light is the softest and most delicate. Taking a beautiful photo of a person's face in the morning or evening is much easier than in the middle of the day.
Sometimes the light scheme can be changed - and photographs "against the sun" - getting a beautiful highlight of the hair, or - with the appropriate exposure - a silhouette against a light background.
© Anton Karpin.
If you are photographing indoors, use an external flash and its light bounced off the walls or ceiling. A head-on flash makes people's faces look too flat.
Choosing a lens for shooting people
If you have a decent camera - with a detachable lens - it is recommended to choose a relatively long focal length lens. For example - 80 millimeters. If you have a "whale" lens - that's not bad either, look how nice it turned out:

© Anton Karpin.
Use the widest aperture possible (f / 3.5 for example) to get beautiful bokeh - the background will be blurred and less distracting from the person in the frame. If the background in your shot also plays a big role - use a larger aperture (eg F / 8) when photographing - to keep both the background and the model's face clear.
Angle, location relative to the model
Doesn't always follow photographing people - in full growth. Try to take a picture up to your waist, up to your chest, try to take pictures only of the eyes ... It is believed that the best thing is to take pictures from the level of the model's eyes. In this case, the face in the photo is the most beautiful and natural. Photographing the girl, however, can be done from a slightly higher point - this does not hurt.
Remember - that the top of the head "cut off" by the edge of the frame, or the hands - do not look very beautiful, not professional!
Cropping - when photographing a person
Human eyes - it is considered correct to place them somewhere in the "golden section" of your frame. If, of course, the person is the semantic center of the frame.
If a person's gaze in the frame is directed to some point that clearly goes beyond the edge of the frame: for example, unambiguously towards the left edge of the frame, then enough free space must be left in this side (i.e., in our case, on the left).

© Anton Karpin and Photosession
Mental balance of a fashion model
It is highly desirable that your fashion model be calm and relaxed. For this, different techniques are used. For example, if you are photographing friends, you can remind them of some funny incident in life ... Children should be given something to play with, to involve the parents of young models in the process. You can ask people you know little about something trivial, be interested in a person, or joke.
Photo jokes, cartoons
Use funny poses, camera angles. Try to choose an angle from bottom to top and top to bottom. Let your model talk to the doll in the frame, or scream! You can use a wide-angle lens - getting very close to the model's face, in this case, her nose will enlarge, and the lines as a whole will be distorted - which will look like a cartoon.
- Dynamics
If your model is moving (running, or riding a bicycle) - take a shot "with the lead". That is, reduce the shutter speed (for example, to 1/30) and while you are taking a picture, move the lens along the path of your model. Then the background will be blurred, "blurred", and the model will remain more or less clear. This will give the photo more dynamism, expression!
In the digital world, pictures taken with a camera are not properly appreciated. Most people "shoot" from their camera like a machine gun, and as a result, out of 250 photos, only 5-10 are good. During the dominance of film photography, people approached each shot with special care and brought the picture, as they say, to the correct one. The reason for this was the strict limitation of photographic film in terms of the number of frames.
Creativity is great, of course, but don't forget about the most important rules for creating high-quality photography. With the help of these recommendations, you can avoid the stupidest mistakes and improve your professional level. Craftsmanship is "honed" frame by frame, and how much joy a photo can bring to your partner, taken in an ideal way. It is professionalism that allows you to create gorgeous and expensive photographs.
There are several photography guidelines that must be followed in any situation.
Diagonals.
The photograph must permeate the entire spectrum of the picture. The lines should lead your eyes into the depth of the image, as if you are immersed in the picture. Rivers, roads, walls, etc. can be used as diagonals. When photographing a person, use body parts, poses, or clothing boundaries. The diagonal rule is created by placing objects in the frame. Draw imaginary lines extending 45 degrees from the corners of the frame. 
Rule of thirds.
I also call this concept the “golden ratio”. Divide the photo into nine equal parts visually. The subject should be located at the intersection of these lines. These intersections are called attention nodes. If this object were to be placed in the center of the frame, the picture would lose its dynamics and drama. "Golden rectangles" are pleasing to the eye and will add harmony to any landscape.  The division diagram of the "golden rectangle" is shown below.
Observe the symmetry or asymmetry of objects in each frame. With the help of some elements of the frame, you can establish a balance between objects. The presence of symmetry is necessary, but excessive symmetry can "kill" the drama and emotion in certain paintings. Due to the correct symmetry, you can draw attention to the desired object. 
Background.
The background you have chosen should not outstrip the main subject. It is very important to choose the right background to maintain the atmosphere of the frame. It is convenient to use an abstract background without the presence of distracting objects. In this case, you can successfully highlight the main subject of the photo. Some photographers use telephoto lenses, which, due to the narrow angle of view, do not allow unnecessary elements to be included in the frame. Such elements can carry unnecessary semantic load and spoil the atmosphere of the frame. 
Depth.
Foreground, middle and background are the three most important areas into which you need to break the picture. A two-dimensional photography environment will not be able to convey the full depth of a real landscape without proper preparation, which you must implement. Another option is to cover all the secondary objects with the main object. 
Depth of field.
By adjusting the depth of field, you can focus on the main subject, blurring the background and unnecessary objects. Depth of field is one of the most effective tools for isolating objects. 
Framing.
Natural frames (frames) can very successfully emphasize the beauty of the object, focus attention on it and saturate the frame with life reality. Natural framing can be found in almost any situation, anywhere. Use elements such as tree branches, a piece of a fence, a window, an archway, and more. 
Geometric pattern.
Different geometric shapes of objects carry certain emotions. Almost everything can be attributed to simple geometric shapes. At the same time, you can create the desired emotional background for each picture. Rectangular objects evoke a sense of stability, rounded ones - calmness, etc. 
Tonal perspective.
Use the correct color contrast to maximize the volume of your frame. The proximity of the object can be conveyed by the darkness of the object, and the distance, on the contrary, by a light perspective background. The sense of depth can be enhanced by the "play" of colors and shades. 
Black and white frame.
With the help of black and white photography, you can correctly convey the emotional component of the frame and the general atmosphere. In this way, you can convey hopelessness, dullness of everyday life, hopelessness, reconciliation with reality and other "dark" emotions. In black and white photography, the first thing to do is to look at light objects. Dark areas of the frame fade into the background. This trend is the opposite of a color painting. In b / w photography, light lines of objects seem to be paramount. 
Remember that by adhering to these rules, you improve your professional level. However, it is worth leaving room for improvisation. Unexpected shots can turn out much more natural and interesting than prepared ones.
How unusual it is to give money for a wedding. 23 original ways
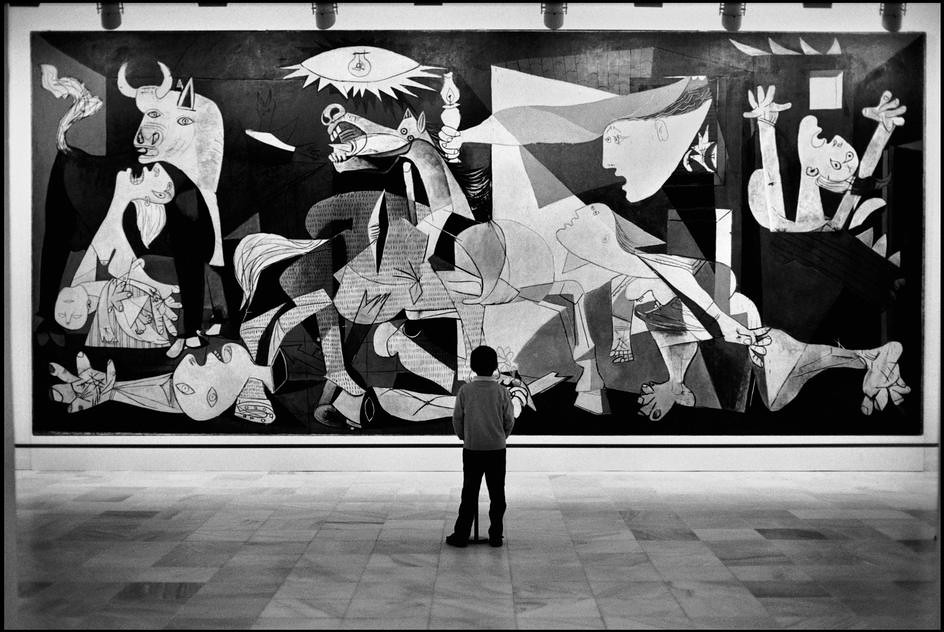
In this article, I would like to analyze some fairly common judgments about the so-called "central composition", about symmetry in the frame, about the golden ratio and about the rule of thirds.
1. The myth of the central composition
Perhaps the most common misconception in the field of composition is as follows. It is argued that the main subject in the frame should not be in the center and that it is desirable to displace important objects relative to the center of the frame. Meanwhile, this is obviously a false statement. Frankly, it’s even surprising that it is still being repeated.
Pieter Jansz Pourbus (1524-1584), The last supper
Let's start by recalling world famous photographers who have actively used and are using the so-called central composition. Many old school portrait photographers, including William Henry Fox Talbot, Julia Margaret Cameron, Dorothea Lange, don't count. Irwing Penn used almost exclusively central composition. Of course, there were other options, but the central one - very often. Below, I specifically cite quite a few examples to demonstrate their diversity.


Richard Avedon

Harry callahan

Alberto Garcia-Alix

Ruth Orkin

Ansel adams

André Kertész

Rodney smith


Many people think that vertical and square frames gravitate towards the central composition, but this, as you can see from the selection, is not so. The central composition of the classics can also be found in horizontal shots.
So, we see that there are a huge number of classics of photography who used the central composition very actively. In addition, studies using the pupil tracking method (eyetracking) show that of all possible “special points” in the frame plane, the only a priori strong “point” is the center of the frame, and to be more precise, the vertical is in the center. You can see the pictures yourself at the link. In other words, different points may or may not be attractive to the eye, depending on what is in them, and the center attracts attention even when there is nothing specifically interesting there. Therefore, central compositions are known to be effective, and the fact that they should not be used is nothing more than a myth.
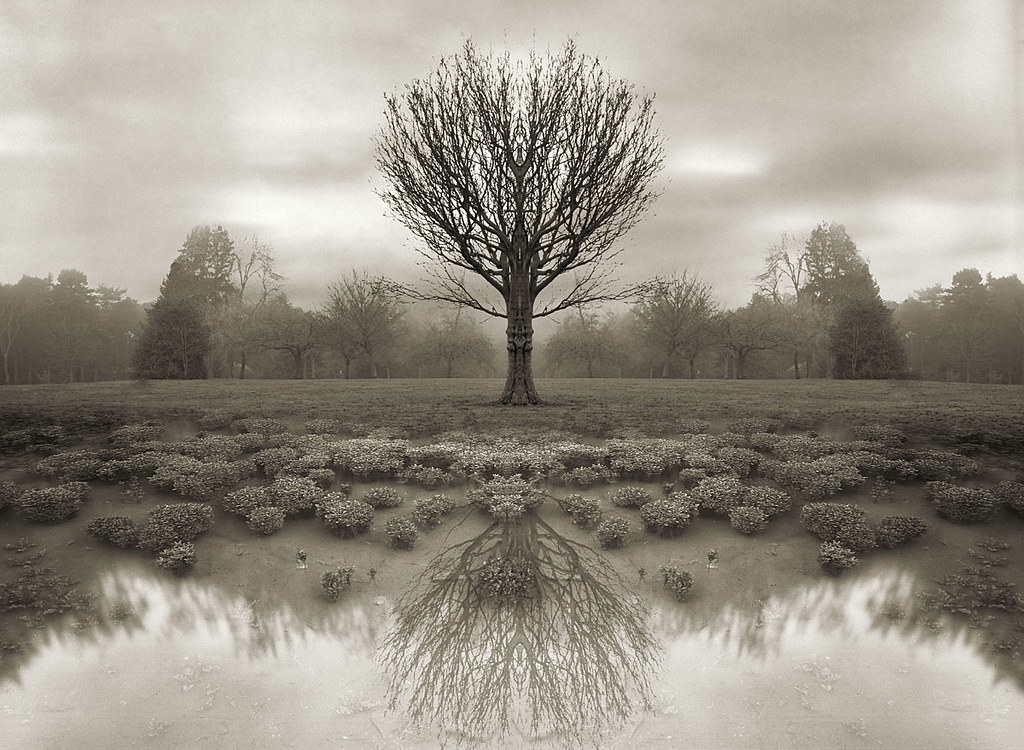
2. The myth of symmetry
I don’t know where the idea came from that having symmetry in the frame is bad. For me personally, this is surprising, since the presence of symmetry in the image is not a defect in the composition, but an artistic device. Symmetry can be observed with and without central compositions. In addition, a generally symmetrical frame and local symmetry can be observed when only its individual parts are symmetrical. Symmetry can be observed about the horizontal and vertical axes, as well as about the diagonals, and in general about anything.
It should be understood that complete symmetry in the mathematical sense is almost never observed in photography. This is usually about approximate or even very approximate symmetry. There is a very plausible hypothesis that when looking at symmetrical photographs, the viewer compares parts of the image, playing the famous game "find 10 differences". If this is so, then memorizing and understanding symmetrical images is determined precisely by the presence of approximate symmetry, and this is precisely the compositional technique. In addition, it is obvious that symmetrical objects are easier to memorize due to the smaller amount of information that is required to memorize.
Below I will give a few examples of symmetrical compositions from the classics of photography. Some of the central compositions above are also photographically symmetrical images.
Philippe halsman
Philippe halsman
Alfred stieglitz
Here symmetry is the result of manipulating the image.

Rodney smith

Rodney smith

Lisa sarfati
Christopher anderson
3. The myth of thirds and the golden ratio
The so-called "rule of thirds" and "rule of the golden ratio" are the biggest, most common and most persistent of all the misconceptions in the field of composition in photography that I have ever encountered. By putting forward reasonable arguments, it is usually fairly easy to convince people that some of their knowledge is not entirely correct or not at all correct. But with these two rules, which are often combined into one, this is not at all the case. More often than not, no reasonable arguments work, so I have long sworn to argue about this and treat the addiction to these two rules as something religious. Either people believe in God, or they don’t believe - it is almost impossible to convince anyone of anything. Nevertheless, I have my own opinion on this issue.
One of the main problems is that these rules have virtually no wording. That is, every normal person knows or is able to understand what 1/3 is and what the golden ratio (or golden ratio) is, but what to do with this knowledge further, everyone understands in his own way. A rule is usually a fairly clear instruction “to achieve something, you have to do this and that” or a clear pattern “if you do this and that, you get this and that” ... For example, “to make your neighbors sleep unbearable, you need to turn on loud music that they don't like when they sleep” (instructions) or “if you eat a spoonful of sodium cyanide, it will have a bad effect on your health” (regularity) ... There are no such formulations regarding the golden ratio and thirds. The most intelligible thing that can be heard or read sounds like this: the "golden ratio" is associated with harmony. And one can fully agree with this wording. Yes, it is somehow connected, but what follows from this? What should be done specifically to achieve harmony? Let's say we know exactly what to do with the golden ratio, but we do something else. Does this automatically mean that we cannot achieve harmony? What is harmony and is it always needed for each particular photograph?
The wordings for the practical achievement of this notorious harmony by the method of the golden ratio often contradict each other in part or completely and vary in their ultimatum. For example, you can find this: "It is very convenient to use the rule of the golden ratio to place the horizon (on the top or bottom line)." I feel unbearably sad at the thought that I come to a photo gallery and see hanging photographs in which the horizon is located exactly on one of the two lines. If, in addition, the proportions of the frame are observed according to this rule, then harmony, frightening by its intolerance, is obtained. Or another option: "If you are shooting a portrait, it is better to place your eyes on the upper horizontal line of the golden ratio." I would like to ask: what to do with portraits, where are the eyes somewhere else? Burn? To anathematize the photographers who made a mistake and did not place the eyes of the subjects there?
The answers to these questions come immediately after reading other formulations. According to other opinions, again for reasons of harmony, it is not necessary to place everything on the lines of the golden ratio and at their intersections, as some authors write. You can instead place everything you need for harmony, including the eyes, somewhere nearby or even on the lines of thirds. For this, manufacturers of some cameras even make screen layouts, and you can see it through the viewfinder too. How far from the magic lines can we move something? For those who do not distinguish between these two rules and consider one rule to be a simplification of the other, the answer is obvious: at least by the distance by which the lines of thirds differ from the lines of the golden section.
Lines of thirds:

Golden Section Lines:

We superimpose one on top of the other and paint over the area between them:

Set aside on each side of the thick lines at the same distance and paint over again:

We get that part of the frame plane into which something important should fall. Don't you think that there is a high probability that something important will always get there?
But it turns out that not everyone thinks that the rule of thirds is a simplified rule of the golden ratio. Some people think that the rule arose from the fact that each of us just have two eyes (although not all) and that the eyes conditionally divide the plane of the frame into three parts. It is not entirely clear why the parts are the same, but it doesn't matter anymore. Religion does not allow us to divide the frame into unequal parts.
Proponents of the pure rule of the golden ratio say that the rule of thirds should be forgotten. Instead, we must remember that the golden ratio is not limited to four lines in a plane and that everything is much more complicated, interesting and harmonious.
Chapter 7. Taking pictures of people. Portrait photography rules
Taking pictures of people. Portrait photography rules
Very often we have to photograph various people, be they friends, acquaintances, relatives or completely strangers. Many photographers become professional photographers of people, and what can we say about the role of a good, high-quality photograph of a person in a family album ... In order to photograph people the way it should be, you need to know some rules and tricks of portrait photography, which we will master in this chapter.
As you study this chapter, you will immediately notice some similarities with the previous chapter where we studied. In fact, the previous chapter was, as it were, basic, preparing for the next step in the formation of professional photographing of people. In addition, in this part we will mainly touch on portrait photography, and further, in the following chapters, we will deal with group photography or weddings.
To get started, you must master both studio and outdoor photography, as both of these types of photography have their own advantages. Photographing people in a studio requires a little more space than a studio designed for macro photography of small objects. Tip: The fabric for the background now needs to be chosen much larger in length and in width (always choose a piece of fabric a little longer than you planned), also make sure that the chosen fabric is easy to wash, as people will constantly walk on it and thereby get dirty ...
Say good morning to your friend and please her with a beautiful verse. Only the most beautiful love poems.
Camera support.
As for the support of the camera (tripod), when photographing people, it is not so important and can even be harmful. In order to take a good photo of a person or a group of people, it is advisable to walk around, see how the object will look from different angles and at different distances. The exceptions are when you know exactly how you need to shoot a person (a photo for documents or a photo of several persons for a company).
Lighting for portraits.
When working with portraits, take the time to experiment with multiple light sources. This technique will give you a lot more creative freedom. Several light sources can also be the combination of a lighting fixture, light from a window and a reflector.
In fact, there are many ways to attractively illuminate a person for portraits. We'll break down a few.
The main light source.
If you are using a single source of light for photographing people, then it will be useful for you to know that one source is most often installed opposite the object, on the side where the camera is located, slightly above the subject's eye level. If you place the source behind the person, you get a silhouette effect that will frame the person. Next, let's look at the basic techniques that are achieved using one light source:
Fill light
Fill lighting is usually complementary to the main light source, such as natural outdoor lighting or home lighting. The fill light is set so that it illuminates or removes those shadows that remain from the main one. The contrast with which the portrait will turn out depends on the intensity of both lighting. If both sources are of the same power, then the contrast will turn out to be weak, but if the fill light is weaker, then the contrast of the object will be quite high. The fill light is most often placed next to the camera.
 Hair lighting.
A special rule in photographing people. Do not forget about hair lighting, as separate lighting directed at some angle to the subject's hair can further emphasize the person and make the picture more attractive. Such lighting, if you use it, must be carefully controlled so that too much light and attention is not given to the hair, which will distract from the main subject.
Now let's look at various lighting techniques. There are a lot of them, but we will analyze the main ones that are used very often.
 Short lighting... It is also called narrow lighting. In this case, the main light source illuminates the face half-turned away from the camera. So it turns out that a part of the face with a shadow comes out in the foreground, the source illuminates the other part of the face. This method is intended to emphasize the interesting contours of the face. Also, in this way, people with large or plump faces are photographed in order to make them narrower.
 Wide illumination... This lighting is the opposite of the previous one. Here, the main light source illuminates the part of the face facing the camera. Also, unlike the previous lighting method, wide lighting makes narrow faces look wider.
Lighting, with an interesting name Butterfly... So, what is this method of lighting. The main light source is placed in front of the subject's face above the level of his eyes. Thus, the light illuminates the face from above and casts shadows downward from everything below the level of the nose. With this kind of lighting, it is worth mentioning that it is not advisable to photograph people with open ears, as they will be strongly emphasized. Basically, women are filmed in this technique.
 Rembrandt lighting... This method, on the contrary, is more suitable for men. The main light source is mounted high, above the face or head, and illuminates the side of the face that is turned away from the camera. Thus, the part that is turned towards the camera will be partially in shadow, besides, since the source is at the top - a shadow will be thrown down from the convex areas, a small triangular area will be darkened under the eye, which will give a very interesting effect.
 Side lighting. With side lighting, the source illuminates only one side of the face. This method is often used when photographing a portrait in profile, it turns out that the face is surrounded by a contour of light, in painting it is called so - contour light. Can also be used when the person is facing the camera in full face.
 Background highlight... In this case, the light is not directed at the person, but at the background behind him. It turns out that he is, as it were, emphasized by the fact that the background behind him is very bright, or not very illuminated.
Creating your first portrait.
So, let's start the long-awaited portrait shooting. Now we will take a step-by-step look at the rules on how to form people's poses and set the lighting correctly. It is assumed that you have already set up the lights and background and you are now ready to shoot the portrait.
Try to relax the person you are filming, a relaxed person is much easier to work with, almost like with soft plasticine. Many people go to shoot with E Zigarette (cigarette) in their fingers or lips. If you do not take it off in full growth, then you should not force him to stand, it will be better if he sits down on a comfortable stool. Photographers often use stools because they tend to make people not slouch and do not have a back that will fit into the frame.
 If you are shooting several people at once, then try to form a dynamic shot. For example, slightly change the line of the heads, for example, make the central line slightly higher than the rest. Here, as they say, is a matter of taste and imagination. In any case, people standing on the same line, exactly as if on a ruler, will create an unusually boring portrait photo for you.
Try different levels of the camera. For example, shoot from waist level, but point the lens in the face of people, let them all look at you. It is easier to work with one person, since you only need to adapt to his anthropometric structures of the face and body. Mono raise the camera above the level of his eyes, in this case, the nose lengthens and the chin shrinks, the forehead, on the contrary, will appear wider. If you want to do the opposite, then lower the camera below his eye level.
 To list all the ways of setting people and arranging lighting devices, for portrait or any other shooting, you need a huge bunch of chapters, and even this will not be enough, because people are not soulless objects or static statues, but living people, all different, all special. It is best if you have difficulty posing people, study photographs of famous photographers or browse magazines that have many photographs of people posing and try to apply that to your subjects.
Small but very important tips and rules for portrait photography.
In the case where the hands enter the frame, it is better to photograph the edges of the hands than the palms or the backs of the palms. Be very attentive to the soles of your feet, it will be better if they do not enter the frame at all, since the feet are not entirely graceful for a beautiful shot.
If the person you are filming is bald and not entirely happy about it, raise his head and slightly lower the camera.
If a person has an unattractive nose, angular or too large, shoot such a person with their face straight at the camera.
Prominent ears are best shot in low light, so that the ear is in the shade.
Scars, wrinkles, bad complexion can be smoothed out with soft, diffused light or photographing from the waist level.
If the subject is wearing glasses, make sure that when the light is on, the glare from the glasses will reflect at an angle and not directly into the camera.
Placement of lighting fixtures when photographing people.
So now we are going to arrange the lighting. It is worth choosing the lighting that was mentioned earlier in this chapter, but do not forget that your luck companion is experiment. Feel free to experiment. Next, we will briefly discuss lighting placement techniques.
Short lighting... With this lighting, the main light source illuminates the side of the face that is facing away from the camera. For example, if the object is looking towards your right shoulder, then the main source is to your right, the fill is to your left. The filling source must be located twice as far as the main one, thus it will be 4 times less intense if it is taken into account that both of them are of the same power. Make sure that the shadows on the subject are not too dark.
Wide illumination... Wide lighting is the opposite of short lighting. The main light source illuminates the side of the face facing the camera. In this case, we arrange the lighting devices in the opposite way than in the previous method.
Butterfly... Everything is easy here. The main light source is located in the same place as the camera, only rises above eye level to create a shadow under the nose. Do not raise it very high so that the shadow falls to the very mouth. Fill light can reduce the intensity of shadows.
Rembrandt lighting... In this case, you need to position the lamp, as in short lighting, so that it illuminates the side turned from the camera, only above eye level. Remove or reduce filling capacity.
Side lighting... With this kind of lighting, the lamp is placed so as to illuminate one profile, or one part of the face. It is also possible to expose the main light slightly behind the person to soften or minimize the amount of light.
A little tip: When shooting portraits, or a group of people, there is a danger that some of the people will blink and the frame will not work. Tell the people or person you are shooting to watch the flash and tell you whether it was white or red.
 Fujifilm X-T1 - Full Review
 Lenses sony sel. Sony lenses rating. Which Sony lens to buy
 Canon PowerShot Pro1 - quality that ends quickly Canon PowerShot G5 X highlights