What you need to paint eggs. Different types of egg painting: natural ways to paint eggs. We paint wooden eggs in stages with our own hands
Preparing for the bright holiday of the Resurrection of Christ is a special process. The key place in it is staining and decorating eggs... It doesn’t matter if you don’t know how to draw, because there is a more interesting and relaxing technique.
Drapunks, or scratches, are made by scratching out a pattern on the painted surface of an egg. The drawing is applied with a pencil, and then scratched with a thin metal object (needle, knife, nail). The main condition is that the background must be one color.
When making drapanoks, craftswomen can give free rein to their imaginations, and looking at their work, it is impossible not to admire these works of art. Editorial staff "So simple!" prepared 15 ideas for your inspiration.
Easter eggs painting
- The simplest patterns look very interesting. As you can see, it is not necessary to have artistic talent.

- Very beautiful patterns... It's even a pity to break such eggs.

- Very painstaking work, but what a result. Amazing!

- Paint the eggs in different colors. Thus, even the same patterns will look different.

- Flowers are the best spring pattern.

- The bird patterns look very symbolic. Interesting idea.

- At first glance, there are a lot of elements, but in fact they are all simple to perform.

- Painted with the same pattern would not look very attractive, but scratched out immediately attracts attention.

- If you are an artist at heart, then you can easily turn Easter eggs into a work of art.

- How much soul has been invested!

- And here is another simple pattern that will serve as a great decoration for your eggs.

- Every stroke is thought out.

- Even a child can handle such simple patterns.

- It’s hard to believe that it’s not drawn, but scratched out.

- I can already see how beautiful these scratches will look in the basket.

If you want to leave your creation as a souvenir, then do not boil the eggs, but after the work is over, make small holes in them. Introduce air into one hole with a syringe. Thus, the white and yolk will flow out through the second.
The tradition of painting Easter eggs in Russia has ancient history... Today we will tell you about Easter eggs - eggs painted with beeswax and painted in different colors with all kinds of dyes. Easter eggs were used to decorate the house, hung them under icons, they were christened and congratulated relatives and friends on the Day of the Bright Resurrection of Christ!
The main principle of painting Easter eggs is that hot wax covers the surface of the egg and maintains a complex colorful pattern layer by layer. Decorating the egg at home is not so difficult - the main thing is to accompany this work with prayer.
You will need fresh chicken eggs free from defects on the shell (preferably medium in size, with equally rounded ends), food or natural dyes, wax candle and scribblers (a tool for applying wax, which is easy to make yourself by driving a small nail or a needle from sewing machine). You can, as in the old days, use a bone from a chicken breast.
Eggs for Easter eggs should be washed very carefully so as not to damage the shell and not leave scuffs and scratches on it. In order for the dirt to easily come off the shell, you need to put the eggs in warm water and, without using chemical detergents, wait until they get well wet. You cannot rub and scrape the shell. After washing, the eggs should be laid out on a towel without wiping.

Gently put clean eggs in a saucepan, fill it flush with water, add salt at the rate of 1 tbsp. spoon for 2 liters of oxen and bring to a boil (it is advisable to use a flame divider on the gas stove so that the eggs do not crack). As soon as the water boils, remove the pan from the heat and gently, one at a time, remove the eggs from the boiling water and place them on a towel to cool.
You can paint not only boiled, but also raw "blown" eggs. To make a blown egg, first remove the contents from the shell. To strengthen the shell, dip a piece of paper into the egg white and glue both ends of the egg. Then punch holes and drill them with a round file to a millimeter diameter. After that, blow out the egg using a straw: blow air into one hole, and the contents of the egg will flow out of the other at this time. You can also blow the egg out with a medical syringe, in which case you only need one hole. After the egg is blown out, the paper can be peeled off. Empty shells are supposed to be washed from the inside and dried.
When the eggs are dry, you can start painting. Food colors should be diluted according to the instructions of the factory instructions. The most suitable dishes for them are glass jars with a wide mouth.
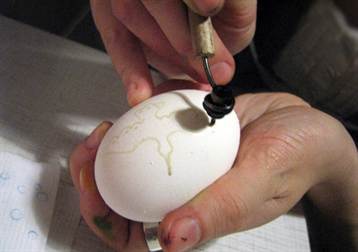
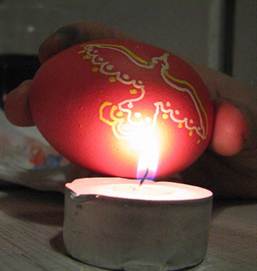
First, apply the conceived pattern with a soft pencil, and then move on to covering the elements of the pattern with wax. To do this, light a candle and cover the egg with hot drops of wax, or dip the nose of the scribbler in melted wax and cover with hot wax those parts of the ornament that should be white on the egg. The wax on the egg hardens instantly.
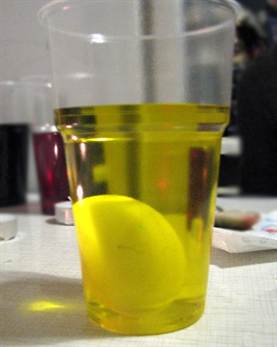
It does not dissolve in water and, therefore, protects with each subsequent dyeing the previous, certainly lighter color of the paint. Place the egg in a spoon and dip in yellow paint for 1-2 minutes. The paint should be warm, but not hot, otherwise the wax on the shell will melt, ruining the paint, and the egg, and your mood. After removing from the paint, blot the egg soft napkin... Wax up the parts of the pattern that should be yellow and dip the egg in red paint.
Wax the lines and margins that should be red and then paint the egg black. When finished coloring, place the egg in a warm oven or heat it over a candle flame. When the wax on the shell melts, wipe it off with a napkin, and an Easter egg will flash in your palms, brighter than fire. Grease it or cover it with a thin layer of varnish. Do not despair if the patterns on your pysanka are not very clear and neat. Mastery will come with experience.

The painted egg, along with cottage cheese and Easter cake, symbolizes the bright Resurrection of Christ. Just like a chick is born from an egg and begins to live full life after being freed from the shell, so also people, by the power of the Resurrection of our Lord Jesus Christ, will one day be sure to be resurrected for the life of the century to come.
Natural dyes for eggs
For staining, it is best to take white eggs and preferably not stamped.
Ocher... Prepare a decoction of onion husks and boil the eggs in it for 15-30 minutes (depending on the cooking time, the color of the eggs will vary from bright red to dark brown). Yellow. Prepare a decoction of young birch or nut leaves, strain and cook the eggs in it over low heat for 10-12 minutes from the moment of boiling.
Pink. Put boiled eggs in cranberry or beet juice (for a more delicate shade, you can simply grate the shells with juice).
Violet. Dip the violet flowers into hot water and leave overnight. Put boiled eggs in the prepared infusion (if you add a little lemon juice to the water, you get a lavender color).
Blue. Finely chop the head of red cabbage and pour 0.5 l of water, adding 6 tbsp. tablespoons of vinegar. Put boiled eggs in the infusion and leave overnight.
Green. Boil eggs with finely chopped spinach leaves for 10-12 minutes after boiling.
Blue. Grate boiled egg shells with blueberry juice
Dark brown. Prepare strong coffee and boil eggs in it.
When the colored eggs have cooled, brush them with sunflower oil - they will become smooth and shiny.
You can decorate your table for Easter in different ways, for example, by painting Easter eggs. This can be done in 1000 and 1 ways. Try to paint eggs both "as God puts it on your soul", and in a certain folk style: like Khokhloma, Dymkovo toy or even Palekh. On this page - step by step description with a photo of 3 eggs: with the painting "Roses", "Under Khokhloma" and "Matryoshka".
To have plenty to choose from.
So, how to paint an egg.
Required materials to create Easter eggs
- egg
- medical syringe
- sewing needle
- acrylic paints
- brushes
- simple pencil
- transparent furniture varnish
- cotton swab
- sponge
- paper napkins
The first step in making any painted eggs
Wash a raw chicken egg with warm water and dry.
On both sides (opposite), make small holes with a needle. Extract all contents with a medical syringe.
Rinse the shell, also inside (using a syringe). Wipe up.
Easter painted egg "Roses"
The eggs will be painted using the double stroke technique: on one edge of the brush you need to type white paint, on the other - red (or the other).Step 1. With a simple pencil, draw a sketch of the future drawing on the surface of the shell.
Step 2. Apply the first, far row of rose petals to the surface of the shell (the white side of the brush should be on top).


Step 3. Do the same with the next, middle petals, trying to brush over the surface only once.


Step 5. Apply white lines along the contour of the petals with acrylic paint, thereby highlighting the border between the petals (creating some natural bend).
Step 6. Turn the shell upside down and start with the second rose. To highlight her, she will be in another colors... The drawing is identical to the first one. Draw blue and white paint on the brush. Its excess can be removed with one stroke on a palette or a clean sheet of paper. The drawing also originates from the upper petals.


Step 7. Apply the rest of the petals in the same sequence to the shell in the same way. The flowers are ready and you can proceed to the leaves. On some leaves, darken the pointed ends with black paint.
Step 8. Using green and yellow paints, paint the leaves, also using the double stroke method. More yellow paint can be applied in some areas.


Step 9. Finish the composition by drawing the stamens lightly. Leave to let the paint dry completely.
Step 10. Proceed in the same way with the other side of the shell.


Step 11. Cover the entire surface of the egg with a thin layer of colorless furniture varnish. Allow to dry.

Easter painted egg "Khokhloma"
 Easter eggs can be decorated different methods, for example, paint using Khokhloma motives.
Khokhloma is an old Russian folk craft, originated in the Novgorod district in the 17th century. This decorative painting craftsmen decorated wooden dishes and furniture.
On a black background, elements of Khokhloma were painted in gold and red, sometimes green. Traditionally, these are strawberries and raspberries, branches, flowers, as well as animals and birds, fish.
The procedure for creating eggs "under Khokhloma":
Step 1 see above (emptying the egg from the contents).
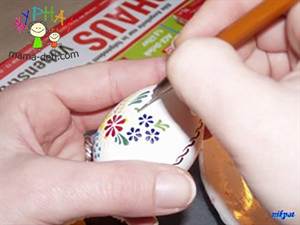
Step 2. With a pencil, draw on the surface of the egg the outline of the main elements of the drawing - berries and leaves. Paint over the strawberries with red paint.
Step 3. Draw rowan berries in the same way. To make them even, you can use a cotton swab: draw paint on one end of it and apply a drawing, applying it to the surface of the shell.


Step 4. The free space remaining between the elements is carefully painted over with the main background - black paint.
Step 5. Paint the leaves with yellow (or golden) paint.


Step 6. Apply specks on the surface of the strawberries - seeds.
Step 7. Draw the stems with a thin brush. Complement the composition with herbs.
Draw a stalk at the base of the strawberries. Add the seeds to the rowan berries.


Step 8. Using a cotton swab, apply small flowers to the surface of the egg.
Step 9. With the thinnest brush, draw veins on the leaves.
Step 10. Draw lines on the stalks, and pointwise - the stamens of the flowers.
Step 11. When the paint is completely dry, cover the egg with a thin layer of furniture varnish, preferably colorless.


Easter painted egg "Matryoshka"
Step 1 see above (emptying the egg from the contents).
Step 2. With a pencil, "sketch" a sketch of the future matryoshka.
Step 3. Paint over a handkerchief with light blue paint. You need to work carefully so as not to go beyond the drawing.


Step 4. Use a small brush to paint the eyes and hair of the matryoshka. Their color depends on your personal preferences, as well as the elements of the matryoshka wardrobe.
Step 5. Apply small dots - peas on the handkerchief. Paint a sundress with red paint.


Step 6. With the thinnest brush, draw cilia, strands of hair and bends of a handkerchief.
Step 7. Decorate the sundress with flowers.
Step 8. Give the matryoshka a smile by painting her lips. Paint the sleeves, arms and draw lines - willow stalks.


Step 9. Dot to paint willow buds with white paint. With a thin and long brush, add a little contrasting black color, forming a curve on the sleeves.
The drawing is ready and the paint should dry.
Step 10. And the final touch. Cover the surface of the drawing with clear varnish and dry. Advice: to make the varnish "lay" smoother, it is better to apply it with a clean sponge.


Marina Tofan painted eggs for Easter.
====================================================
Apart from the traditional Easter cake, the symbols of the Easter table are, of course, eggs painted for the holiday. You can decorate Easter eggs in an original way using simple painting techniques that are available not only to adults, but also to children. We are happy to share the secrets of this skill with our readers.

To complete the painting easter eggs, it is not at all necessary to masterfully own a brush. In addition to traditional painting with an artistic brush, there are simpler techniques, in some of which this tool is not needed at all. Let's consider the most popular ones.

Stucco painting
To paint Easter eggs using this technique, you will need:
- cotton swabs (pokes);
- acrylic paints;
- brushes;
- sponge;
- cotton pads;
- sunflower oil or furniture varnish.

Working process:
1. Boil a hard-boiled egg, dry and chill. If you want to make a real Easter souvenir, carefully remove the contents of the raw egg through the small holes at the bottom and top and paint on the dried shell.
2. Using a foam sponge, paint the entire surface of the egg with white acrylic paint. Let dry for a few minutes. If the coating is not thick enough, apply another coat.
3. Start painting your Easter egg. We suggest you decorate the shell with rowan bunches. Dip a poke (cotton swab) in red paint and, applying it in perpendicular movements to the shell, draw 10-15 large berries that form a bunch.
4. The second element of our Easter egg painting will be rowan leaves. First, with a cotton swab, draw with green paint the lines - the base of the leaves. To liven up the painting, apply a thicker brush stroke over each green line with a thin brush.
5. Yellow strokes made on the leaves with a thin brush will liven up the painting even more, make it more voluminous.
6. Draw highlights on the berries and leaves by applying a few white strokes with a brush or cotton swab.
7. Add some black dots to the base of the berries to create contrast.
8. After the painting on the Easter egg is dry, cover it with furniture varnish. A boiled egg can be treated for shine with vegetable oil using a cotton pad.

Easter egg painting with wax
Easter eggs painted with wax are called Easter eggs. This technique is traditionally popular in Ukraine and allows you to create both simple souvenirs and genuine artistic masterpieces.
To paint eggs using a wax technique, you will need:
- a raw egg;
- scribbler - a device for applying hot wax to the shell. The scribe can be done independently by twisting a small piece of foil into a funnel and fixing it on wooden stick... Wax is placed in the foil, heated over a flame to a liquid state and applied to the shell through a hole in the funnel;
- candle;
- vinegar;
- cotton pads.
Working process:
1. From a raw egg at room temperature (not cold!) Remove the contents through the small holes at the bottom and top. Wipe the shell with a cotton pad dipped in vinegar.
2. Prepare dye for eggs - it can be natural or artificial dye.
4. Immerse the scribe in the melted wax and once again heat the contents of the funnel over the flame.
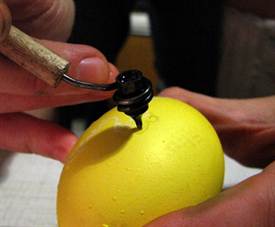
5. Apply the wax by rotating the egg, but not moving the scribblers.
6. After the wax has set, dip the egg in the dye and let the paint dry.
7. While heating the wax painting over the candle flame, gradually remove the wax mark from the shell surface with a woolen cloth. The spots where the wax has been applied will remain unpainted, and you will have a light ornament on a colored background.

Working with a scribbler

The traditional color of Easter eggs is red


The Easter egg is a model of the world, so eggs are often painted with belts.
(heaven, earth and the underworld) and draw animals and plants on them

On the mural - birds, flowers and ornaments with waves

Color and variety of styles

And this is how Lusatian painting Easter eggs with wax looks like
Easter egg painting engraving
Easter eggs painted in this original technique are called "shkryabankas". To create a painting-engraving you will need:
- chicken, duck or ostrich eggs, peeled from the contents;
- a sharp and thin engraving tool, such as a stationery knife;
- paint for Easter eggs.
Working process:
1. Dye the eggs of your choice using natural or artificial dye.
2. Dry the shells within 24 hours so that the dye hardens well.
3. Using a sharp tool, "scrape" the eggshell the selected ornament (you can use a stencil).


Modern shkryabanki

Even a simple shkryabanka can be performed masterly
Ornaments for painting eggs
Browse through our selection of Easter egg ornaments - perhaps one of them will inspire you to experiment.

Simple pattern for bonding painting and painting with traditional solstice

Traditional painting

Ornament "Intercessor"


By the way, you can decorate not only ordinary chicken eggs, but also wooden models- they definitely won't crack, and especially beautiful drawing can be saved for years.
If your family has a tradition of exchanging Easter souvenirs, make Easter eggs with beads.


Easter eggs, specks, krashanki are eggs painted for Easter different ways... Modern housewives usually just boil eggs in food coloring and use special films with pictures; when boiling water gets on them, they tightly envelop the egg. In this article, we will look at the old traditions of painting Easter eggs with our own hands, a master class on painting wooden blanks with paints is attached.
We paint with wax
To start painting eggs with hot wax, you need to prepare materials and tools, as well as come up with a pattern design. Basically, Easter eggs are raw eggs painted with lines and abstract patterns. Sometimes the contents of the egg are blown out of the holes.

So, for work we need eggs, wax or paraffin candles, napkins, food colors diluted in water in advance, and a scribble tool, which is sold by handicraft stores. It is a metal funnel with a handle.
Wax is put in this funnel and drowned over a candle fire. Actually, in this way we will apply the pattern with wax from this watering can.

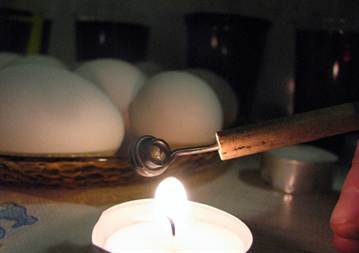
The eggs need to be rinsed, dried and wiped with alcohol on the surface, each time we warm up the watering can, because the wax tends to cool quickly.
After drawing the main lines, we lower the egg in one of the colors, take it out after a couple of minutes and continue to apply additional patterns. And again we put it in the paint, but in a different color.

In order for the drawing to show itself now, you need to hold the egg over the flame of a candle and wipe it with a napkin.
Another way to color eggs for Easter is with colored wax crayons. You can buy them at a stationery store. Crayons are melted in metal containers and colored pictures are applied with an inverted needle or other stick.
Continuous lines are unlikely to work out, but making petals and spikelets is quite realistic with dot painting.


If you are using empty eggs, satin ribbons can be threaded through the holes at the bottom and top and can now be hung or rolled into pretty bows. Although, in fact, Easter eggs can be boiled, dyed and then painted.
Easter souvenirs
Coloring eggs is an interesting creative activity for children as in kindergarten and at home. For novice artists, you can paint with gouache paints, and after emptying the eggs. To do this, a hole is made in the upper and lower parts with an awl and the contents are blown out, the holes, if desired, can be sealed with a small piece of masking tape or covered with dough. Or, if you have a medical syringe, use it to retrieve the contents. You can apply a pattern to the eggs.


To work with drawings, you can connect markers and felt-tip pens for contouring.


Experienced craftsmen are also engaged in painting wooden eggs, original souvenir eggs are created with acrylic paints, which can be presented to loved ones or sold.
Let us consider the painting technique in detail using the example of one of the works.
Step 1. Prepare materials and tools.
We will need - an egg blank made of wood, sandpaper, acrylic paints (you can also paint with gouache), brushes, preferably synthetic, for working with acrylic. The rest, if necessary - napkins, pencils and protective newspapers, decoupage varnish.
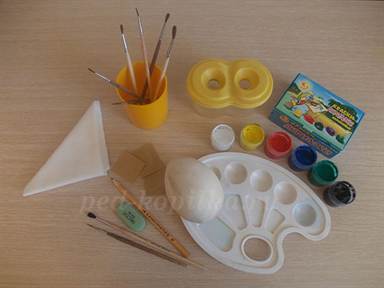
Step 2. Preparation of the workpiece for work consists in cleaning the wooden surface with sandpaper. Usually wooden surfaces before painting, it should be coated with either an acrylic primer or a homemade solution of PVA glue and water in equal parts and cleaned. You can use a construction sanding sponge instead of sanding paper.


Step 3. Apply the first layer of paint with a wide brush over the entire surface and let it dry, make a sketch with a pencil and apply the details of the drawing with thin brushes, as shown in the photo.


Ideas for painting
Eggs in traditional folk painting are made in several layers. To draw berries, flowers and birds in the style of Gorodets painting, the background is first applied, then the first layers of the spot are drawn, which determine the positions of the main parts, while making the tone lighter. With the second layer, draw dark details with thin strokes that create the shape of flowers or leaves. And at the end, highlights are drawn with white and yellow paints. At the end of the work, they are varnished.
 Fujifilm X-T1 - Full Review
 Lenses sony sel. Sony lenses rating. Which Sony lens to buy
 Canon PowerShot Pro1 - quality that ends quickly Canon PowerShot G5 X highlights