Make the stamp on the document blue. Insert signature. Hard: printing from photopolymer
Quite often, the question pops up about how to insert a stamp and signature in a pdf. To solve this problem, you can use a special tool called "Stamp", which is available in Adobe Acrobat. The print in this case will be applied to the PDF document without any additional manipulation in an instant.
It should be noted that the image in the form of a seal or signature can be created independently or selected from a list of predefined ones. In general, printing a PDF document is not as difficult as it seems at first glance. In addition, it is possible to create a dynamic stamp that will receive all the necessary information from a personal computer and the "Personal Information" panel, which is located in a dialog box called "Preferences". This gives the user an excellent opportunity to specify not only the name of the seal, but also its date and time of affixing. The tool itself is usually displayed in a panel called Annotation.
- To solve the problem related to how to insert a print in pdf, you should open "Comments" and go to "Annotations".
- Click on "Stamps" and among the list of items shown, click on "Show palette ...".
- To insert the desired option into a pdf document, you should click on the tool of the same name, and in the palette that opens, select a specific category, and then the stamp itself.
- Click on the page of the document where you want to place the image as a print. You can also drag the rectangular area with the mouse pointer in order to determine where the future print will be placed and what size it will be.
- In the event that you did not specify a specific name in the parameters with personal information, in this case, a dialog box with personal information settings will appear in front of you, where you should enter any name you are interested in.
If you want to change the appearance and location of the image, then for this you need to do one of the following, using a tool called "Hand" or "Selection":
- To move the supplied seal, simply use one of the above tools and drag it to a new location.
- To delete the just placed image as a print, right-click on it and click on "Delete".
- To resize the stamp, click on it, then drag the handle that appears on the corner.
- To change the color of the note that pops up near the stamp or the value of its opacity, right-click on it, and then select "Properties". Go to the " Appearance”And set the required values.
If you liked one of the stamps and decided to add it to the favorites list, then first select the stamp mark with the help of "Hand" / "Selection". After that, click on the "Stamp" tool in the "Annotations" panel and click on the item that implies adding the current stamp to the list of favorites.
How do I create a stamp?
If a suitable stamp in the form of a seal is among those loaded in Adobe program There are no Acrobat files, you can create it yourself. To do this, you just need to insert it. In addition, the inserted seal will have all the same characteristics as other stamps.
First, find a suitable seal on one of the electronic documents, and then solve the problem of how to cut it out - use any graphic editor for this. Or you can download any suitable stamps from thematic web resources for free. If the print file is already ready, then follow these steps:
- Open the "Annotations" panel, then go to "Stamps" and click on the item that opens the palette with stamps.
- Click on "Import", then select "File".
- Then you just need to select in the menu or enter your own category, assigning a name to the added seal. After that click on "Ok".
Insert a seal and signature using a special program
In addition to all of the above, it should be added that to add printing to a PDF file, you can download and install the PDFSign software. In this case, it will be enough for you to open the required file, click on the add seal / signature button and place it in the desired place. Thus, printing with such software is added in a few clicks. The advantages of this program are the quick signing of documents, the ability to save in PDF-format, print the document from the software itself and work with any images where there is the possibility of scaling.
Applying a stamp and signature using a virtual printer
Another easy way to put a stamp on a document and save it in PDF format is.
So, suppose you have a contract typed in Word, which you need to sign, convert to PDF and send by e-mail.
- We scan the document from which we are in graphic editor cut out the area with the signature
- Insert the cut image into our contract and adjust its size
- We press the print of the document and select the virtual printer as the printer, which must be installed in advance
- Choosing a place on the disk to save the PDF of the contract
A handwritten signature gives your document a personal touch. You can scan your signature, save it as a drawing, and then paste it into documents.
It is also possible in the place where you will need to sign.
Create and insert a handwritten signature
Adding typewritten text to a signature
If you need to make part of the signature a position, phone number, address Email or other information, save it with the image as auto text.

Insert signature line
To add a signature line to the document with an X to indicate where to sign, use the command Signature line.

A handwritten signature gives your document a personal touch. You can scan your signature, save it as a drawing, and then paste it into Word documents.
Scan and insert a drawing of a handwritten signature
You need a scanner to complete the steps below.

Adding text to a reusable signature
If you want to include your title, phone number, email address, or other information in your signature, save it with the image as an autotext.

How to add a seal, signature and logo to the printed form of an invoice for payment to the buyer (for 1C: Accounting 8.3, revision 3.0)
2018-07-27T09: 42: 51 + 00: 00Often organizations are asked to embed a logo and signature stamp directly into the customer's invoice. This makes the bill look more solid and representative. Facsimile printing on the account is not prohibited regulations and therefore many take advantage of this opportunity.
Today I will tell you how to make a similar setting for 1C: Accounting 8.3 (revision 3.0) on your own, without the help of a programmer.
Setting up the seal, signature and logo
So, go to the "Main" section and select the "Organizations" item:
We open the card of our organization and open the item "Logo and seal":

Immediately after that, we will be asked to indicate the image that we want to use as our logo. You need to prepare a file with such a picture in advance (order from a designer) or find something suitable on the Internet.
For our experiments, I took the 1C logo:
![]()
In general, any picture in the formats (png, jpg, bmp) is suitable.
The logo was inserted into the field and displayed on the form, great!

Let's start making facsimile stamps and signatures. To do this, click on the "Instructions" How to create a facsimile signature and seal "":

Let's print and follow the instructions on the printed sheet:

After that, we will have at our disposal 3 pictures in one of the formats (png, jpg, bmp) with a seal and signatures, in my case they look like this:


We see that pictures with seals and signatures have been substituted and displayed on the form. Press the button "Save and close" in the organization card:

Finally, go to some invoice for payment to the buyer and press the button "Print" -> "Invoice (with stamp and signatures)":

A printable invoice form with a logo, seal and signatures has appeared:

If the pictures with stamps and signatures are too small, scan the sheet again at a higher resolution.
We are great, this seems to be all
But what if we want the seal to fit into the signature?
Not everyone needs this, and apparently that's why 1C made the default option with a separate location for the signature and seal.
For those who need to combine them, the instructions are below.
We combine the seal and signature of the head
To do this, go to any account and form a regular printable form (without seals and signatures):

It will turn out like this:

Then we cut off along the bold line at the bottom (before the signatures and the seal) and scan the bottom part and save it as a picture on the desktop.
I got it like this (the seal and signature are invented):
Go to the organization's card again, the "Logo and Printing" section.
Here we delete the pictures with the signatures of the manager and the accountant, and instead of the old print picture we load the one we just made. big picture combining seal and signature:

We press the button "Save and close" in the card of the organization, and then we form a printed form of any invoice together with the seal and signatures:

In the opened printed form from the item "More" select the command "Change layout ...":

In the opened layout, go almost to the very bottom (about 90th lines) and select the invisible square below the heading:

Our task is to drag this square slightly higher (determined experimentally) than the heading and stretch it to the full width of the printing plate, like this:

Don't change anything else! Press the button "Save and close", the printed form of the invoice will be reshaped automatically:

Exactly what we wanted happened - the seal got into the signature.
We are great again
By the way, for new lessons ...
Change in BP version 3.0.64.34
Now, having set up the signature and seal in the organization, we still have to select the "Invoice for payment" item in the invoice, and already in the printed form, put the "Signature and seal" checkbox:

You need to put it once. Its value is retained between calls to the printable.
Supplement from the site reader... If the invoice form was - field
does not appear with a daw - it is necessary
Now I will show you with a simple example you can quickly create a round stamp in Microsoft Word. I won't show you how to create a rectangular stamp, since it's even easier. In the process, the usual previously studied Word tools will be used, but in a slightly different way.
To make fewer questions while reading the article, I highly recommend that you first read about the general principles of working with pictures and other non-text objects in Word. The fact is that when creating seals, this will also come in handy.
It is also worth noting that this article is not intended for you to learn how to make "fake" printing using the common office program... This is just a demonstration of the possibilities. By the way, sometimes it is required to apply a facsimile signature or seal in 1C to a document, and there is standard functionality for this.
An example of a round stamp created in Word
The result of all operations is shown below in the form of a picture. The created "seal" is, of course, very primitive, but the principle demonstrates. Let me remind you that if you want to make something more difficult, then you need to spend much more time, and on your own. You shouldn't hope that the Internet has exactly what you need - I have already spoken about the consequences of such an attitude to work.
website_Any round stamp has a border, text in a circle, text or a picture in the center. Here are the possible options, one of which is shown in the picture. It is easy to do this, but it is worth considering one peculiarity.
The main difficulties in creating a round stamp in Word
The main "difficulty" is that you do not know how to make the text in a circle. It is because of this that they got on the Internet to solve such a primitive task. Have you guessed? This is most likely the case.
It speaks only of poor knowledge of Word, nothing else. Let's see how to make the text in a circle and so on.
There was an important part of the article, but without JavaScript it is not visible!
How to make a round stamp in Word yourself
I will not explain how to make a rim and a picture in the center. This is an autoshape and a regular image from an external file - everything is simple here. Curved text, on the other hand, is done using the properties of the Label object. First, add an inscription to the sheet and write the text inside. It is better to write the entire text at once, at least the one that forms one circle inside the "seal". This is because it is more convenient to adjust the curvature of the text this way.
Next, select the Lettering and in the Ribbon menu, open the Format tab that appears, look for "Text Effects" there, and in them - "Transform / Circle". That, in fact, is the whole trick with the text curved in a circle. There, if you wish, you can select any type of text distortion.
If the "circle" distortion option is selected, then you also need to select the size of the inscription and the font so that the curvature of the text coincides with the curvature of the "print" rim, otherwise the text will not go exactly along the rim, but will go to the side. All other operations are clear and without comment.
Let's sum up
In this way, you can create a round stamp in Word. It is worth noting that when printing on a black and white printer, all colors are converted to grayscale. Also instead of laser printer for prints, it is better to use inkjet (remember why?) or print to a file and take it to where there is a color printer.
I also remind you once again that this is just a demonstration of the program's capabilities. It is also worth noting that there are special programs for creating round pictures (not necessarily stamps / seals, but the principle is similar) - they are much more convenient to use (for example, there is a program for printing on CD / DVD disks). Again, the 1C program has stamps on documents.
Elba users had a dream - to insert images of seals and signatures into invoices, acts, invoices and other serious documents. Why not please the dreamers, we thought. Looking around, we realized that usually in such cases all the dirty work is blamed on the user (well, you know: “the picture should be 300 by 400 pixels, with high contrast, good resolution and a perfectly white background”). But judging by the experience of our team, which happens to be in the call center, even a simple download of an image from a camera plunges users into a deep depression, and they have to be rescued in god-like ways, a la "insert a picture into Word". Of course, there can be no question of forcing users to clean stamps in Photoshop - let them take pictures as they can, and Elba will do the rest for them!
If you're wondering what you need to do with a photo taken with a phone or a soap dish to get a clear seal and signature with transparent background- read on.
Actually, we have made not one, but as many as three methods of processing seals and signatures. This is not from a good life - some images are better cleaned in one way, some in another. We use all three in parallel, and then let the user choose:

Method one: scientific approach
Any picture can be considered as a collection of points, each of which has a specific color. Based on this, our task looks very simple - take only those points that are part of the seal or signature.The idea looks like this: in some way turn the original image into a black and white image (background - black, print - white), then intersect the set of all white points (mask) with the original image. Those parts of the original image that coincide in coordinates with the white dots are considered as print. In more detail: 
Here's what happens when you apply this as a mask to the original print:

Everything that is far enough from the elements of the image, we threw out, and this, of course, is a success. But we haven't removed background details close to the print. This happened because the color of the background near the image did not differ enough from the picture itself (the photo was of poor quality, unevenly illuminated, etc.) and during our coarsening these areas were not assigned to the background. A very simple step immediately suggests itself - we will maximize the difference between the print and the areas of the background near the print. It's very simple to do this: increase the contrast. To do this, let's run the original photo through anti-aliasing and HistogramEqualization:

As a result, the background far from the print became the same color as the print, but we don't give a damn, we have learned to discard it and work only with background areas close to the picture. Then it's a matter of technology, there will be no new ideas: gray, inverted, roughened.


So, we know how to clean everything except the garbage around the print, and have already seen what the result will be. We just learned how to clean up the garbage around the print well, now we will apply what we got to our first result:

Not bad already. It is clear that you need to blur a little, raise the contrast, make the background transparent, etc.
True, we discovered a problem with high-resolution photos (the race for camera megapixels, alas, did not spare the owners of phones) - wide (10, and sometimes even 100 pixels) print lines began to disintegrate as a result of searching for edges into two separate strokes.To eliminate such minor troubles, you can use a closing (closing). In our case, snapping will lead to the fact that all areas of the background between paired strokes will be blurred, but only if the distance between strokes is not too great. Here's an example of how closures work from the AForge.Closing filter documentation:
It can be seen that the closure cannot cover up cavities larger than several pixels in a row. And the size of the cavity depends on the resolution with which the seal was photographed.
It would seem - well, let's bring the resolution in line with what we need (we will stupidly establish a specific value experimentally). However, the problem is that people can (and love) photograph prints with huge white margins.
After compressing the picture to “ optimal size”, We will get a tiny stamp in the corner of the photo at the exit.
As a result, we decided not to bother and run the algorithm 2 times. The first time we will remove large debris (and, possibly, small parts of the print), and also understand where the print is in the picture. After that, we again take the original picture, cut out the now known place with the print, scale it to the right size and again we run the background cleaning algorithm.


It seemed that the goal was achieved, but when we started taking examples of seals and signatures from the Internet, we faced a new problem. If for most stamps our algorithm worked quite well, then with captions everything was much worse: the level of contrast of photos was sometimes such that the search for edges simply lost half of the lines, and lowering the bar for searching is also dangerous - we risk getting a bunch of "garbage" in the bargain.
Method Two: The Great Invention of the Bicycle
We decided, why do we need these searches for the edges and other bells and whistles? After all, a signature is a very simple thing: a few lines drawn with a dark pen on light paper.At first glance, it is not a great science to separate the dark from the light. To begin with, the algorithm, codenamed "who is not with us, is against us" looked very simple: we go through all the points in a row that have a higher brightness than the gray color, write them into the "background" and destroy them. We leave everything that is darker, for the "handle".
They drove away at the first signature that came across - hurray, cool processing!


Drove to the second - a complete fail.


For some reason, the interface designers did not approve of the first thought - to write on the download form “take a more contrast, guys” and score it. I had to turn on my brain. We figured that since it works on some pictures, but not on others, you just need to normalize the pictures a little yourself. We took a photo, walked through all the points, built the simplest histogram: it is commonplace for each of the 256 possible brightness to calculate the number of points of this same brightness. We found the minimum brightness, then the maximum one, chose a point “somewhere in the middle” and cut out the background.

Hurray, we said and started looking for examples of thrash signatures with joy. Well, to find as much evidence as possible of how great we are. Life, as always, turned out to be more interesting: literally on the second photo, a tough file was waiting for us again! No matter how we chose that very point “somewhere in the middle,” either the background remained in the corner, or part of the signature disappeared.


Looking doomedly at the result, they opened the original and began to think.
In general, there was no puzzle, just the light lay down so that the background on one edge of the photo was darker than the pen on the other (as it turned out later, this is real life happens quite often). Obviously, in this situation, the desired point simply does not exist.
At the word "local" they sharply revived and decided: since it is impossible to select a point like "the handle is darker, the background is lighter" for the whole picture, then we will try to do it on a part of the image!
We split it into rectangles (experimentally we were arranged with a 10x10 grid) and applied the algorithm to each cell separately. Everything would be fine, but some of the cells were filled exclusively with the background. It's already easier here - since there is nothing besides the background, it means that the local contrast is extremely low. This means that the brightest point and the darkest point in the histogram are very close.
It seems to have worked out.


We take a separate cell, build a histogram on it, look at the left edge (minimum brightness) and the right edge (maximum brightness). Then we take the delta, which is the contrast. If the contrast is less than a certain value (at least, it is calculated based on the overall contrast of the picture), then we consider the entire cell as a background and throw out the excess. If the contrast is greater, we define the point of "separation" and cut off everything that is brighter.
Method three, final
Two options seemed a little to us, we decided to add a third - a simple processing of "almost perfect" photos, in which the entire background is white (well, or almost white). To do this, we knocked out all pixels lighter than 95% of the maximum brightness and cut off the fields.As a result, as we said at the beginning, the user chooses one of three options. In case none of the options came up (which is extremely rare), we show
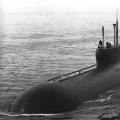 The fastest boat in the world!
 The history of the Off-White brand
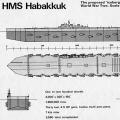 Habakkuk: how the British tried to build an aircraft carrier from ice Why the project was curtailed