We fight noise. Photoshop tutorial. Photoshop Tutorial - Get Rid of Digital Noise in Photos Applying Noise on a Separate Layer in Photoshop
Instructions
Most The best way the fight against noise is the prevention of its appearance. Noise in images occurs in low light conditions, in which the camera or photographer is forced to raise the ISO values very much. Already at ISO 400, extraneous artifacts appear in the photos, but if the ISO is raised to 800 or even 1600, you cannot avoid noise in the photo. Blurry clumsy spots greatly affect the quality of the picture, they can be done both with special filters and with the tools originally built into the Photoshop editor.
For clarity, we will not be with the whole image, but only with a small part of it, where multi-colored noise is perfectly visible. The most in a simple way getting rid of it will be a filter specially designed for this purpose. We move through the menu items as follows Filter - Noise - Reduce Noise. With a filter, a preview function is available, so you can set the parameters at your discretion, focusing on the resulting result. This method is the most famous and common, but there are other options.

Convert the image from RGB space to LAB Color. This is done easily Image - Mode –Lab Color. In the layers palette go to the Channels tab, there you will see the Lab, Lightness, a and b channels. Apply Gaussian Blur to both last channels. Filter - Blur - Gaussian Blur. The value of the filter parameters will depend on the size of the original image. After blurring both channels in this way, return the photo to its original color space Image - Mode - RGB Color. The result will be something like this

If the noises are so strong that none of the above options can cope with them, then you can make a knight's move, namely, discolor the photo. Desaturating the photo will discolor and noise, which means it will become less noticeable. A little grain can add a stylized effect to the photo.

But such photos are not always obtained, to put it mildly, and sometimes there are cases when he saw something out of the corner of his eye and reacted immediately. And only then I realized that the frame was somehow spoiled. I did not set the exposure correctly, nor the aperture, except that the photo is in focus and that is good. As a result, the photo is either underexposed or overexposed. But this photo is one, there are no repetitions and I do not want to delete. And if in cases with an underexposed photo it can somehow be saved, then with an underexposed photo they start serious problems... In particular, terrible digital noise comes out when converting. Here I will show you how to deal with him. I will say right away that there are a lot of methods of dealing with noise, and my method is not the only one, let alone the truth in the highest instance. I just share it. What if it comes in handy?
So, I'll tell you howI get rid of noise in photos. For an illustrative example, I deliberately took an underexposed photo. Well, let's get started?
So, there is such a photo:
After conversion, we get this picture with terrible noise:

Step 1. Duplicate the layer in any known way.
Step 2. Here I must say that there are an incredible number of noise canceling filters. I personally use two. Noise Ninja and Imagenomic noiseware Professional. Why exactly these two? Because I like them. I will not say here how each filter works, otherwise I will read this text to you until the morning. On the Internet, you can find a lot of information about the algorithm of their work.
So, step two. It is necessary to find out on which channel, and there are three of them in the RGB color space, there is more noise. In my case, there is a lot of noise on the red and blue channels.

Step 3. Open the Noise Ninja filter, select the red channel in the settings, set the desired settings. Exactly what numbers I am not talking about, since each photo has its own settings. And press OK.


I repeat the same steps, but select the blue channel. At the output, I get the following picture:

Slightly smudged, lost skin texture. But that's okay. We will return everything later.
Step 4. I open the Noiseware Professional filter and set the settings as in the screenshot. I repeat, the settings are individual for each photo.


At the exit, I get an even more blurry photo. But we are not afraid grey Wolf and we move on.

Now comes the fun part. The picture has blurred, but there is still noise. So what to do? For many years of working with photographs, I have tried a bunch of all sorts of methods and came to the conclusion that once and for all this rest of the noise removes the blur. There are several options for blurring in Photoshop, but I chose Gaussian blur. And there is a little nuance here. If you blur a photo, then it will be simply unrealistic to restore clarity and texture to it. Therefore, I am cunning. I blur selectively. There is a very famous and easy way to get rid of the raster on the scans of magazines. This is what I use for my own selfish purposes. I'll tell you step by step what I'm doing.
Step 5. Create new document 8x8 pixels:

Step 6. Select the Rectangular Marquee Tool in the toolbar and set the settings as in the screenshot:

Step 7. Make a selection on a transparent layer, go to Edit-Stroke:

Step 8. I set the settings as in the screenshot and press OK:

Step 9. I go to Edit-Define Pattern and press OK.

Step 10. Returning to our photo. Create a new layer and fill it with the created pattern:

Step 11. On the layer with the pattern, press CTRL + click. Make active the layer with the photo and press CTRL + J. Delete the pattern layer. We don't need him anymore. As a result, I have a transparent layer like in the screenshot:

Step 12. Here I am blurring this layer according to Gaussian. Each photo has its own settings. I have 1.7

Step 13. Merge the layers by pressing CTRL + ALT + SHIFT + E. I delete the layer that I blurred and start jewelry work. It consists in the fact that I create a layer mask on the resulting merged file and carefully mask those places that are responsible for the sharpness of the photo. Namely, wrinkles, pupils, eyelashes, etc. I deliberately did everything with a mouse, not a tablet, so that it was clear that for this jewelry it was not necessary to have a tablet at hand.

Step 14. So, we have dealt with the noise. It remains to bring back the sharpness of the photo. Merge all layers with the key combination CTRL + ALT + SHIFT + E... Duplicate and sharpen in any known way. I am doing unsharp mask. Add a layer mask, change the blending mode of the layer to Soft Light, reduce the opacity of the layer to 50-30 and carry out another jewelry work, but already to remove the noise that blew through in several places.

Step 15. Merge the layers in the same way. Duplicate. And sharp again. This time, I used High Pass to reveal the lost wrinkles. Create a layer mask, change the blending mode of the layer to Overlay, reduce the opacity of the layer to 50 and again do some jewelry work to remove the noise that has come out.

Step 16. Merge all layers, add some contrast and voila - the photo is ready.

This method is quite laborious, but the result is worth it. I wish everyone to create such photos so that no methods need to be used, but still I hope that this lesson will be useful to someone.
Noise can spoil the most beautiful photo, which is why it is so important to be able to clean it up programmatically. By means of Photoshop, you can significantly improve a noisy photo by increasing its quality with the help of special filters.
In the photo taken as an example, the background noise is visible only when zooming in, however, it spoils the impression of the work. Let's try to fix this using the standard filter of the program.

Go to Filter> Noise> Reduce Noise and set the values in the dialog box that opens. For this image, the settings are as follows:

As a result, the color noise is gone, and the overall image looks much better:

Even a very low quality photo can be corrected in Photoshop. An example of a photo with strong color noise, taken in low light:

Open the image in Camera Raw; to do this, select File> Open As and select the following format:

The first thing to do is to remove chromaticity noise, for this we go to the corresponding filter menu, marked with the icon of black triangles.


Set the luminosity to maximum, then adjust the Luminance Info parameter so that the image does not appear flat. After applying these settings, the preview shows that the photo has become blurry and has lost the definition of the outlines. Sharpness can be restored using the Sharpness Adjustment menu - adjust the position of the Effect and Radius levers until you get a satisfactory result.
Now you can evaluate the quality of the enhanced image using before and after photos.
In this Photoshop tutorial, we'll learn how to simulate film-like grain. Any version of Photoshop will work, but if you are working with Photoshop CS3 or later (we have Photoshop CS5), then thanks to Smart Filters, first introduced in Photoshop CS3, you will be able to adjust any parameter of the special effect at any time. If you have Photoshop CS2 or earlier, just skip the Smart Filters steps and you should be good to go.
In today's tutorial, we'll be using this frame:
Since the grain is very small, it may be difficult to see it in the screenshot, but here is at least roughly what you will get in the end (we enlarged part of the image to make it easier to see). Your photo will be larger and the grain will be more visible. We will tell you how you can adjust the special effect at the end of the lesson:

Let's start!
Step 1: Add a new layer, fill it with 50% gray, and set the mode Overlay
Let's first create a new layer in our Photoshop document, which will contain the grain that simulates film, so as not to damage the original image. Usually for this we just click on the icon New layer in the lower part layer panels, and Photoshop creates a new empty layer, but in this case we need to fill it with gray and change the blending mode, so we will do all this at the same time using the dialog box New Layer. Click on the icon New layer , holding Alt (Win) / Option (Mac):

Photoshop will display a dialog box with options for creating a new layer before adding it. In the upper part of the window, set the name of the new layer Film grain , then change the blending mode to Overlay and just below we select the option Fill with Overlay - neutral color (50% gray), by putting a tick in the box:

When finished, press OK, and the dialog box closes. You will feel that nothing has changed, but in the Layers panel, you will notice that Photoshop has added a new layer. Film grain, positioning it above the original layer BackgroundLayer. Blending mode selected Overlay, on the thumbnail layer, to the left of its name, you can see that it is filled with 50% gray (this shade of gray is exactly halfway between black and white). We do not see this gray in the document, because thanks to the blend mode Overlay this gray is now transparent:

Step 2: transform the layer New layer to smart object
If you are using Photoshop CS2 or earlier, you can skip this step. If you have Photoshop CS3 or later, click on the small menu icon located in the upper right corner of the layers panel:

In the menu that appears, select Convert to Smart Object :

Again, nothing seems to have changed, but in the lower right corner of the layer thumbnail Film grain an icon has appeared, symbolizing that the layer is now a smart object. This means that all filters of this layer will become smart filters, and, as we will see later, until the very end of the work, we will be able to make adjustments to them:

Step 3: add noise with a filter Add Noise
From the menu at the top of the screen, select Filter , then Noise , then Add Noise :

The filter dialog will appear Add Noise... The noise we add will become grain. To increase the amount of noise, move the slider Amount . Usually the value 10 % but it's still best to follow the image to find the best metric for your photo. Check if options are selected Gaussian and Monochromatic at the bottom of the dialog:

When finished, press OK, and a dialog box Add Noise will close. We've zoomed in on our image to make the added noise more visible:

If in step 2 you turned the layer Film grain into a smart object, in the layers panel below it you will see a filter Add Noise in the list of smart filters. We'll come back to this shortly:

Step 4: apply the filter Gaussian Blur
Now the noise seems harsh and doesn't look like film grain, so let's soften it with a slight blur. At the top of the screen, select again Filter, then Blur , then Gaussian Blur :

Open up Filter> Blur> Gaussian Blur
At the bottom of the dialog, set the value Radius near 0.5 pixels... This should be enough to make the noise softer, but not "float":

By clicking OK, close the dialog. Ready! We created the grain as in the film photo:
Adjustment
If the grain seems to be too conspicuous for you, one of the adjustment options is to lower the layer's opacity. Film grain... Option Opacity located in the upper right corner of the Layers panel. The lower the value, the more the original image will show through:

Another option is to change the blending mode of the layer. Film grain layer with Overlay on the Soft light , this is a less contrasting blending option than Overlay:

If you change the blending mode to Soft Light, the grain will also become less intense
Finally, if you are using Photoshop CS3 or a later version and, as we have shown, have made all filters smart filters, at any time you can return to their dialog box and adjust the special effect without losing quality. You will see a list of used filters in the layers panel under the layer. Film grain... Double clicking on the name of the filter will open the corresponding dialog box. For example, we will open the filter dialog Add Noise:
Double-clicking on the name of the Add Noise smart filter opens its dialog box
A window opens and Photoshop lets us adjust the value Amount, to reduce or increase the amount of noise. When finished, click OK, and the window closes. Smart Filters are a great addition to Photoshop, so if you're still using CS2 or earlier this is a good reason to consider changing it.

That's all!
Source - photoshopessentials.com
How to remove noise from a photo so that at the same time preserve small details and leave the maximum sharpness of the frame? The question is quite complex and very common. That is why many tools have been developed to combat noise in different programs and plugins.
The ideal solution to the problem of noise is to prevent it from occurring during the shooting process:
- ask the correct one;
- if possible, photograph in RAW format;
- compose the frame so that during processing it does not crop too much.
But if all the conditions were met during the shooting, and there is still noise ...
How to remove noise from a photo:
How to remove noise in Adobe Photoshop:
Before direct noise removal, in critical shots, in each channel, for a more subtle elimination. This allows you to retain more detail in the image and achieve better results.
Reduce Noise filter
In order to remove noise from photos in Photoshop, there is a special filter Filter - Noise - Reduce Noise (Filter - Noise - Remove Noise).
The dialog box presents two modes of filter operation:
Basic - Lets you set the parameters to remove noise from all channels in the same way.
Advanced - it becomes possible to configure the parameters of noise removal in each channel individually (Per Channel) and a setting similar to the Basic mode - (Overall) (Fig. 1).
 Rice. 1 - Reduce Noise Dialog Box
 The Strength parameter adjusts the amount of brightness (tonal) noise reduction in all channels.
The Preserve Details option allows you to preserve some of the image detail. But the higher the parameter value, the less noise is removed. The parameter value is determined empirically, depending on the original image and the Strength parameter.
Reduce Color Noise reduces the level of chromatic noise.
Sharpen Details allows you to sharpen the image.
The Remove JPEG Artifact checkbox masks the square portions of the image that result from JPEG compression.
 Rice. 2 - An example of the action of the Reduce Noise filter
 The filter can be applied multiple times to enhance the effect. Short command Ctrl + F.
Adobe Camera RAW Plugin
Adobe Camera RAW- a plug-in that allows you to process graphic files before opening them directly in Adobe Photoshop. It was specially designed for the RAW format, in which most professional digital cameras save photos.
If the original file is not in RAW format, but for example, JPEG, then Photoshop has a function that will allow you to open the image in Adobe Camera RAW File - Open As (File - Open as) - select Camera RAW - select the file - Open (Fig. 3 ).
 Rice. 3 - How to open a file in Camera RAW
 In order to remove noise from the photo, you need to go to the Detail tab (Fig. 4). In the Noise Reduction column, it is necessary to raise the Luminance to a level where the noise begins to disappear and lower it to a minimum Luminance Detail, followed by a rise to reveal small details. Likewise with Color , Color Detail.
The Luminance parameter adjusts the level of suppression of luminance noise.
The Luminance Detail parameter adjusts the noise reduction threshold. A small value gives a cleaner result, but details disappear with noise.
The Luminance Contrast parameter adjusts the brightness contrast on the edge between light and dark areas. Small values give a better result of noise suppression, but at the same time, less contrast, a more blurry image.
The Color parameter adjusts the level of suppression of chromatic noise.
The Color Detail parameter adjusts the chromatic noise suppression threshold.
 Rice. 4 - Detail tab. Example of Camera RAW Plugin Action
 It is also possible to remove noise in Photoshop Lightroom, it has an intuitive interface, which is built by analogy with the plug-in Adobe Camera RAW.
As you can see from the examples above, the Adobe Camera RAW plug-in does a better job of suppressing digital noise than the Reduce Noise filter. Also among the advantages of Camera RAW:
- non-destructive image processing;
- synchronization of settings among pictures taken under the same conditions to increase processing productivity;
- performance (Photoshop has not been loaded yet);
- intuitive interface.
Noise reduction plugins
To suppress noise, in addition to Adobe Photoshop, other programs and plugins are also used (most often RAW converters). They can be both paid and free.
Photoshop plugins: Adobe Camera RAW, Topaz DeNoise, Neat Image, Grain Surgery, Noise Ninja.
RAW converters(standalone programs): Adobe Lightroom, Capture One, Bibble (Corel), Apple Aperture (Mac OS X only).
 Fujifilm X-T1 - Full Review
 Lenses sony sel. Sony lenses rating. Which Sony lens to buy
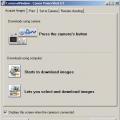 Canon PowerShot Pro1 - quality that ends quickly Canon PowerShot G5 X highlights