Ideas for flash presentation. Four easy ways to create stunning Flash presentations. Create playback controls
Many marketers use desktop applications such as PowerPoint to create videos and presentations. However, they do not like to experiment with animation and prefer to do everything the old fashioned way.
Perhaps this is due to the likelihood of technical problems. However, animated presentations are much more engaging than classic ones, making it easier to convey complex concepts. Another plus is that they are better remembered.
To create animated videos and presentations, you don't need to own professional programs such as 3D Studio Max, Maya or Adobe After Effects. It is much easier to use straightforward online services.
The presentations created in them are easy to share online, they can also be downloaded as a video file that can be played without problems on any computers and mobile devices.
How to make a video presentation fun and effective, we talk about in the article ““.
Below, we highlight the 5 best online services for creating animated presentations.
1. GOANIMATE
It doesn't matter if you are confident using your computer or are still getting lost at the sight of the Windows navigation menu. If you know how to use a mouse and keyboard, then easily create a professional animated presentation in GoAnimate.
This service allows you to create videos using ready-made templates, background music and animated characters.
GoAnimate is a lot like PowerPoint. The tool can be used to create short videos, marketing demos, videos for YouTube channel and of course animated presentations with interesting characters and branding elements.
https://youtu.be/9S3FlqB4-gs
Finished projects can be downloaded, uploaded to YouTube or another program for preparing presentations. To use GoAnimate, you need to subscribe to a paid subscription for at least a month. A free demo version for 14 days is also available.
2. WIDEO

Create slides
Creating slides where images (photos) simply replace each other after a certain period of time is the easiest thing to create in Adobe Flash.Example 1:
Let's create a new project.
Let's apply the Time-lapse animation method.
Import the 1st photo (menu File - Import).
When you set a photo on a stage, a keyframe is automatically created in the 1st frame.
We will set aside 30 frames (approximately 1 sec) for each photo to be demonstrated.
Select the 30th frame, transform it into a keyframe - at the 30th frame we should have a new photo.
Import the 2nd photo, set it up on stage.
Similarly, after 30 frames we place the appearance of the 3rd and 4th photos.
The timeline (Timeline) will look like:
It can be seen that when creating simple slides, one layer is involved.
Example 2:
Let's create more complex slides using multiple layers.
1. Let's create a new project.
2. Import and paste the 1st photo into the scene.
A keyframe is automatically created in the 1st frame.
Let's transform the photo into a graphic symbol (see Symbols).
Select the photo on the scene, in the context menu select "Create Motion Tween" (Create Motion Tween).
Let's make the photo fade out (see Animating color and transparency). Set the animation duration to 50 frames.
Note: You can import multiple photos at once and arrange them by separate layers using the context menu command of any photo Distribute to Layers (Distribute to layers).
3. Create a new layer.
Import and paste the second photo on this layer (outside the scene - on cardboard).
Let's transform the photo into a graphic symbol. Create a motion tween - the photo appears from behind the curtains on the stage (see tweening in a straight line)
4. Create a new layer
Import and paste in the third photo (to the left of the scene).
Convert the photo into a clip symbol, create a motion tween - three-dimensional rotation (see. Animation of 3D rotation and movement)
You can add objects to your photography, such as text. To do this, create a new layer "Text" and paste your text. The text can also be animated (see Text).
5. Create a new layer
Import and paste the fourth photo into the scene.
Let's add an animated object (symbol) to the photo. Previously, we created an animation of a butterfly flapping its wings (see. Resize animation).
Paste a similar butterfly into the fourth photo by creating a new layer "Butterfly".
Thus, 6 layers have been created, each with 50 frames.

Now we need to put things in order in the order of appearance of photographs, their duration, as well as agree on the appearance of the text and the butterfly in the corresponding photographs.
All ordering operations are performed by dragging keyframes and frame ranges (see. Work with personnel).

Adding sound to slides
If you want, you can include background sound (music) in the slide show.
Import the sound file into the Library (see Import).
Note: Adobe Flash Professional comes with its own stock of sounds - from the Window menu choose Shared Libraries(Common Libraries)> Sounds.
Create a new layer. In the 1st frame of this layer, create a keyframe. Select the keyframe.
Click on the Name menu, click on the selected sound file to place that sound in the selected keyframe.
Open the Sync option menu and make sure the Event option is selected (the default option).
By default, every new sound added to the Timeline is set to Repeat and set to 1.
Press Ctrl + Enter (Windows) or Command + Return (Mac OS) to preview the animation in Flash Player.
Additional reference materials:
Last updated: December 2014
Learning to make games, presentations, etc. in Flash
What about what?
I have no doubt that you have probably seen a lot of banners (animated advertisements), Flash games on the Internet. As you might guess, all this is done in Flash.
What you need:
- A wish
- Straight arms
- Flash itself (starting from the 6th version)
The basics
General terminology
Below is a table providing an understanding of the terms that will be used below.
| Term | Title in editor | Description |
|---|---|---|
| Frame / Frame | Frame | It's just a shot. Frames are divided into Key frames and regular frames. |
| Key frame | Key frame | A frame containing any image or objects. From the sequence of keyframes, the animation is composed. |
| Timeline | Time scale | Top panel *. Contains all frames in the document. |
| Toolbar | Tools | The panel on the left. Contains tools for drawing and selection. |
| Action bar | Actions | The panel at the bottom. Contains an editor for Action Script code. |
| Parameters panel | Properties & Parameters | The panel at the bottom, below the action panel. Contains the properties of the selected object or document as a whole. |
| Script / Action script | Action Script | Flash movies programming language. Required for games and applications. It is also used to control the progress of the presentation. |
| Working field | The field that is in the center of the document when it is opened. Has a rectangular shape and the background color selected in the options bar. Determines the visible area of the document at the time of display. | |
| Preview | Preview | The debug mode of the document is necessary for viewing "what happened" and finding errors. Called by pressing the keyboard shortcut Ctrl + Enter |
Interface
A visual display of the listed in the table.
Creating a new project
- Subsequence:
- File ->
- New (New Flash Document)
- We will immediately save it under some name: to save, execute the keyboard shortcut Ctrl + S ( always save the file when making important changes, it is also recommended to keep backups)
Project created
Animation creation
- First, let's create a new project.
- Now let's take a look at a simple example of creating a stop-motion animation:
- select the tool "Brush" (Brush);
- draw something in the center of the work area;
- press F6 to create a new keyframe. New frame will appear on the timeline, and you will automatically move to it;
- as you can see, nothing has changed in the new frame. Select the "Selection Tool";
- select the object you have drawn with the tool, and then, holding the left mouse button, move it a short distance from the initial position;
- repeat steps 3, 4, and 6 until you are satisfied with the result;
- now, to see the work done, preview it by pressing Ctrl + Enter;
- watch :)
Conclusion: animation is just a sequence of keyframes, they are easy to create and easy to edit. It is not necessary to move the picture, you can also change it, i.e. paint something else, erase, change shape, color, etc. The content of any frame is completely at your disposal ... Attention! Your cartoon is limited only by your imagination!
Writing a script for a frame
- You probably noticed that when watching a cartoon, when the animation reaches the last frame, everything starts all over again? This is because, according to the standard, there is no "stop" command at the last block. So let's write it:
- go to the last frame by clicking on it with the mouse (on the timeline);
- now click on the action bar to expand it;
- write: stop ();- this will make the animation stop at the last frame;
- check it out by running the preview.
About "scripts in frames": commands written in this way will only work during the transition to the frame in which they are contained.
Creating a button
- Let's draw something in the center of the working area with a brush:
- on the toolbar (left) select "Brush" (Brush);
- in the center of the working area, draw something button-like.
- Now let's transform the resulting image into a button:
- highlight your drawing;
- press F8;
- in the window that opens, select "Button";
- click "OK".
The button is created!
Writing a script for a button
- The script will be assigned to the button (how to create it is written above):
- select your button (a blue frame should appear around it);
- go to the action bar;
- in the text input field enter:
- Let's analyze what is written here:
- on (press) // when the button is pressed (press in brackets means that the action will start the moment the button is pressed. But there are many other events, for example, release - if you put it instead of press, then the action will start when the button is pressed, and then they will release, i.e. when released);
- { // open parenthesis marks the beginning of the action list;
- stop (); // stop playback (if we wanted, on the contrary, to continue playback, then instead of stop (); would write play ();)
- } // close the action list.
As a result, when the button is pressed, the animation stops at the current frame.
List of basic commands (actions) to control playback
Create an interactive presentation
Create playback controls
Create a navigation bar for a presentation or cartoon
- For work we need:
- "Skip forward" button;
- Pause button;
- button "Next frame";
- Previous Frame button.
Where can I get them? Nowhere. We will do it ourselves - you and me.
Working process
- Draw some objects.
- Convert each object to a button as described above.
- Assign your action (script) to each button according to the sample.
- For the Next Frame and Previous Frame buttons, add the following actions: nextFrame ();(for the Next Frame button) and prevFrame ();(for the "Previous frame" button)
Moving the panel to a separate layer
If there is no animation or presentation frames yet
For convenience:
![]()
Locking a layer
- click on the "Lock Layer" button, as shown in the picture;
- add a new layer. It will host animation or slides of your presentation;
- on the timeline, click on the first frame of the new layer to go to it.
If you have already created your presentation or animation
- Select your entire panel with control buttons.
- Execute the keyboard shortcut Ctrl + X (to cut the panel for subsequent insertion).
- On the timeline, click on the first frame of the new layer to go to it.
- Add a new layer. It will host the control panel.
- Go to the first frame of the new layer.
- Execute the keyboard shortcut Ctrl + V (to paste the panel on a new layer).
- Now scroll through the frames in the timeline to the last frame of the animation / presentation.
- Select the frame of the new layer at the same position (as in the picture) and press F6.
Creation of flash presentations at a price of 30,000 rubles, like any other promotion, it is ultimately created to inform their potential clients about the services provided by the company and for making a profit. It directly depends on costs. Traditional advertising is a very expensive and costly pleasure without a guarantee of efficiency, therefore today electronic or computer visualizations take an increasingly important place in traditional marketing.
Low-cost multimedia development yields the most effective results. Compared to the traditional one posted on information platforms, it is a very democratic way to promote your product on the market, since it is available to almost everyone. This is a very beneficial and easy to use form; and at the same time, professionally performed work - for example, slide show design - can become a decisive argument in the competition for a leading position in the market. She works for the image of the company and the promotion of its brand. This happens when successful designs become business card organization or project, as well as when it decorates the participation of a customer in exhibitions, giving additional opportunities to persuade customers.
This is a fascinating creative process in which, as noted above, the client himself can actively participate, however, in order for its production to end with the birth of a successful product, the help of a professional is needed. To convince you of this, we invite you to take a look at our portfolio, which will allow you to see examples developed by our team members.
Multimedia 3D renderings and slideshows
Creating an interactive flash presentation - difficult technological process but so good Computer techologies that at a relatively low cost, they provide great opportunities for slide shows. In the past, making advertising albums was expensive with very limited abilities. In recent years, 3d visualization has become a serious help.
The main arguments in its favor:
- This is an important and crucial moment in promoting your product or service on the market.
- A slideshow promoting your company, product or service brings you closer to your potential partner or customer.
- Allows you to be modern and progressive.
- You can make it one day, and then transform it into a company record on which its history will be based.
For examples of works made by our studio, see the Portfolio.
Cosmetology, design and stylistics
Creating a Flsh presentation Ways of creating a presentation in Flsh Creating a presentation Basic principles of creating a presentation Ways of creating a presentation in Flsh Creating a presentation Introduction A presentation correctly designed using Flsh will stand out among the template products born in the Microsoft incubator Power point... Basic principles of creating a presentation It is very important that your presentation has a coherent, finished look. After creating the structure ...
dobe Flash Tomilova Elena Anatolievna
Lecture 7. Creation of Flash-presentation
Plan.
|
Basic principles of creating a presentation Presentation creation |
|
Basic principles of creating a presentation Ways to create a presentation in Flash Presentation creation |
Introduction
A presentation well-designed with Flash will stand out from the templated products born in the Microsoft Power Point incubator. Imagine this situation. You come to an important meeting for you and are faced with the following: the person speaking in front of you created his presentation from the same template as you. This, of course, is unpleasant for you and does not at all increase the morale. If you create your own presentation using Flash, you will feel confident at any event. Now, as, however, before, everyone strives to look original, unique, recognizable. And in this program Macromedia Flash will become your faithful assistant. In it you can order music, animation and additional reactions to mouse actions, create a stylish unique design and do much more.
Basic principles of creating a presentation
- It is very important that your presentation has a coherent, finished look. Consider a structure and sequence of slides that should accurately complement your speech. Remember that quantity does not always determine quality.
- After creating the structure, work out the common design elements for all slide pages in your presentation.
- Then move on to filling with content - working out individual slides and programming mouse responses using Action Script.
- Finally, add musical accompaniment separate elements of the presentation. But do not overdo it, remember that it should help, not interfere with your performance.
Pay special attention to testing. Do not forget that you are not dealing with debugged templates, but with the living result of your creative activity.
- Here are some more tips to keep viewers interested in your presentation.
- Avoid heavy content on the page - you are not having a reading lesson, but a presentation, so instead of words it is better to place an illustration or visual diagram or diagram.
- You should not completely abandon the text that explains the pictures, because you can quickly get tired of an excessive number of complex schemes and graphs.
- Do not overload the work with a large number of spectacular effects, everything should be done with taste, with a sense of proportion and in line with the main idea of the presentation. Excessive diversity is annoying, and the audience, forced to helplessly follow the chaotic flashing before their eyes, will not understand what you want to explain to them.
Ways to create a presentation in Flash
A presentation can be done in two ways.
Method 1. Take a standard Flash presentation as a basis. To do this, you need to open the template file using the menuFile - New, select the tab in the dialog box Templates and check the itemPresentations (Quiz)(Presentations), and then give preference to one of the standard templates.
Method 2. Create your own presentation starting from scratch. We will go the second way as the most interesting and allowing to make a presentation.
Presentation creation
- Create a new document.
- Configure its properties. To do this, on the panel Properties specify the following parameters: Frame Rate ) - 15 fps (default is 12), select a background color. The first (bottom) layer, which serves as the "background", will have a design common to the entire sequence of slides.

- To make it easier for you to work, turn on the rulersView - Rulers(View - Rulers) and grid View - Grid - Display Grid(View - Grid - Show Grid ). These elements are needed to accurately place objects on the working area.

- Add a new layer andwith the Text toolwrite the words “ Summer" ... This will be a button in the future.
- Add more layers and write the names of your buttons on them.
- Make sure that the text on the scene does not appear immediately, but gradually. To do this, translate the text into a symbol. Standing at the first keyframe of the second layer ( Summer ) highlight the text and press F 8.

- Create motion tweens.

- Select frame 15 and convert to keyboard ( F 6 ). Go back to 1 keyframe, select Symbol Introduction and in the Properties pane, select Color (Color) - Alpha (Alpha).

- Select frame 60 and convert to keyboard ( F 6).
- On layer 3 (Autumn) make the button Autumn appeared already starting from the 15th frame, right after the button Summer .

- Make all the other buttons and background for all frames, for this select on the layer Background 60 frame and convert to keyboard ( F 6).
- The title page, we seem to be looming. But besides the title page (hereinafter, we will call them scenes), the project should also contain lessons. Create a separate scene for the lesson Summer .
- Open the Scene panel , for this, select the menu itemWindow - Other Panels - Scene (Modify - Scene)or press the key combination Shift + F2.
- A panel with scenes will open, in which so far there is only one scene Scene 1 , rename it to Title ... To do this, double-click on its name in the list and enter the name.
- For ease of navigation, all scenes should look similar, that is, the same navigation menu should be on each scene. In order not to draw everything again, make a copy of our current scene: press the buttonDuplicate Scene at the bottom of the Scene panel and name the new scene Summer .

- Make changes to the scene Summer. Remove the animation of the buttons. To do this, select all frames, excluding the last one: you need to click on the penultimate frame on the very bottom layer; then press the key Shift and hold it. Then click on the first frame of the topmost layer (thus highlighting the range). Next, right-click on the selected area. Select from the menu that appearsRemove Frames.

- Add a new layer Photo, insert a picture.
- Before this lesson, we did the animation ourselves. Not only we are puzzled by the problem of inventing interesting animation effects, the developers Flash they are also constantly thinking about how to diversify the automatic effects creation functions. And in the latest version of the program we are studying Macromedia Flash MX 2004 they made significant progress in this, creating a whole tabTimeline effects(Timeline Effects ), which opens when you select the menu Insert ). The tab contains three sub-items:Assistants, Effects ( Effects ), Transform / Transition.
- Add a Blur effect (Blur ) to the inserted picture.

In the Blur dialog box that appears, adjust the parameters for the effect as follows:
- Effect duration(Effect duration in frames) - indicates how many frames the effect will last. Set 20 frames.
- Permission (Resolution) - determines the number of steps for which the effect will be carried out. Set the number of transitions to 10.
- Scale (Scale) - sets the size of the base object compared to those objects that are used to introduce the blur effect. Values less than 1 indicate that the base object will be less than its derivatives, and more than 1, of course, on the contrary - auxiliary "blur" will be less than the blurred object. Set this value to 0.25.
- Allow horizontal blur(Allow horizontal blur) - allows you to blur horizontally. Leave this checkbox checked.
- Allow vertical blur(Allow vertical blur) - by analogy with the previous paragraph, allows you to "blur" the object vertically. Let this item also be active.
- Direction of movement(Direction of Movement) - allows you to select one of the arrows indicating the direction in which the blur will be carried out. Select a center point, which means that movement will be made in all directions at once.
Click OK - the effect is ready.
- The interactivity of the presentation is created using sets of commands ( Actions ), which are triggered by strictly defined events ( event ). An event can be, for example, the moment when a frame is played, or when a mouse or keyboard button is pressed.
- Add the command to stop the scene at the last frame in the scene Title:
- Go to the stage Title.
- Create a new layer and name it Actions.
- Go to the last frame of the layer Actions.
- Create an empty frame in it.

- Expand the Actions panel : select the menu itemWindow - Actionsor press the key F9.
- On the left, in the list of actions, selectGlobal functions(Global functions ) - Controls ( Timeline Control) - stop (by double clicking on the action " stop ").

- In the Actions layer a small letter will appear in the last frame on the timeline but ... It means that there are actions in this frame.
- The same procedure will need to be done for the rest of the scenes.
- Next, you need to finally get the buttons to work:
- Return to the stage Title.
- Select on layer Summer in the last frame the character Summer .
- In the Properties panel change the object type from Graphic to Button.
- Below you need to set a name Summer button for a copy of the symbol.

- Next, expand the panel Actions.
- Choose an actionRoic fragment management tools ( Movie Clip Control) - on (release) (gotoAndPlay ("Summer", 1);


- The button is ready.
- Configure all the buttons on the scenes so that you can go from any scene to any other.
The task.
Create a presentation on a free topic. The number of scenes is at least 3.
Send in the archive.
PAGE 5
And also other works that may interest you |
|||
| 23337. | Generating reports | 434.5 KB | |
| Lab Assignment: Determine the structure of the report. Create and run a standard report. Create a complex report based on a standard report. Run the report. | |||
| 23338. | Designing labels | 124.5 KB | |
| Lab Assignment: Determine the structure of the label: a database for the label; name of the label; the order of placement of fields in the label; the order of placing the labels on the sheet; size of labels. | |||
| 23339. | Screen design | 371.5 KB | |
| Construct the display. Create on the screen form buttons: navigation in the database; adding a new record; closing the screen form. Create an edit box in a display edit box with a list of radio buttons or control lights. Save the environment of the created display. | |||
| 23340. | Creating macros | 107.5 KB | |
| Lab Assignment: Explore the rules for recording macros using examples of standard F2F9 macros. Create your own macros to perform the following work: open the required databases; delete databases; establish relationships between databases; modify the report; execute the request; Save the created set of macros in a file. Lab Report: Macro Dialog Box: Macro Key Definition Automated Generation: Macro Key Definition Manual Recording: Open Table ... | |||
| 23341. | Application generator | 290 KB | |
| Lab Assignment: Before starting, create a separate directory for the application files. Generate the standard application by creating or specifying the database in step 1. Check the operation of the standard application: standard screen; input form for control buttons; menu of the standard application. Lab report: Application design: Generator output: New Knopka button output to enter a new entry: test questions: Building blocks of a standard application. | |||
| 23342. | FoxPro Integrated Environment | 49 KB | |
| Laboratory work # 1: FoxPro integrated environment. Purpose of work: acquaintance with the capabilities of the FoxPro for Windows DBMS. Task: Create a directory named FOXPRO on disk X: to store examples. Enter the FoxPro environment. | |||
| 23343. | Creating a database structure in the FoxPro DBMS | 118.5 KB | |
| Laboratory work No. 2: Creating a database structure in the FoxPro DBMS By discipline: Databases. Objectives of the work: to study the data types of FoxPro; learn how to create a database structure; fill tables with data. Assignment: Create a database structure in accordance with your theme of the computational task. Explore the capabilities of the FoxPro for Windows DBMS to create a database structure. | |||
| 23344. | Sorting and Indexing Databases | 87 KB | |
| Laboratory work No. 3: Sorting and indexing databases By discipline: Databases. Task: Sort by one field in a database containing at least 15 records. Repeat sorting for fields containing different types data. View the sort result in the new database. | |||
| 23345. | Predicting the frequency of maintenance (turnaround cycle tM) for an ensemble of machines of the same type | 44 KB | |
| 16 TM 93 98 102 Calculation data: Variants 1 2 3 tk time of measurement of the output parameter h 10 10 10 up limit value 100 150 200 u1 measured values 9.5 155 21 u2 measured values 12 165 19 u3 measured values 11 14 23 u4 measured values 105 145 22 u5 measured values 85 15 17 u6 measured values 9 15 20 u7 measured values 95 135 21 u8 measured values 10 157 15 u9 measured values 105 153 24 u10 measured values 95 15 18. | |||
 The fastest boat in the world!
 The history of the Off-White brand
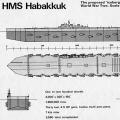 Habakkuk: how the British tried to build an aircraft carrier from ice Why the project was curtailed