How to choose equipment for the production of photobooks. Technological process of making a photobook Equipment for creating a photobook at home
A complex technological process, including the use of the most modern and materials. A variety of equipment, its capabilities allow us to make a photobook using various technologies. The design of any photobook is the same regardless of the equipment used. A photobook consists of, on the pages of which photographs are placed, and a cover (cover). Already at the stage of obtaining an image, two fundamentally different printing technologies are distinguished - printing on and printing. Let's consider the operations included in a typical technological process of making a photobook.
Photo printing of spreads
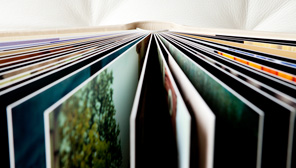
Modern technologies make it possible to make an original photo album from real photographs printed in a chemical process and rolled onto a dense base. Adjacent photographic pages are printed as one sheet and are called a spread. In this case, a block of a photobook is a series of photographs pasted onto a base (plastic or cardboard), forming pages. The pages of a photobook, collected using this technology, have the ability to open 180 degrees, forming a flat surface. Now the brightest frames can be placed not only on separate pages, but also on the entire spread, using the entire area without restrictions. Layout spreads, it is necessary to take into account the technical requirements for the files of the manufacturer of photobooks. The geometric dimensions of the spread are calculated based on the dimensions of the photobook itself. For example: if you ordered the production of a 20x20 photobook, then the spread size should be 203x396mm. The final dimensions of the block after cutting are 3mm. on three sides will be 197x197mm. Additionally, the manufacturer indicates the characteristics of the printing device: color model of color reproduction, resolution (the number of dots - bitmap elements per unit area), bit depth of the color palette. For example: to print spreads on a standard digital lab, you must specify the following parameters. RGB, 300 dpi, 8 bit / channel.Reversal creasing
After printing, the spread of the future book is folded in half. But the fold may be uneven or not neat enough. Moreover, the ink layer of photographic paper in the place of the fold can be damaged and there is a high probability of cracking of the emulsion layer. To avoid this, creasing is used - the process of punching a thin convex strip with a special tool - a cliché. If during the layout of the layout the center of the spread was determined correctly, then the big will coincide with it. Without breaking the sequence, the spreads are creased in the middle, bent at the place where the big is applied and folded, keeping the order in which the spreads are assembled.Block assembly
Further, the spreads, bent in half, are glued to a dense base, the dimensions of which are slightly larger than a page (half of the spread). Depending on the base material and the glue used, three technologies are distinguished: "wet" (using liquid glue), "dry" (without liquid glue) and combined (both liquid and dry types of glue are used). The base material on which the spreads are glued is plastic or cardboard. With the "wet" technology, the formation of a book block is carried out by applying liquid glue on the surface of the spread and the base. The glue is applied using a special gluing machine. "Dry" technology involves the use of a base with a pre-applied glue. You just need to remove the protective layer and the base is ready for assembly (hence the name "self-adhesive"). The base material can be either cardboard or plastic. The assembly sequence is as follows: spread - base - spread - base .... etc. If endpapers are planned for a future book, then the assembly begins and ends with endpapers. After installing the next turn or base, it is necessary to fix the block with special clamps. The base is glued with a slight indentation, which provides the ability to turn to unfold 180 degrees.Block crimp
After assembly, the block is placed under a press. With the "wet" technology, it is necessary to immediately squeeze out the remaining air between the spreads and the base of the pages. Further, the exposure of the block under pressure sometimes reaches 48 hours. This is necessary so that the cardboard, which has absorbed moisture from the applied glue, is completely dry without deformation and warping caused by the action internal stresses. To reduce the drying time, special presses built into the drying chambers are used. "Dry" technology does not require long-term holding of the block under pressure. In this case, the crimping time is significantly shorter. If hot melt glue is applied to the base, then the block is placed in a special heat press, where the sintering process takes place. The block is also cooled under pressure. It is worth noting that spreads printed on glossy paper are more likely to stick together. Books collected using different technologies have significant differences that are not obvious at first glance. The difference is in the materials themselves, from which the block is assembled. Cardboard is a hygroscopic material that absorbs water vapor (moisture) from the air. If a book assembled on cardboard is wetted or placed in a room with high humidity, then the book block will deform (bend). Under normal conditions, the likelihood of such bending is rather low. Plastic - man-made material is not hygroscopic. This raises another problem. A photograph glued to plastic is a hygroscopic material and continues to absorb and release moisture. The following situation arises: if the humidity is low, then the photo is reduced in size, if it is high, it increases. Therefore, spreads with a photo pasted on one side will curl. After several cycles of reduction-enlargement in size, the photo peels off the plastic. It is also worth noting that books collected on plastic are heavier than books on cardboard. The assembled blocks are glued with gauze at the folds of the spreads (spine), with access to the spine margins of the endpapers, to increase the strength of the book when opening. The fabric material, as it were, tightens the block, eliminating the appearance of gaps between the spreads, and prevents the book from falling apart.Cropping a block
To align the pages, the block is clipped on three sides. The bleed allowance is approximately 3-5mm. To decorate the trim, a colored base is sprayed or glued to the ends of the pages. The trimming is performed on a special machine designed for polishing and foiling the ends of book blocks. The decoration of the block is completed by gluing the captum, which gives the book a finished look.Cover (cover) production
To understand the technology, you need to define the terms. Cover - a flexible paper covering, one piece or composite, in one way or another (paper clips, hot melt glue) is attached to the spine of the block. The binding cover is the outer shell of the block. Being integral or composite, it is connected to the book block using endpapers or extreme spreads. The spine of the block does not stick to the cover. For the production of the simplest photo books, a so-called soft photo cover is used. This is an ordinary photograph, which is laminated or varnished to give reliability. In this case, the block trimming process occurs after the block is inserted into the photo cover.Photo cover lamination
Cold and hot lamination is used. For cold lamination, self-adhesive films are used, on which the adhesive layer is protected by a release liner. For hot lamination, films are used, on one side of which a layer of polymer glue is applied. Passing through the heated rollers of the laminator (about 100 degrees), the film acquires adhesive properties. Speaking of the "cons", note that when the film is applied by hot lamination, the dark pigment in the photograph "boils" (bubbles appear). This disadvantage manifests itself in photographs printed on an inkjet printer that uses water-soluble dyes. The "minus" of cold lamination is the high cost of the film.Photo cover varnishing
The process is devoid of the disadvantages inherent in both types of lamination. Coating with varnish does an excellent job of protective functions and increases the contrast of the image by about 10%.Binding cover production
For the manufacture of the cover, you can use more reliable materials made on the basis of fabric and artificial leather. The lid is assembled on a special covermaker. The device allows you to accurately position the cardboard sides and back (spine) relative to the cover material of the binding cover, automates the process of trimming corners and bending the flaps. The "face" of the cover can be decorated with a photo by cutting it out under it. The cover material is tucked into the clearing and a laminated photograph is inserted. If equipment such as a calender is available, then it will not be superfluous to pass a lid through it for the final overlaying of the covering material. The original design of the cover spine will make the book more presentable. Additional use of several materials in the construction of the lid, embossing, installation of decorative corners provide unlimited possibilities for personalization. For the cover material, a photographic image is used.Installing the unit in the cover
This operation completes the assembly process of the photobook. Endpapers are sequentially glued to the sides of the cover. During installation, you must carefully monitor the accuracy, otherwise all the work done will be in vain. To improve opening and impart structural strength, the book is shaded.Hatching (edging) of the rib
This method of finishing consists in applying indented ribs with blunt heated knives - deepened lines on the front side of the cover along the spine margin. The block is pressed under pressure, which ensures high-quality fixation of the decorative relief. The operation is carried out on special line equipment.Package
An important detail in the production of photo books. After the book is made, it is necessary to pack the book. If you neglect this rule, then after transportation from the workshop to the customer, due to the hygroscopic properties of the materials discussed above, the book may be subject to deformation.Basically, the service for the design of photographs in the form of photobooks is offered by printing houses in large cities, and in most regions given view products are poorly represented or not represented at all.
The photobook is a book edition with original design, in hardcover, in which the pages are photographs.
 examples
The process of making photo books consists of the following stages:
- Preparation of the layout of the book.
- Printing (photos, cover)
- Cutting and assembling the book.
Equipment for the production of photobooks can be automatic and manual, we give a list of the minimum required set of machines for manual production books:
For the purchase of the above equipment, a budget of 120-150 thousand rubles is sufficient.
If the budget allows you to allocate a more significant amount of 350-400 thousand rubles for the purchase of equipment, then we recommend purchasing automatic equipment that allows you to perform all the necessary operations on one machine.
Alternatively, you can see the following models of machines for the production of photo albums and photo books:
Making photobooks is ideal as additional type activities for an existing photo studio, as an additional service offered to visitors, but it can also be used by a novice entrepreneur as a main activity. But in any case, the production of photobooks is promising business an undertaking that has significant growth prospects and promises good profits.
Victor Stepanov, 2012-12-11
The production process, equipment and subtleties of creating photo books
What is a photobook?
Photobook Is an invention that appeared several years ago, but has already gained wide popularity. In fact, this is a kind of photo album, in which photographs, texts, comments to them are printed, and also special artistic and graphic elements are often inserted.
Difference from the album
Contrary to popular belief, photo books are different from photo albums. And the point here is not in appearance, but in the very technology of their manufacture. A photo album consists of photographs pasted on the pages of an album, and in a photo book, photographs are assembled directly onto the page, thus creating a kind of digital layout.
Business in the production of photo books
Photobooks are becoming more and more popular, despite the complexity of production and the costly process of creating layouts. Equipment for the production of photo books, as you know, is also expensive. But even if we make the most conservative calculations, it becomes quite obvious that even such equipment will pay for itself in a couple of months of operation.
It makes no sense to save on staff. The creation of photo books and photo albums should be done by professionals with at least a technical background. Only specialists will be able to work with rather complex equipment. We can only help a little by briefly describing the process of creating a typical photobook. The procedure for its creation is subdivided into several stages.
Stages of making a photobook
 1) The first thing to prepare is the original - the layout. To do this, the client takes the printed digital photos... Then the program is connected to create a blank mock-up.
2) The second stage of making a photobook is printing (or printing out already brought by the client) covers or spreads of the book. To do this, you need to discuss in advance with the client the size of the future photobook, since after printing the size can no longer be changed. All parameters are set on the equipment. Typically, photobook equipment works with the following general purpose photo papers - Glossy, Matte, and SuperGlossy. But due to its high cost and high quality, the latter is increasingly referred to as premium photo paper, so it is rarely used for single clients.
3) The third stage is the assembly of the spread (cover) of the photobook. For this, the equipment for the production of photobooks includes a lid-making machine, which will make this crust or spread. If you have purchased an expensive lid-making machine, then such units as corner cutters and special bending machines operating in automatic mode will be built into it.
4) The next stage in the production of a photobook is the compilation of indoor units. There is nothing complicated in this process - it's just gluing the cardboard and the cover (spreads) onto the layout. These will be the pages of the photobook.
5) And finally, the fifth and final stage of making a photobook is the final trimming and assembly. The most important thing in this step is a sharp cutter. If it is not sharpened well enough, then your work will be irretrievably ruined before delivery. The dimensions of the future book should already be known exactly at this stage - further changes will be impossible.
Guillotine cutters are rightfully considered one of the best cutters.
The fact is, roller or saber cutters, by virtue of their design, cut photographic paper at an angle or round, which cannot but affect the shape of the cut corners. And most often it affects in the most negative way. And the cutters of the guillotine type seem to fall on the material from above, which practically eliminates the possibility of error. The only strict requirement is the maximum sharpness of the cutter blade.
Other related articles on Manufacturing process, equipment and subtleties of creating photobooks
We actively support new trends in the Ukrainian photo printing market. One of these areas is the production of photo books. This popular service for the production and storage of prints is becoming more and more in demand.
To meet the demand for such products, global manufacturers provide a wide variety of devices and devices that may be in demand depending on the needs of the local market.
This variety of equipment allows any photo businessperson to participate in the production process depending on the needs of a particular market.
As a rule, the production of photo books is based on the principle of performing specific work on separate devices. Most often these are the following operations:
Creasing, - folding the printed spread in accordance with the specified dimensions.
Assembly of the block - formation of the internal block of the book with the placement of the necessary materials between the sheets.
Pressing - pressing the produced book block for high-quality gluing of pages.
Trimming - leveling and making the block of the given size using a powerful knife - a guillotine.
Cover production - production of the outer cover of a book, into which a previously made block is glued.
Hatching - making a special outer groove at the inner edge of the cover.
All these operations can also be performed using special high-performance machines. Any photo businessman can, with our help, select equipment for the production of photo books, depending on the needs and capabilities of a particular outlet.
Home / Catalog of Services and Goods / Materials for photobooks
PLASTIC AND CARDBOARD FOR PHOTO BOOKS AND ALBUMS
We offer quality consumables for the production of photo books.
Each photobook is individual.
Beautiful photos in designer processing, decorated in various covers make it unique. Consumables are one of the main criteria in the creation or production of photobooks, right choice high-quality consumables and make the final result of the photobook beautiful and high-quality.
 |
 |
For the production of photo books and albums, we offer two types of consumables: double-sided self-adhesive sheets and double-sided thermal sheets.
As a base, we use high-quality pure-cellulose cardboard with a density of 250 g / m2 (thickness 0.3 mm) and plastics Rigid PVC sheets, PVC foam sheets, White PET rolls.
We offer more than 15 types of adhesive materials for photobooks and albums from 10 rubles per sheet 21 * 31cm.
See the price list:
The specifics of the production of photobooks in modern conditions requires the use of equipment adapted for the collection of photographs printed both on traditional photographic paper with the possibility of one-sided printing of panoramic prints obtained in digital minilabs, and using prints with two-sided printing, printed on various models of photo printers and similar equipment, using the so-called "dry" technology print. In the first case, “Butterfly Binding” technology is used to assemble photobooks, in the second - “Perfect Binding”. For each technology, our catalog contains various types of equipment for the production of photobooks.
"Butterfly Binding"
Photolux presents technology "Butterfly Binding" for the production of photobooks based on digital printers of the CONTACT PhotoBookPrinter2301 (2601) series, equipment for the production of photobooks BEIJING HENGYIN MACHINERY MANUACTURING CO., LTD and software for layout of photobooks Event Album Maker ™.
The photolaboratory of the Kontakt PhotoBookPrinter2301 series is based on the high-performance printer Kontakt 1217 N23, which allows you to print up to 1400 prints of 89 mm x 127 mm per hour with a resolution of 366 dpi, but is also equipped with the additional software Advanced Panorama Print, which allows you to print panoramic images up to 305 mm x 840 mm. This panoramic format allows you to make a one-piece spread for a photobook of 300 mm x 400 mm format. Software lbnSender ™ allows you to correct images by color, density, contrast, crop images. In addition, the software additionally includes an automatic image correction function using the i2e software.
Event Album Maker ™ software installed on PhotoBookPrinter2301 and created on the basis of standard LbnSenderX minilab software is a universal photobook layout tool aimed primarily at professional photographers working in the wedding and studio photography market, making portfolios. Thanks to the program's intuitive tools, fast navigation between image files, direct ability to process images in the program Adobe photoshop or any external photo editor, a set of additional ready-to-use templates, the process of making up a photobook does not take much time, effort and does not require additional qualifications.
Page typeset using Event Album Maker ™ software and printed on PhotoBook Printer2301 is collected into a photobook.
FL-18PBS universal station is complex solution for the production of photo books and includes all the necessary equipment:
- Creasing machine
- Automatic gluing machine
- Size press
- Photo Album Table
- Drying press
The universal station is easy to operate and can be serviced by one operator, occupies a minimum area of 1.3 sq m, which is very important in the conditions of a real photo shop.
In addition, if required, is available whole line additional equipment:
This technology for making a photobook includes the following stages:
|
"Perfect Binding"
If for some reason panoramic printing is not available to you, the photobook can be assembled using the technology "Perfect Binding" using hot-melt glue technology for assembling book spines.
In this case, you will need a hot melt glue machine - manual hot melt glue machines S320 / a, S320D, S460 or an electric hot melt glue machine S460E.
In addition, equipment for lamination of photographic paper is available - liquid laminators LM520, LMU650, LMU470.
This technology for assembling a photobook includes the following stages:
|
"System (hardware, consumables and software) for the production of photobooks ClixxPixx® from PROMAXX® Innovative PC Print Media GmbH, Germany"

 Designed for photographers, photo studios and photo shops, the ClixxPixx® System offers photo business customers elegant looking photobooks assembled using a wide range of covers, including the elegant PRO2 series covers, made with a variety of leather, imitation leather or textured plastic covers. materials, as well as more democratic "hi-tech" covers of the DIGI4 series, made of various types of embossed plastic, including transparent and translucent versions.
All opaque covers can be equipped with a window through which the first page of the photobook is visible.
The undoubted advantages of the ClixxPixx® system include:
- Minimum investment. 
- Large assortment of possible photobook formats: 10 × 15 (4 × 6 ″), 13 × 18 (5 × 7 ″), 15 × 20 (6 × 8 ″), 15 × 23 (6 × 9 ″), 20 × 20 (8 × 8 ″), 20 × 25 (8 × 10 ″), 20 × 30 (8 × 12 ″) and 30 × 40 (12 × 16 ″).
— Unique system assembly on chrome rings allows you to get a durable photobook with 180-degree page opening and the ability to add or change sheets.
- A wide range of covers made of plastic, cardboard coated with different materials and leather.
 - The book can contain up to 16 double-sided pages in the case of using KODAK ROYAL photo papers, but if you are printing on double-sided photo papers - the number of pages in the book can be increased to 29.
- Just two desk fixtures allow you to produce the entire range of photobooks.
- Convenient program DesignSuite 5.0 for creating a photo book layout. The program is Russified, including the instruction manual. Allows you to achieve excellent results in the process of creating a layout of your own photobook with little labor and time.
- DesignSuite 5.0 contains over 200 ready-made templates developed by professional designers. The templates are visually balanced, which guarantees a "professional" look for your layout, even if you are not familiar with the basics of working with layout programs and the theory of composition.
Stages of making a photobook with ClixxPixx®
|
Create a design |
Using DesignSuite, select a template, fill it in by simply dragging and dropping your images into the cells, zooming in and out as you like, and adding captions |  |
||
|
|
A minilab is the only way to get great, long-lasting pages for your future book. Available anytime. Excellent traditional quality. DesignSuite converts the finished photobook into regular .jpg files, which you simply print as usual. |  |
||
|
Joining pages |
There is a smart little tool for this - DoublePageMaker. It will connect 2 photos so that they look like one page with images on both sides. The cost of glue is minimal. |  |
||
|
Perforation of pages |
Use the DrillPunch to make the required holes. Unlike conventional punchers, this device uses hollow punches like any other professional puncher. With its help, beautiful, even holes come out, and you can punch the entire book block at once. |  |
||
|
Final assembly |
You can insert 3 double pages at a time into the cover to create a finished photo book. Not counting the time it takes to print pages in your minilab, you will assemble a book of 32 20 × 30 pages in less than 10 minutes (Including the time for gluing and perforating pages). |  |
Photobooks are products that will take a long time to run out of popularity. They are in high demand. Souvenir products, namely, photobooks can be attributed to this type, which means colorful publications that contain many photographs. Taking into account the wishes of customers, as well as using special equipment for the production of photo books, specialists carry out the layout and editing of each page.
Distinctive feature
It should be understood that these books differ from simple photo albums by the very technology of their production. Pictures in such publications are not pasted on the page. First, layouts are created - and each of them is individual. However, it should be noted that the equipment for the production of photo books and photo albums is exactly the same.
What should be purchased without fail?
So, what equipment will you need to use in order to set up the production of photobooks? The main machines should be listed. First of all, you need to buy a scoring machine. This device helps to carry out such a procedure as punching a sheet for subsequent folding of products characterized by different densities.
In this situation, both plain paper and double-sided self-adhesive cardboard for the production of photobooks are meant. The functions of different models may include operations such as line punching. This procedure should be understood as the creation of a special tear line.
Wet assembly technology
In the process of manufacturing products, you will need to collect pages on a pre-prepared basis. The choice of equipment for this procedure is necessary depending on what kind of glue and material will be used. In order to establish a "wet" assembly, which uses a liquid glue solution, a special glue machine should be purchased. With it, an adhesive layer will be applied to the base.
What other assembly technologies are available?

"Dry" production technology is understood to mean the use of the base on which the adhesive layer has already been applied. The combined method can also be used. The most optimal equipment for the production of photo books in such a situation is glue machines.
With their help, you can apply a uniform layer of adhesive solution of a certain thickness. Some models can work with hot melt glue. They are equipped for this with a special heating element. There is also a forced ventilation system in such devices.
Using the press in the production of souvenir products
In order to crimp a block, you should use a photobook production equipment such as a crimper. He is the best option... If the basis is “liquid” technology, the products must be under pressure for two days.
Only in this case can we talk about complete drying of the base. With the "dry" technology, a long-term stay of the product under the press may not be required. However, in such a situation, you will have to buy such equipment for the production of photobooks as a heat press. It is used to collect pages under pressure.
The swaging press is capable of being mechanical, electrical, electromechanical or vacuum. A device of this type not only provides pressure on the product, but also does it evenly. The main characteristic is the maximum height of the crimping block.
What is the best cutter to use?

In order to trim the block created earlier, you need to use a guillotine cutter. It allows you to make pages smoother and more beautiful. Why exactly the guillotine type? Because using a different kind of cutter can ruin layouts. The guillotine equipment falls from above, the quality of its work is higher. But this cutter needs to be sharpened thoroughly from time to time.
Outer shell manufacturing process
Do not forget about making the binding. It should be understood as the rigid outer shell that contains all the pages. It is necessary to thoroughly approach the purchase of raw materials. Consumables for the production of photo books in this situation must be of high quality. Usually either fabric or imitation leather is used. To get ideally high-quality products, you need to make the binding yourself, and not buy a ready-made version of it.

In order to make the outer shell, you should use the automatic cover making machines for the production of photo books. With the help of them, you can simplify the procedure for making a binding. These machines can work with the most different materials... In this case, the output will be ready layout given size... When choosing equipment, you must be guided by the size of the cover. However, you should not forget about such additional parameters as power and trimming method.
Minimum processing lines
Increasingly in recent times such universal installations as photo stations began to be used. In the case of their use, it is possible to combine at once several technological devices necessary for performing different tasks into one group. Among the main advantages of the equipment are compactness and cost-effectiveness. However, there are also disadvantages. The equipment has lower operating parameters compared to the above devices.
Conclusion

In this review, the main devices were listed, which you will need to purchase if you want to establish your own production souvenirs of a similar type. In addition, do not forget about the continuous improvement of your own enterprise. Only in such a situation can we talk about a consistently high income.
With the development of digital technologies and in connection with computer accessibility, making photobooks at home is becoming commonplace. The photobook is gaining more and more popularity, replacing the usual photo album with pockets for photos.
This is a great gift for family and friends, friends and colleagues for an anniversary or any event. You can personally participate, or even completely create the design and layout of the book.
Do-it-yourself photobooks of two types are made: with a digital block and a photo block.
Such a book is printed on soft flexible sheets with a density of no more than 160g / sq. m., double-sided printing, which allows us to make a book of up to 200 pages.
Business on memories: production of photo books
It is ideal for storing family photos.
This type of book can be ordered or made by yourself (if you have the necessary printing equipment and skills in bookbinding) in the form of the following production methods:
- stitching on paperclip with paperback and hardcover;
- spring binding;
- paperclip stitching with paperback and hardcover.
Digital block photo books are low cost, versatile in workmanship and lightweight with a large number of pages.
Photobook with photoblock
it classic look manufacturing. It is in this version that graduation albums are made, which today are in every home. This is a hardcover book, the front cover can be in the form of a laminated image or a photograph. It can also be decorated with other materials such as leather or suede, embossed fabric, or just pretty paper.

Internal rigid sheets unfold 180 degrees to form a flat surface. As a rule, these spreads will contain the whole image.
The number of spreads can vary from 5 to 30, which does not allow such a book to be just a repository of family photographs. It is more suitable as a gift or as an album for a significant date (wedding, anniversary, graduation, and so on).
Photobooks with a photo block are distinguished by the highest image quality. This technology is ideal for positioning panoramic images as it opens 180 degrees and has a flat surface. Since its sheets are made on rigid cardboard with a thickness of one to one and a half millimeters, they will not be wrinkled while turning over the book.

Many ways of making
Making wedding photo books is possible in any of the following ways:
- Pick up photos yourself, arrange them in the right order, print sheets and sew a book, i.e. do everything with your own hands;
- Choose photos yourself, distribute them in the right order and order the production of a book in a professional studio;
- completely trust the experience of a professional who has his own technology.
The production of photo books is possible through special programs, with the help of which sheets are formed for further printing. To make an amateur book, an ordinary photo printer is enough. But in order to make a high quality product, you need special equipment for making a photobook.
Photobook Printing
Today there are many ways to print a photo. The best quality, combining a wide color gamut and sufficient durability of the image is provided by traditional chemical printing on photo paper. The technology has been used since the invention of photography and has been perfected to the smallest detail over the centuries. These are exactly the photos that we are all used to.
We do not use printing.
Equipment for the production of photo books
Regardless of whether it is toner or dry offset - this is a print only imitating a photo. The truncated color gamut and thin pages of printing books initially do not have the quality of a full-fledged photo print. We consider it unacceptable to use technologies that are not designed for long-term operation in the production of a photobook.
Making a photobook

The traditional binding material is leather. This natural material has been used for centuries not only to bind the most valuable books, but also to create and decorate other items. Practical, durable, with the widest range of possible textures and colors - leather is perhaps the ideal material for binding a photo book.
Photo paper is rolled onto the base, which increases the density of the sheet and allows you to easily turn over the pages of the album without fear of wrinkling. The knurling on the base is carried out according to the author's technology using materials made in Germany, Italy and Holland and specialized photo glue. We do not skimp on quality and do not aim to reduce the cost of production as much as possible.
Wedding book design

The internal content, of course, must match the external design of the album. The album will look rather strange in which, with a chic cover and high-quality printing, faded and uninteresting photographs will be used, located without observing the rules of compositional construction.
It seems that the design of a wedding book should be entrusted to a professional. Ideally, the created album page design should be combined in the chosen colors appearance design (cover, binding, endpapers).
This is why our albums are sold exclusively through professional photographers and designers.
When printing and decorating wedding photo books, we use traditional binding technologies and exclusively natural materials.
A photo album ordered from us will delight your customers for decades. For a photographer, such an album will become an unconditional status product, confirming the level of the master.
Business idea: making photo books to order
Fujifilm photobook production equipment
We present the following company products:
Photobook Builder

Photobook Builder allows you to create professional photo albums and double-sided cards using prints from your minilab. The device glues, creases and trims nested prints without operator intervention. In a matter of minutes, the system produces fully processed and designed photo albums, ready for issuance to the customer.
Business from scratch: making photo books
All you need to do is load the photos into the input tray and press a button!
Possibilities:
- Product format - A5 (15x20 cm) - DVD-size, ideal for storing and viewing your favorite photos
- High profitability
Brochure, 0.39 MB: PhotobookBuilder.pdf
Specifications
Photobook Builder Multi
Photobook Builder Multi lets you create professional photo albums and double-sided postcards using prints from your minilab. Like its predecessor, this device glues, creases and trims nested prints without operator intervention. In a matter of minutes, the system produces fully processed and designed photo albums, ready for issuance to the customer. All you need to do is load the photos into the input tray and press a button!
Possibilities:
- Create paperback photo albums and double-sided postcards
- Product format - 15x20 cm or 20x20 cm - the ideal size for storing and viewing your favorite photos
- 4 to 30 pages per photo album
- Manufacturing time - from 2 to 5 minutes
- High profitability
- Special software allows you to automatically distribute photo images on the pages of the future album, set a background image, a photo for the cover, as well as sign a photo album
Brochure, 1.00 MB: Photobook_Builder_MULTI_Broshure.pdf
Specifications
Photobook maker

The first compact and automatic solution to instantly create albums. Set a new standard by offering innovative services at an attractive price - New Product, which will increase the loyalty of your customers and become a source of constant profit. The device prints, glues, creases and trims nested prints without operator intervention. In a matter of minutes, the system produces fully processed and designed photo albums, ready for issuance to the customer. All you need to do is upload digital photos and 5 simple steps create a unique photo album! More than 60% of those surveyed (Source: 2009 PMA Marketing Research) stated that they did not order a photo album, not because it was expensive or poor quality, but because it took too long! Consumers are ready to spend no more than 10 minutes on the formation of an album, especially for ordinary events. Photobook Maker software makes this task easy - even for the inexperienced computer user!
Possibilities:
- Create paperback photo albums and double-sided postcards
- Product format - A5 (15x20 cm) - DVD-size, ideal for storing and viewing any events, birthdays, holidays, sports events
- Various designs for any market and situation
- Albums are moisture and scratch resistant
- Up to 30 pages and up to 90 photos in a photo album
- Manufacturing time - from 4 to 10 minutes
- Easy loading: joint, error-free loading of consumables (paper, film, glue) in less than 3 minutes
- High profitability
- Fast staff training
- Robust modular design
- Special software allows you to automatically distribute photo images on the pages of the future album, set a background image, a photo for the cover, as well as sign a photo album
Brochure, 2.2 MB: PhotobookMaker.pdf
Specifications
| NAME | TYPE OF | SPECIFICATIONS | PRICE, $ | ||
|---|---|---|---|---|---|
| PhotobookMaker | Photobook Production Device | Configuration Intel® Celeron E 1400 2 GHz RAM 2 GB DDR2 80 GB hard drive, 7200 rpm CD / DVD reader and writer 32-in-1 Card Reader 17 inch touch screen Bluetooth® adapter Seal Sublimation printer 203 mm, 300 dpi, 20x30 cm consumables loading Album format 20 x 14.5 cm Ticket printer Citizen coupon printer Expendable materials Adhesive set for 230 A5 pages Cold glue method Acrylic adhesive Dimensions (cm) 46 (w) x 96 (d) x 162 (h) Occupied area (sq.m.) 0.44 Power supply parameters 110-240V; 50-60 Hz; 3-6 A Certification CE, cTUVus, FCC, CB |
15800
230-sheet adhesive set (includes dye sublimation paper with ribbon for the printer and a roll of tape for gluing): $ 390 |
||
New life of old pictures: photobook design
Why is it interesting for us to look at illustrated historical albums? Because, in addition to the text, these albums contain photographs and drawings - they help to feel the spirit of the times, to feel the atmosphere of places and events.
A well-thought-out photo book will be interesting not only for you - even a stranger will want to consider it. Through the history of a particular family, you can make the details recognizable, preserve the flavor of the moment. Such a personal history of the country in miniature is definitely worth creating for the sake of your descendants.
For photobook design you can use "historical backgrounds" - street photographs, newspaper pages, some attributes of the era. This is a good reason to delve deeper into the study of the little things typical for a particular time, to learn the peculiarities of the moment.
What is the best way to arrange a photobook?
Let's start with the fact that the subject of a photobook can be anything: a wedding, your baby's story for a year, impressions of an interesting trip, photos with your beloved grandparents, collected especially for a gift photobook, and much more ... Photos can be of any size: large and small , photo in full spread, to which comments and memorable notes are attached. Photobook is a flight of creativity! And we want to give just a few of our professional recommendations for the design of a photo book.
Order a photobook
V photobook design it is important to observe the principle of simplicity and contrast. For example, the "large / small" contrast looks very good, when a portrait of a person is placed on one page of the spread, and a full-length photo on the other. By the same principle, color contrast is created when placing both color photos and black and white on the page. Also, on a spread on one side, you can place one large photo, and on the other - a series of pictures on the same subject.

In addition, it will be great if you devote an entire spread of the photobook to one of the photos. The main thing is to choose the right photo, because the larger it is, the more attention will be paid to it by those who will view your photo album.
Typical mistakes when making a photobook
We have highlighted some of the most common mistakes when creating photobooks and would like to warn you against them:
Firstly, it is not recommended to place two similar photographs on the same spread. For example, if the difference is only in the direction of a person's gaze (in one photo he is looking directly, and in another photo - to the side), and the framing remains the same in both photographs, then the principle of contrast is violated.
The technological process of making a photobook
When viewing such a reversal, the beholder's attention is scattered and interest is lost.
Secondly, do not try to fit 20 photos on one spread - the excessive number of images on the page confuses the viewer, preventing the main thing from being highlighted.
Thirdly, an overabundance of decorative ornaments, like any excess, may not decorate, but, on the contrary, make the page tasteless.

What else is important to think about when designing a photo book?
It is necessary to make up a photobook taking into account technical requirements- observe all necessary indents and spacing.
The cover can be made in strict leather - it looks expensive and solid, but if you have several of these on your shelf, you will easily get confused in the themes of the books.
A photo cover is a variant of a "talking" cover, on which the theme of the book is immediately indicated.
The laminated surface will protect the surface from scratches and damage.
We recommend making a choice in favor of a book in a square format no more than 30x30 cm. It is in this option that it is most convenient to place photos on the entire spread (30x60 cm). In addition, the square format does not require re-layout to print reduced copies of the original book.

Pages can be printed on matte, glossy and silk photo paper, or on offset printing paper.
If the volume of the book does not exceed 20-25 pages, then it is better to use the option of photo printing on photo paper. Pages will be dense, durable with careful use.
The most practical option is matte paper. Such sheets do not stick together, as in the gloss version, and do not create an illumination effect, as in silk pages.
If you are planning to make a book of a large volume - more than 25 pages, then you need to print by typographic method, on thick offset paper. Such a book requires more careful handling, but nothing more. But here you can place a large amount of material.
As a rule, the choice of photos is the most difficult thing in the design of a photobook. First of all, I must say that it is worth sticking to a single idea. If the photo album, for example, is dedicated to one year of your child's life, then the photos can first be grouped by month, and then you can choose the key ones from them. For a photo album about summer vacation it is worth noting key events first, and then making a selection of photographs.
Order a photobook
As a result of the work, the most pleasant thing will be possible - to pick up a ready-made photo book, which you will consider yourself or give to someone close to you, and it will be presented to everyone great mood... At the Art-book studio we do this every day and really appreciate the results of our work, the key to the successful implementation of which is the correct design atmospheric design of the photobook. Come to us for positive emotions!
Family archive in photobook
The retro style is perfect for decorating a family archive of grandparents.
Black and white pictures with scuffs, cracks in themselves already create a nostalgic mood. It can be emphasized, for example, by vintage wallpaper as a background. You can find old photographs of the places referred to in the book, insert images of some objects of that era.
It makes sense to retouch badly damaged pictures.
You can pick up information about the events of those years. Working on a family archive involves solving not only design problems, but also an interesting research work.
Quite often, wedding photobooks and pages in travel books are made in vintage style. But this style is unlikely to be appropriate when designing a children's photobook.
In our portfolio you can see an example of a vintage photobook.

Retro style photobook options
Retro genre opens up the richest scope for creativity and implementation of ideas. The past has given us an inexhaustible source of inspiration and many examples of sophistication and good taste that we so want to bring to our time. A photo book made in this style can be created on the basis of photographs of old years, in which the history of your relatives has been preserved. In addition, there is always an opportunity to make a retro album from modern photographs, which are only stylized "antique". Most often, such photobook design options are used when creating wedding albums. In the most popular ways retro style photobook design are giving the photo a specific "faded" shade, the effects of "scuffing", "graininess", as well as "torn edges".
Order a photobook as a gift
Making a retro photobook out of old photographs means taking care of those in them. Such a photo book can both please and touch both parents and children, and even grandchildren, who will receive a retro photo book as a gift. The thing is that such a book shows the importance of the continuity of generations, caring for loved ones, as well as respect for the time they have experienced.

Equipment for the production of photobooks is the most dynamically developing direction in the photographic market. To date, the entire range of equipment necessary for the assembly of photobooks is presented. Many of the equipment described in this article is also used by our software workshop.
Printing device
To obtain prints of spreads, equipment is required that produces an image of the required photo quality. It can be either a household inkjet printer that prints paints on photo paper, or one that exposes an image on. The spreads printed on such equipment are equally suitable for assembling a photobook. There is no limitation related to the heating of the photo paper or the adhesion properties. Photos printed with water-based ink require additional protection - varnishing or lamination. The difference in the quality of images obtained by different printing devices is not discussed in this article. You can take your time with the purchase of this equipment, but print spreads on the side.Creaser
Designed for creasing printed products of various formats (in our case, photographs). The main parameter is the working width of the creasing. For the production of small editions, a hand creaser is a good choice. Creasing is performed to prevent kinking at the place where the reversal is folded. The system of double creasing stops allows you to significantly speed up the process of transferring material from one indent to another. This is very convenient when, for example, the folds of the cover photo spine are folded. If further expansion of the production program is planned, it is better to choose a more "older" model. Such machines are designed for creasing thick paper and cardboard in the manufacture of calendars. An additional option of such models is the ability to apply line perforation, which allows you to create a tear line. A perforation is made on the reverse side of the creasing knife, and to readjust the device, it is enough to remove and turn the knife over. Accordingly, the surface of the marzan changes, which is rearranged to the side intended for working with the perforating knife. The power of the rack and pinion mechanism of such a creasing machine is sufficient for through-breakdown of material with a density of up to 250 g / m 2. For large runs, a rotary creasing system is used, which guarantees the absence of paper pulling and tearing, does not damage the fibers, keeping the printed layer intact. The process is carried out using special creasing rollers mounted on the shaft. Photopress machine SX-630 "Butterfly"
Photo press machine
It is such a "serious" name for the device designed to assemble blocks of photobooks. In fact, it is an assembly table equipped with a pneumatically driven clamp. A special plate is built into the clamp, which regulates the indentation at the time of gluing the base of the page. The set includes a special magnetic stop that makes it easier to fix the assembled block. On such an assembly table, assembly is possible both with the use of cardboard bases coated with liquid glue, and with the use of self-adhesive plastic or plastic with a hot-melt coating. The hold down action is provided by means of a pedal included in the pneumatic circuit. The pressure in the system must be at least 3 atm. Compressed air is supplied from an external source - a compressor that is not included in the delivery set.
The choice of compressor depends on the required capacity and is determined by the amount of pneumatic equipment connected to the circuit. The diaphragm compressor (air) is quieter in operation, but less efficient. The piston type compressor (oil) has high performance combined with relatively noisy operation. On initial stage work is quite suitable membrane. It will provide the required 3-4 atm, but with an increase in the volume of orders it can fail from overheating ("knock"). The fact is that the block head is assembled on thermo-paste, which loses its properties due to overheating. It is possible to purchase a two-cylinder membrane-type compressor with increased power at once. But such a design is less sealed and has losses in the system and does not give a tangible difference in performance.

Gluing Machine
The main function of this equipment is to apply a uniform layer of glue with an adjustable thickness to the surface of large-format sheet semi-finished products. The use of gluing equipment allows not only to increase productivity, but also to seriously reduce the consumption of glue. This equipment is required. Unlike other equipment that automates the process, increasing its productivity, the absence of a gluing machine will make the assembly process impossible. A hand-applied layer of glue will be squeezed out under pressure in the press, causing the pages to stick together. The principle of operation of the adhesive is as follows. Glue is poured into a special pallet before starting work. A system of shafts is immersed in the pallet, on which a thin layer of glue is applied during rotation. The shaft, located above all, is clamping and retreats from the shafts with glue by the amount of an adjustable gap. This gap is adjusted depending on the thickness of the material to which the adhesive is to be applied. The thickness of the adhesive layer can be adjusted in two ways: by changing the distance between the rolls immersed in the adhesive, or by moving a special plate that removes excess adhesive from the roll. Special guides ("feathers") are provided to guide the glued material away from the shafts. The adhesive for the sticker must be selected so that it does not chemically affect the photo paper. The glue should be free of acids, chlorine, sulfur, etc. Photo glue, rice starch glue and most synthetic adhesives are harmless to photographic paper. Depending on the glue used (type of PVA or hot melt glue), a heating element can be installed in the machine. Working on a hot melt adhesive machine requires forced ventilation of the room, because a smell is emitted that resembles the smell of molten rosin. On some models, the rotation speed of the shafts is adjustable. The gluing width is the main parameter of this equipment.
Laminator
A device designed for applying a protective film to printed products. In addition to protecting the image from moisture, UV radiation, mechanical stress and other contaminants, the film changes the appearance of the print, increases the contrast and saturation of colors. There is hot and cold lamination. For cold lamination, a self-adhesive film is used, on which the adhesive layer is protected by a backing. During operation, the substrate is separated, and the film itself and the print are rolled between two silicone rubber rollers. The high pressure in the contact area of these shafts ensures a high-quality adhesive of the protective film. For hot lamination, a film with an applied polymer glue is used, which becomes liquid and acquires high adhesion properties only in a heated state (about 100 degrees). Lamination can be one-sided and two-sided. If the image is laminated on one side, then, depending on the humidity of the room, such a sheet will bend (it may curl into a roll), which will complicate the process of assembling the cover photo. This is due to the hygroscopicity of the paper. Double-sided lamination or installation of a moisture generator in the workshop will help to correct the situation. For cold lamination, sometimes it is necessary to heat up to a temperature of 30-40 degrees. Therefore, the heated laminator will allow the use of films for both cold and hot lamination. The main working parameter is the width of the laminator rolls.
Coating machine
Purpose - application of a glossy or matt varnish layer. The principle of operation of the equipment is as follows: the varnish is supplied to the hot rollers and evenly distributed, after passing through the rollers, the sheet enters the drying chamber, where it dries with the help of a UV lamp. The process has a low cost, because the varnish is suitable for reuse... Compared to a laminated coating, the lacquer layer improves the contrast by 10-15%. The machine, which has a chain drive mechanism, has a straight-through design that allows an unlimited length of varnishing. Important parameters of coating machines are - conveyor width and maximum speed varnishing. More advanced models, thanks to the rollers with a special reflection, have the ability to apply a textured lacquer coating. Crimping press. The height of the foot is 0.5m.
Crimping press
This type of equipment is used to perform operations on the sealing of book blocks or notebooks, as well as for subsequent crimping after connecting to the binding cover. Structurally, the press consists of two plates - movable and fixed. The blanks for compaction are placed directly on the stationary plate, after which the movable plate is lowered to provide the required pressure. Special guides provide an even distribution of the load over the entire area of the slab. The main parameter is the height of the crimped foot. More efficient electric ones for accurate regulation of the crimping time are equipped with a standing time sensor in the closed position. One of the varieties is a hot press. Serves for baking a block of books under pressure at a certain temperature (0-110 degrees). For high-quality production of a cover with a complex volumetric relief, a vacuum thermo-press is required. Vacuum technology ensures uniform pressure over the entire required area. A special heating element system ensures fast and uniform heating throughout the entire working area. Samples are located over the entire area of the table, the size of which is the main characteristic of this type of equipment.
Embossing press
Embossing is the process of obtaining an image on paper, cardboard, leather, leatherette, etc. with help special form(cliche). The cliché, heated to a predetermined temperature, is lowered onto the printed material under a predetermined pressure. The resulting image can be colorful or "blind". According to the direction of deformation and the use of foil (metallized, pigment, holographic), there are three main types of embossing: flat foil embossing, blint and hot stamping. Foil stamping produces a glossy, saturated image. Foil is used not as a film, but as a base, with applied on it: a dye, a metallized layer and hot melt glue. Blint (blind) stamping is used to obtain an impression with a smooth surface without the use of foil. Relief embossing is obtained by using a counter stamp located at the bottom. Thus, a convex image is obtained. This type of embossing is used to imitate bandages - convex transverse stripes on the spine of old leather bindings. A cliché is a plate on which white space elements are deepened relative to the printed ones. The convex stamp used for relief embossing is the patrix (as opposed to the matrix). All binding materials have different characteristics in relation to embossing. Therefore, to obtain the final version, it is necessary to make samples on the samples, adjusting the temperature and pressure of the press.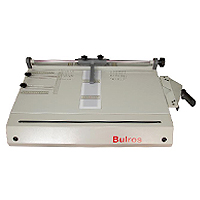
Cover making apparatus
The equipment is designed to be operatively of the desired size based on a variety of covering material. The device helps to accurately position the cardboard elements of the lid (spine and sides) relative to the covering material (photograph or leatherette). A photo cover is placed on the table of the fixture (back side up) with an applied adhesive layer. If the cover is printed on self-adhesive, then the protective backing is removed. Additional stops limit movement along two axes, and the illumination of the table from the bottom allows you to control the center of the cover. The created small vacuum inside the table, due to the pressure difference, presses the material against the table surface. A special device allows you to accurately position the cardboard sides and back off and press them against the cover material. After cutting the corners of the valve, they are bent from four sides in a special press clamp. The cover is assembled. The whole process takes 2-3 minutes. Making a similar lid by hand will take about 30 minutes. Most of the time will be spent on calculations, and if a mistake is made, the cover will be rejected. The main parameter of the device for the production of bound books is the maximum possible size of the binding cover. But the speed and accuracy of the work are greatly influenced by the options: trimming the corners of the covering material, a press clamp for bending the valves. Some manufacturers produce models in which the creasing process is integrated.
Calender
This type of printing equipment is irreplaceable in the production of photo books. The machine has a horizontal shaft system. The lower shaft is metal, the upper one is rubber-coated. A gap is created between the shafts, which is regulated by special flywheels. The table surface is located at the same horizontal level with the gap, for convenient material feeding. As a result of passing between the shafts, the material acquires the required density, and, if necessary, is glued together. In the production of photo books, this equipment is used for pressing the book covers. The cover is rolled evenly and the cover material is crimped evenly over the base. The main technical characteristic is the width of the bonded material.
Guillotine cutter
Any workshop for the production of photobooks should have a guillotine cutter. In such cutters, the knife feed is carried out along the vertical axis, which provides a high quality cut throughout the block. The main parameter is the length of the cut. To cut several photobooks at once, it is necessary to take into account such a parameter as the height of the pile when choosing a cutter. The simplest cutters are equipped with a manual backplate (paper stop) and a manual clamp. Further growth lineup provides the presence of a mechanical and electrical clamp, which significantly increases the accuracy of the cut. Additional options: devices for cutting narrow strips, illumination of the cutting line, protective screens or covers, mechanical interlocks of the process in case of danger of injury, make the work more comfortable. The replaceable blade is micro-adjustable, which allows it to be adjusted when worn.
Hatching equipment
Hatching is the process of applying a decorative scar to facilitate opening of the cover side. A special adjustment system makes it possible to adjust the desired indentation of the rib from the spine. Hatch knives, made of a material with a high thermal conductivity, under pressure corresponding to the thickness of the book, press the cover material between the spine and the cardboard side. Heating profiles are provided for heating blunt knives. The temperature makes it possible to activate the adhesive inside the lid. A photobook with this finish takes on a more presentable look. When choosing such equipment, the first thing to pay attention to is the width of the working area.
Corner rounding device
It is a table on which the block is placed horizontally. A special stop allows you to quickly and accurately set the angle of the book block, and the presser foot automatically locks it precisely. The knife mounted on a vertical bed has a rounding. The set includes 7-8 knives with different radii (from 2 to 8 mm.). The control is carried out using a foot pedal, which is very convenient and significantly increases the productivity of the operation. The equipment is not complicated, it has a reliable metal structure, a large working surface. One of the advantages is a quick change of cutting knives and marzan. It is possible to round the corners of the pages of the block and the binder itself together and separately. This equipment will expand the range of additional options for finishing the photobook.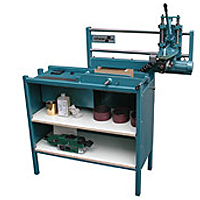
Book edge gilding equipment
The gilding technology produced on such equipment allows you to decorate any book, diary or other print edition... Thanks to the gold or silver trimmed edges of the block, this book looks more attractive. The block is installed in the clamp, and special rollers apply the material to the end, creating a uniform pattern on the surface. As a rule, special foil is used as a material. If desired, immediately before applying the dye, the block cut can be roughened to give the block roughness, as a special type of artistic finish. With glued seamless fastening, the spine of the block is roughened. There is no point in purchasing such equipment for small volumes. This operation can be ordered from other firms specializing in gilding the spine.
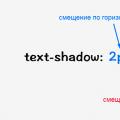 Creating Text Effects Using CSS3 Decoration Line Style: The text-decoration-style property
 Railway waybill reverse side Filling in the railway waybill
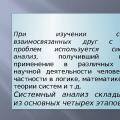 Systems analysis in modern management