How to print pdf as a brochure. How do I print a document as a book? ▻ Importing a module with macros and forms into a common Word template
file in operational printing is almost an everyday activity. It is very often necessary to print brochures, small booklets, or any other multi-page publications in which it is necessary to do imposition. In general, of course, imposition is a multifaceted operation, but in this article I will describe creating a multi-page booklet from a ready-made PDF file using the plug-in for Adobe Acrobat - Quite Imposing Plus. So, creating booklets, short instruction on the imposition.
We have a ready-made multi-page A4 document. My test document was downloaded from the Internet and consists of 7 pages, although the number of pages is not limited by anything. We need to doimposition, that is, to make a booklet ready for printing in A3 format in a spread. Now let's plunge into the theory and tell you what imposition is and why we need it.
Descent of the bands
From Wikipedia, the free encyclopedia
Descent of the bands- the process of placing the pages of the publication on the installation and printed form, which ensures the required interleaving of pages in notebooks or when printing small-sized products (for example, business cards) on paper after folding and cutting the prints, and printing press large format (A3, A2 ...) - placement of the required number of products in the required proportion.
Imposition operations are the responsibility of the PrePress.
Well, enough theory, let's move on to practice. Open our Adobe Acrobat, launch the plugin Quite Imposing Plus .
Choosing a menu Create booklet ...(booklet creation). Our task at this stage will be determined with the layout, that is, what method we will need to make a booklet. In my case, this is a simple last-first booklet. Well, okay, now let's figure it out in all these krakozyabra. By the way, before the creation of booklets I did very simply, I took small pieces of paper, folded them in the way I needed, then numbered the folded booklet, then straightened the paperwork and received ready layout, which has already been done manually imposition... But we are not looking for easy ways, but we will understand the program Quite Imposing Plus.
A small window opened.
In this window, all sorts of crap is written in bourgeois, about the fact that there will be two pages on one, about the fact that we can save the finished file with a different name, print and save, in short reference Information... You can put the first checkbox if we do not want to see this window anymore, and put the second checkbox opposite Show advanced options, then the window will slightly change and it will be possible to install additional options, such as marks for cutting, changing color models and other crap, which is especially not needed in everyday work. If all this is not clear or does not interest you, feel free to press Next (I always do this).
The next step is choosing the page size.
1. Create a booklet that is twice the maximum size of the original page. Scale 100%. That is, if the maximum page size in the original file is A4, the booklet will be A3. If we do not want to change the scale, then we select this particular item. Most often it is he who is used.
2. Create booklets on a US letter page.
3. Create a booklet on an A4 page in a spread.
4. Creation of a booklet on a page of any format.
By the way, which is convenient, it automatically calculates the scale, this can help if you have pages of different formats.
By the way, I'll tell you right away about a small nuance - for correct work Quite Imposing Plus it is desirable that all pages of the document have the same orientation.
Experiment with this page because it is the backbone of the entire booklet.
If everything is clear here, set all the necessary paper sizes, click Next.
The following window appears.
We choose binding method.
The imposition will vary depending on the binding method. This point is very important, so let's take a closer look at everything.
1. Continuous... This is the imposition in order. That is, first the first stripe is put, next to the second, on reverse 3, then the fourth. All pages are in order from first to last. This method is used if we just need to place all the pages on the format in order. It is very convenient for example for simplex printing, or for example when printing a photo. But in practice it is rarely used. Booklet layout: 1-2, 3-4, 5-6, 7-8. All pages follow one after the other.
2. Saddle stitched... The most used method is when the finished product is stitched onto a staple. Used for making not very thick brochures, magazines and the like. The pages are arranged in such a way that the numbering is in order on the spread. Schematic for an eight page document: 8-1, 2-7, 6-3, 4-5. After assembling the finished product, the numbering will be sequential.
3. Perfect bound... This method is used if the finished product is too thick in order to sew it on one and a staple and therefore it is sewn with notebooks. Absolutely the same as the second method, but the entire document is divided into notebooks. Most often, a notebook consists of 32 pages, but everything is relative and the number of pages in one notebook you can set in the field Pages per group... If you check the box next to Add extra pages, the program will automatically add the missing pages to the last notebook. It is very helpful to check this box.
4. Well, the last way Cut stacks... Also, by the way, a very often used method of creating a booklet when stapling with thermal binding. Simply put, the entire layout is divided into two equal parts, which are located on the left and right. Schematic for an eight page document: 1-4, 2-5, 3-6, 4-8. They assembled the layout, printed it, cut it in half, folded it on top of each other and glued it. For one-sided printing, be sure to check the box next to Stacks are single sidet... Well, that seems to be all, they have decided on the method of imposition.
Feel free to press Next.
The next step is to choose the order for the double-sided booklet. Most of the time this step is skipped, but I'll stop for a bit.
1. Alternating face-turnover. If the checkbox is next to Normal, then the face and back will be formed in the usual way, as with simplex printing. More often than not, this is exactly what we need. If the checkbox is opposite All the Backs are flipped upside-down, all back pages will be turned upside down. Also, by the way, a sometimes necessary thing.
2. Order of turns. If there is a check mark next to Normal, the order will be sequential, the second option - revolutions are numbered backwards.
3. Two separate documents are created, in one there will be all persons, in the second all turnovers. This is if in the third paragraph Normal. If the second checkbox is selected, then, accordingly, in the second document, all revolutions will be in reverse order.
As practice shows, here all values should be set to Normal, to be honest, I have never faced the task of setting something else, but just in case I wrote it.
Going to the final final step of creating booklets - imposition.
The last window is the alignment of the stripes. It is used in the event that the format of some pages is smaller, or something is shamanistic with formats, in short, is also rarely used.
Well, everything is simple and with illustrations. The first checkmark is to center each page, the second is to move to the spine.
That's all very simple.
After all the manipulations, press the Finish button and get a ready-made booklet according to the layout we have chosen.
Everything is very, very simple and is used every day.
I will also say about a couple of nuances. Always try to create the brochure in a new file, so you can easily change the settings if you are not satisfied with the result.
Numbering of pdf pages. try to do it before creating the booklet; after imposition, it will be very inconvenient to put page numbers.
Don't forget that Quite Imposing Plus is a plugin for Adobe Acrobat and won't work without an acrobat! Moreover, the version should be professional
If you have a source document in Word, then convert it to PDF using a PDF printer, for example I use Bullzip PDF Printer.
For complex layouts with border fill, remember to add labels.
That's all for creating a booklet, somehow I dashed everything so raw, ask questions, I will write more extensively and correct mistakes.
Be careful when printing back side of sheets! Printers differ in the way they load and output printed sheets: face up and face down.
| Load and face-up printers | Printers with an up / down switch |
 |
 |
Face-Up Printers with Face-Down Printing |
|
 |
 |
Face-down printers with face-up printing |
|
 |
|
When printing the back side (reverse) in 2-page and 8-page modes, feed the paper feet forward (side that exited the printer at the end).
When printing the back side (reverse) in 4-page mode, feed the paper head first (the side that first exited the printer).
When preparing your document for printing, pay attention to the margins in the document. If the normal mode is selected, and the left and right margins are not equal, then when folding the sheets in the notebook, the text will look shifted. It is preferable to make these margins equal, or select the "Mirror margins" mode and set the required margin difference in the "binding" field. Keep in mind that scaling will also reduce the internal margins, which can deprive you of stitching space.
 |
 |
Please note that Word, when forming a print job, is guided by the page numbering assigned by the user. That is, if the number "4" is indicated on the first page of your document, then for Word it will also be page number 4. In this case, the print sequence calculated here will be incorrect.
Pages that do not contain any printable characters and headers and footers are not included by the editor in the print job. Therefore, if there are such pages, then the sequence of printing the pages will be disrupted. For this reason, a "blank" placeholder page requires an invisible but printable character.
Form / Macro for Word
For maximum convenience of printing a document with a book (notebooks) in a word processor Word, a software solution has been developed in the form of a macro in the Visual Basic for Applications (VBA) language for Word. Referring to this macro makes it possible to adjust the optimal printing parameters and consistently print the document in the format of your choice for the further formation of a brochure or book. In this case, there will be no need to copy the sequence lines in the [Print] dialog box, but only to confirm the output of the next portion of the document.
There are two ways to use this software solution:
... create a document based on a template (Template with macros for Brochures - Dec14.dot) containing the necessary macros and a form, followed by calling the required macros;
... import into general Word template(Normal.dot (m)) a module with macros (BrochureMacroDistr.bas) and a form (2 files: BookletUserForm1.frm, BookletUserForm1.frx) for its work, which will make it possible to call a book print macro for any document.
Download all the above files in one archive
▻ Creating a document based on a template
To create a document containing the necessary macros and a form, you just need to run the "Template with macros for Brochures - dec14.dot" ( For example: in Explorer - left-click, key)
Attention! Windows security, antivirus software, and Word security settings may prevent you from starting of this template and documents created on its basis, as containing macros, which is regarded as a potential danger to the system!
How do I configure security systems to run a template with macros?:
|
|
In the window that opens, select the [Security] tab ( circled in yellow) and click on the button [Macro protection ...]
|
In the window that opens, select the section [Trust Center] and click on the button [Trust Center Settings ...]
|
▻ Importing a module with macros and forms into a common Word template
When you run the "Template with macros for Brochures - dec14.dot", you can import from it into the general Word template the module with macros and the form necessary for printing brochures.
How to import a module and a form into a common Word template?:
|
In the [Macro] dialog box that opens, click on the [Organizer ...] button.
Now these objects need to be copied into the general template Normal.dot (m) displayed on the right side of the window. To do this, select the lines BookletUserForm1 and BrochureMacroDistr in the left part of the window - the first one by clicking the mouse, the second one by clicking the mouse with the pressed key, and then clicking the [Copy ->] button. The list on the right will be supplemented with lines from the list on the left. Now you can close the [Organizer] window and the document that was automatically created at startup.
To use macros contained in a document based on Template with macros for Brochures - dec14.dot, or imported into the general template Normal.dot (m), you need to open the [Macro] dialog ( how to open this dialog - see above in the section). Three names should be displayed in the list of available macros:
Brochure_1a_Print,
Brochure_1b_Dump_Prints and
.
 |
To configure print settings and directly print the active document in the form of a book (notebooks), you need to run the first macro: Brochure_1a_Print... A Form will open that is similar in content to the one presented on this page (above), with the difference that it uses the parameters of a specific active document and provides the ability to customize the printer driver, Word print settings, add a "blank" page, select the feed order sheets, as well as the output of the Print Dump (calculated print job) in a separate file.
 |
Executing the second macro: Brochure_1b_Dump_Prints Maybe ONLY if the macro was executed just before Brochure_1a_Print! Then, based on the data received in the first macro, instead of directly printing the active document, the calculated print job with all the details specified in the form (Print Dump) will be displayed in a separate file - similar to that displayed on this page when you click the [COUNT] button. You can, if you wish, on the basis of the data provided, independently print both the entire document and individual sheets (for example, if some sheets were printed with defects).
With the third macro: Brochure_1c_Insert_Blank_Page You will be able to independently insert a "blank" page into the active document.
Microsoft Word allows you to make up a document for printing in the form of a brochure, without resorting to any additional special programs. This can be done with literally a few clicks and there will be no problems with plain text. However, you will need a cover, and the original document may contain tables or figures.
Let's take a small, illustrated article as an example and take a closer look at the formatting steps in Word 2007 or 2010 before printing it out as a DIY book.
On the "Page Layout" tab, click the arrow in the "Page Settings" line. In the pop-up window, check the "Paper Size" (rectangle with a green marker). The default is usually A4, so we leave it that way. To brochure in finished form corresponded to the size A5, it must be printed on a regular A4 sheet.
Go to the "Fields" tab and click the arrow in the "multiple pages" line. In the drop-down table, select the option "". The program changes orientation to landscape and shows a sample with two columns, each of which is a page of a future book. There are already 10 sheets on the preview, however, all illustrations are outside the margins, and the document will have to be formatted.
Cover
On the "Insert" tab we find " Title page"And dwell on one of the proposed options. For business text, the "Conservative" style will be appropriate. Before the article, two sheets appear with tables consisting of one column. The template offers to fill in:
- Name of the organization,
- title of the book,
- date and the like.
The abstract is located on the second sheet, which corresponds to the inner side of the cover. If there is no desire to fill it, select the cell and press the right mouse button. In the drop-down window, click "Cut", the hint text will be deleted, and the table itself will remain in place. This way, the article will start on the next sheet and the cover inside the brochure will remain blank. When you click on "Delete rows", not only the table cell is removed, but also the page, which in this case is unnecessary.
Numbering
Book cover shouldn't have extra numbers, and Word offers a special header for the first page only. However, the document can split into sections... Putting the cursor in front of the title of the article, select the line "Next page" in the tabs "Page Layout", "Breaks". Double click on the top or bottom of any sheet to open the "Working with headers and footers" mode. The program activates the "Design" tab, where there are buttons to move to the header or footer, as well as between sections. You can also change the fields here.
By default, a link is established between sections. To be able to work only with the headers and footers of the second part of the book, press the button "As in the previous section", making it inactive. Unchecking the "special header for the first page" line in the "Options" tab, click:
- "Insert";
- "Page number";
- "At the bottom of the page";
- "Simple number 2" (center position).
The sheets of the second section of the document are automatically numbered starting with the number three. However, you need to check the headers and footers of the first part of the brochure. If numbers appear on the cover of the book, it means that the program has again established a connection between the sections. It is necessary to release the button "As in the previous section" again and remove the numbers from the headers and footers of the first part.
Text formatting
On one sheet of A4 size, 4 pages of A5 size are placed if printed on both sides. Therefore, the book should also contain multiple of four pages... Now there are just 12 of them in the document, but the last one is the outer side of the cover and it is advisable to leave it blank. Let's perform the usual formatting actions:
- set the indentation of the first line;
- align the text to the width;
- move drawings away from the edge;
- remove extra lines between subheadings;
- reduce margins.
Subheadings should not be placed separately from the following text. On the "Page Layout" tab, click the arrow in the "Paragraph" line, select "Position on the page" and "do not tear off from the next." The picture, which took up a little space on the A4 sheet, now looks large and the text flowing around it is not readable in this form. We activate the window of the inserted object by double-clicking and, hovering over the border, right-click. Click "Label Format", "Position" and "Advanced". In the next pop-up window, on the "Text Wrap" tab, we find the option "Top and Bottom".
The document is placed on 11 sheets and formatting can be finished, although there is another way to reduce the amount of text - changing the font size. You don't have to do it manually. If you click the Shrink to Page button on the Preview tab, the program will reduce the font sizes by 1 or 0.5 points.
Seal
On the "Print" tab, put a tick in front of the line " two-sided printing", Select" all "and" OK ". Word arranges the brochure itself and dictates the order in which you want to print the pages. The printer pauses after ejecting three sheets, and a window appears on the computer screen asking you to put them in the input tray. Most often, the paper is turned over relatively
To print a document in the form of a book, you do not need to go to a printing house - a regular printer will do. However, this process has its own complexities. By not considering them, you run the risk of wasting a lot of time, paper and toner. If you want to print a book quickly, easily and without errors, use our tips.
Note: if there are more than 20 pages, then it is better to use special programs. For example: FinePrint(Yandex search) and ClickBook(search on Yandex).
Preparing Text for Printing with Microsoft Word 2010
Before figuring out how to print a book in Word 2010, you need to understand the process of preparing it.
The first stage is the production of the cover. Go to the "Insert" tab, click on the "Cover Page" button and select the appropriate option. The proposed templates can be changed at your discretion. If none of the cover options work for you, simply redesign any of the templates as needed.
The next step is page numbering. Go to the "Insert" tab, click on the "Page number" and set the desired settings. The numbers can be positioned at the top, bottom or in the margin. The program also allows you to add a chapter number, start numbering from any number.
If you wish, you can make headers and footers indicating the author of the book, its title, chapter, etc. The necessary buttons are located to the left of the "Page number".
Microsoft Word automatically opens the "Design" tab when you click on the header and footer. There you can configure additional settings. For example, the cover usually does not indicate a number, so it makes sense to check the box "Special header for the first page".

If there are several parts in the book, you should use the "break" option. Of course, you can do without this and move the beginning of each chapter to a separate page using the Enter key, but in this case, any change, including adding, deleting pieces of text or changing the font, will lead to the location of the headings being lost and the document will have to be redone ... When you set a break, the chapter starts on a new page and the title is always at the top. To use this option, place the cursor at the beginning of the text you want to wrap and then click on Page Break in the Insert tab. You can also use the keyboard shortcut Ctrl + Enter.
The last stage of preparation for printing the book remains. You need to set the fonts for headings, subheadings and paragraphs, set the size of the margins, align the text, make sure that all pictures are correctly positioned and correct them if necessary.
How to print a book in Word 2010
Before sending the document for printing, you need to change the settings:
- set the appropriate size of the fields;
- set to print two pages per sheet instead of one;
- choose two-sided printing instead of one-sided printing.
You can also specify the binding width in the page settings.
 To the right of the menu is a preview window - with its help you can flip through the book and see how the pages will look after printing. This is especially true if you've added graphics and set text to wrap around the sides. If a mistake was made in the design, you will see something like this:

Get a preview and fix any bugs before sending your document to print.
Please note that because we are using 2-sided instead of simplex printing, the printed text will need to be re-placed in the printer tray. Microsoft Word makes the following recommendation:

However, there is one important point : Paper feed and paper exit in printers may vary depending on the product model. In some cases, following the recommendations of the program, you can get sheets, one side of which will be blank, and on the other the text will be printed twice. It may also happen that on half of the pages the text will be upside down. To avoid this, swipe small test and try printing one sheet on both sides. Once you understand how to put paper in the printer's tray, you can proceed to clean up the copy.
If the book has many pages, it will not be easy to staple the sheets together. The best option- split the document into parts of 10-20 pages, print them in the form of brochures and staple each of them separately. After that, the pieces of the book can be joined together, and if necessary, even a strong binding can be made.
You can prepare and print a book in Word 2007 in exactly the same way.
How to print a document as a brochure: other options
You can do without Microsoft Word. One of the most accessible, but at the same time rather difficult, ways to solve the problem is to print the document and set the necessary settings:
- The number of pages per sheet is 2.
- Portrait orientation.
- A4 format.
- Two-sided printing.
Then you need to specify the page numbers to print. This is the main difficulty. To better understand the principle, take a sheet, fold it in half, then number the pages and unfold the paper again. You will see that on one side there are numbers 4 and 1, and on the other - 2 and 3. This means that you need to specify the printing of pages 4, 1, 2, 3. If there are more sheets, the task becomes more difficult. For example, this is how the sequence looks like if you want to print an 8-page brochure:

If there are 12 pages, you need to specify numbers 12, 1, 2, 11, 10, 3, 4, 9, 8, 5, 6, 7.
If there are 16, then 16, 1, 2, 3, 4, 13, 12, 5, 6, 11, 10, 7, 8, 9.
If 20 - 20, 1, 2, 19, 18, 3, 4, 17, 16, 5, 6, 15, 14, 7, 8, 13, 12, 9, 10, 11.
As you can see, this printing method is relatively easy only if the pages are few. If there are many of them, or if you want to split the document into several parts, print each in the form of a brochure and staple, you will have to do some serious preparatory work to select the correct sequence.
If the above option is not suitable, you can use programs designed to quickly prepare a document for printing. Examples: FinePrint(Yandex search) and ClickBook(search on Yandex). Most of these programs are shareware. This means that they can be used for several days, after which you need to pay for activation. However, if you do not often have to print text in the form of a brochure or book, the paid version will not be needed - the standard test period will be enough.
Also keep in mind that the interface language in most of these programs is English. For example, this is how ClickBook looks like: 
If you are not comfortable using the English version, you will have to install a crack.
Whichever method you choose, after printing the document, be sure to check the result and make sure that all pages are correctly positioned and numbered, headers and footers are in their places, the size of the margins is selected without errors. The best option is to do a test print before making a book or brochure. This simple precaution can often help clear errors before you print all pages.
If you often have to print large documents on the printer, you may want to save a little on paper and toner consumption. Learn to print text as brochures and get 4x your savings!
Do you like to read? Surely, your answer will be positive (at least, I hope that our site is visited by literate people or who want to learn something useful). Today it is not at all necessary for the reading population to buy books or various periodicals. The Internet provides the broadest freedom. You can read online directly on various sites, or download eBooks and view them on your tablet or smartphone.
However, not always reading in in electronic format allows you to effectively assimilate information. Sometimes it is much more convenient to have typed text on hand. Therefore, many people print e-books and various articles on a printer. It would seem that everything is fine: print and order! But, there are a couple of "buts" ... Usually the printer prints on standard A4 sheets, which, at times, is redundant in terms of its size. It would be much better to print on A5 sheets in the form of small booklets or brochures.
This printing option, firstly, significantly saves paper (up to 4 pages fit on 1 A4 sheet), secondly, it reduces toner consumption, and thirdly, it allows you to get a more compact "booklet" that you can always carry with you! Would you like to know how to print a brochure in Word or its free Writer counterpart from OpenOffice and LibreOffice? Then I offer you several ways to do it at your choice.
General principle of creating brochures
The main condition for the correct printing of bulky text in the form of a brochure is the correct position of the pages. You need to calculate it so that the finished booklet can be folded in half and its pages go in the correct order, and on both sides of the printed sheet!
At first glance, it is difficult and incomprehensible. However, simple math will help us. The main "trick" when creating brochures is that the number of pages in it will always be a multiple of 4. Knowing this, you can easily calculate the correct sequence. For example, to print a 4-page brochure, we need 1 A4 sheet. On the front side we will place pages 4 and 1, and on the back side - 2 and 3. To print an 8-page booklet, you will need 2 sheets of paper and placement on the front sides of pages 8, 1, 6 and 3, and on the back 2, 7, 4 and 5.
That is, in fact, on the front side, all even pages are printed on the right, starting from the end, and on the left, all odd pages from the beginning. Similarly, on the back, we will, on the contrary, print on the left all even pages from the beginning and odd pages from the end. In order not to get confused, I propose to visualize the task in the form of a table:
I think now everything is more or less clear. You can continue the sequence for more sheets, however, the more there are, the worse they will bend. As a result, our book will simply "creep away". For this reason, even the GOSTs of the USSR approved the maximum volume of the brochure at 48 pages (12 sheets).
If the number of pages is a multiple of 4, then you can successfully use the above scheme. However, in practice, we usually deal with an arbitrary number of them. In this case, you just need to add from 1 to 3 blank pages to the end of your document to be printed, so that their number becomes a multiple of four!
For example, your document contains 21 pages. You have two options:
- Condense text so that it fits on 20 pages (for example, reduce the font) and print the brochure on 5 sheets.
- Leave the text unchanged and simply add three blank pages at the end... Then you will have a 6-sheet brochure.
Actually, the whole theory. Knowing it, you yourself can manually arrange the pages of your future brochure in the desired sequence and in two passes (first all the front sides, and then all the backs) print it on almost any printer that can print two pages per sheet. However, doing everything manually is long and not very convenient, so we will consider the existing automation methods.
Native function of printing brochures in Word and Writer
It would be strange if such powerful word processors how Microsoft Office Word and OpenOffice Writer didn't know how to print text into a brochure. But at first glance it seems that this is exactly the case. Both editors have a standard function for creating brochures, but it is hidden quite deeply and, alas, it does not always work correctly ...
Print brochures in Word
The main disadvantage of this standard Word function is that the entire document is reformatted from portrait to landscape with not always correct page placement (especially if they have tables or pictures). This method is also inappropriate if the file contains page breaks and / or mixed page orientations (some pages are portrait and some are landscape).
However, for simple books, the option is sometimes the simplest. To use it in Word, you need to open the window "Page settings"... For Word up to and including 2003, its option is in the File menu, and, starting in 2007, on the Page Layout tab, the Margins drop-down list, the Custom Margins item or the small button in the lower right corner of the Page Setup section ":

In the window that opens, follow the tab "Fields" select in the dropdown list "Multiple Pages" meaning "Brochure"... The result of this action will be that the document will be automatically reformatted into landscape view and each page in it will become smaller (in fact, it will turn into A5 format). This will cause the text to shift or be cut off (if using large fonts, table frames, or images).

If preserving the original formatting is not particularly critical for you, then to save paper, you can slightly reduce the text (for example, from the standard 14th to 12th or even 10th) and start the document for printing. In the print settings, you need to select duplex printing, taking into account the properties of your printer (I recommend that you pre-print a 4-page brochure and remember how to turn the sheet over to print from the back side).

So far, the document has not changed visually (except for changes in page reduction, that is, the brochure itself is not displayed anywhere). But, if you activate the option in the printer settings preview before printing, then we will finally see what it was all about - the correct pagination of the document:

Printing brochures in OpenOffice Writer
OpenOffice Writer does a lot better with brochures than Word. There is no preliminary formatting of the document, and all the tasks of forming the brochure are performed by the print manager. This avoids violations. appearance pages of the document, and also eliminates the problems with mixed orientation and breaks (the content of all pages is proportionally reduced and automatically switches to landscape view with a layout of two pages per sheet).
"Native" formats text documents OpenOffice Writer prints brochures with a bang. However, problems can arise when opening Word documents that do not always have a layout compatible with Writer ...
To use the function of printing brochures in Writer (and indeed in the OpenOffice or LibreOffice package) you need to go to the menu "File" and call the item "Seal"... In the window that opens, go to the tab "Page layout", activate the option "Brochure" and set the printing sequence (for a printer with the "All" duplex printing function, and for normal printers, first "Front sides" and then "Backs"):

As you can see, in terms of printing brochures, Writer bypasses the popular Word! If you use this particular editor, then you are in luck in this regard. However, the formatting of Word documents when opened in Writer may suffer, so consider alternative ways printing brochures.
Booklet print queue generators
Modern printers, even the simplest ones, are very "smart" devices. If you study better the functions of their driver, then there you can find a whole bunch of all kinds of settings and options that allow you to flexibly control printing. Among these settings, you may find the ability to print booklets.
Most often, this function is located either in the section that is responsible for page settings, or even directly in the print dialogs. For example, in my Canon printer this is on the second tab "Page Setup" in the list "Page Layout" - "Booklet Printing":
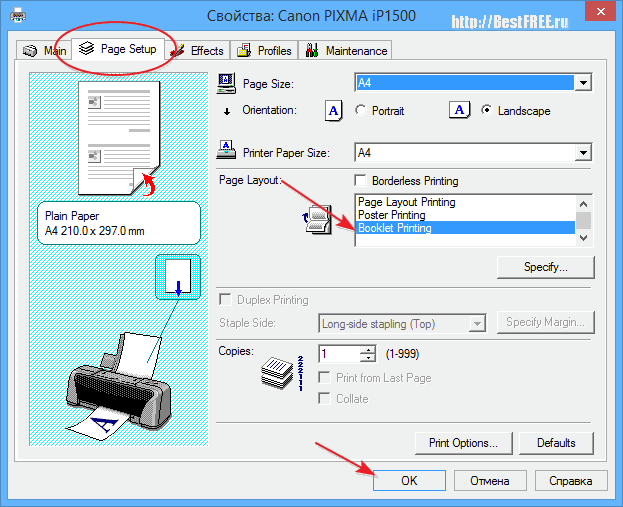
I can say I was lucky. My printer itself correctly breaks the pages of the document in the correct sequence, without breaking formatting, adding blank pages if necessary and correctly changing the orientation of the sheet where necessary. However, unfortunately, not all printers can do this. But most printers (and even in the settings of Word itself) have a print function two pages per sheet:

Having this opportunity and knowing the required sequence of pages in the booklet, we can easily print any document in a booklet without losing formatting. The only drawback of this method is that landscape-oriented pages will remain in the brochure in a horizontal position (see screenshot above).
If this is not so critical for you, then all that remains is to form the required sequence of pages for printing. There are quite a few different solutions for this. I offer you one of the best, in my opinion, an online generator, which for some reason is located on the website of the Berdyansk Department of the Ministry of Emergencies :)

There are many different options and a fairly extensive article on brochure printing in general that you should read. As for our task, then to generate the correct sequence of the print queue, we will only need two or three steps:
- We indicate the number of pages in our brochure (I deliberately put a number that is not a multiple of 4).
- If the number of pages in our brochure is not a multiple of 4, then we should add an extra blank page with an unprintable character at the end of our document (for example, several spaces, or even better invisible characters that are entered from the numeric keypad at 255 with the ALT key pressed). After that, mark the checkbox "Blank page added" so that it will be taken into account when calculating the print queue.
- We press the button "Calculate" and get the result.
The result is displayed as a listing of the copied rows of numbers separated by commas for the front (obverse) and reverse (reverse) sides. At the same time, for the reverse side, there are two rows at once for printers that support or do not support the reverse order of sheets when printing.
If you do not have access to the Internet or want to tinker with an online service, you can install a stationary print queue generator on your computer called (install on behalf of the Administrator):

This program is quite old and has not been updated for a long time, but, nevertheless, it works even on new systems. Its use is quite simple: we indicate the number of pages in our brochure and press the "Get" button. In the "Line 1" field we get a number of front pages, and in "Line 2" - the back pages. In this case, the program calculates only sequences that are multiples of 4.
The program has a small number of options that can be accessed by pressing the "Setup" button. Here you can activate the reverse order of generation of the string, as well as set the insertion of separators or combine both strings into one sequence of numbers.
The advantage of brochure print queue generators is that we can use the calculation results not only for printing in Word, but also for printing brochures from PDF or DJVU files! In a word, from any programs that support the function of direct indication of the print queue.
Brochure Printing Software
As we could see, OpenOffice Writer has very good standard functions for printing brochures, while Word lags far behind in this regard ... on their own.
The most popular are ClickBook and FinePrint. However, their main drawback is that they are both paid and are quite expensive! It is even more sad that these programs have no free counterparts for Windows (under Linux there is a Boomaga virtual printer with similar functionality).
How to be for lovers free software on Windows. who don't want to become pirates? There are two options for solving the problem. The first is to save the document as a PDF file and print the booklet using a viewer program.
I recommend doing this in STDU Viewer. We save the document in PDF (in new versions of Word this can be done directly, and for older versions (before 2003) you will need to use a virtual printer) and open it in the viewer. Now go to the menu "File" and click item "Extended printing"... In the window that opens, in the printer properties, set the printing of two pages on one sheet, then indicate the desired print queue and be sure to activate the option "Automatically rotate pages"... We'll get the right brochure!

The second way to print booklets programmatically from Word is to use various macros. Macros are miniprograms that run in the Microsoft Office environment and significantly expand its functionality. Unfortunately, macros can execute malicious code, so by default they are blocked both by Word itself and by most antiviruses.
Unfortunately, the only effective free way in this case, it is the use of the standard functionality of the printer driver. However, not all printers "know" to print in a booklet. If you are unlucky with this, you can try printing the brochure from PDF. This will allow 100% to preserve the original formatting, but will require additional gestures and installation of additional software.
Unfortunately, there is no universal way for all occasions, but for each task it is really possible to choose the best option actions that will allow you to create a brochure from any document. Successful printing to you!
P.S. It is allowed to freely copy and quote this article, provided that an open active link to the source is indicated and the authorship of Ruslan Tertyshny is preserved.
 Fujifilm X-T1 - Full Review
 Lenses sony sel. Sony lenses rating. Which Sony lens to buy
 Canon PowerShot Pro1 - quality that ends quickly Canon PowerShot G5 X highlights