How to make a 3-D shape in powerpoint. Working with presentation objects and shapes. Change the look of 3D models in Office
In Windows and macOS, Word, Excel, PowerPoint and Outlook support Insert 3D models directly into documents, books and presentations that can be illustrated. You can rotate models 360 degrees and tilt them up and down to reveal a specific part of the object.
The improvements in this update are available only to Office 365 subscribers. If you want to be among the first users to access them, join the Office Insider Program.
Insert, select 3D models, and then - From file.

3D models > from internet sources
Insert.
Format on the ribbon tab
Collection 3D models

If you have multiple 3D models but are having trouble choosing the one you want to use, click selection area to include a list of objects. Then you can easily select one or more images.
Panorama & Zoom panorama & zoom

You can apply interesting effects to inserted 3D images, such as rotating the object.
Sending 3D models by email
In Outlook 2019 or later, you can insert 3D models into the message Email... This feature can be used in the full size message editor. If you are composing a new email message, it is already in use, but if you are replying to a message in the Reading Pane, you will need to click the Open button to expand the message editor to full size. Then you can open the Insert tab and click the 3D Models button.
It is important to remember that there will be no way for another user to change the model inserted in the message. The 3D models in emails are converted to drawings when they are sent, so other users cannot edit it.
Supported macOS versions
3D models in Office 365 for Mac and Office 2019 for Mac are supported on macOS 10.12 and macOS 10.13.4 and later.
This feature is not supported on macOS 10.11 and earlier. It is also not supported on macOS 10.13.0 through 10.13.3. If you are using one of these versions, you need to update it to more new version to use 3D.
Adding 3D objects from a local file
3D models are inserted into files in much the same way as other images. Open a tab on the ribbon Insert, select 3D models, and then - From file.

After inserting the object, you can use the controls:
Use the volumetric rotation control to rotate and tilt the 3D model in any direction. Just click, hold and drag with your mouse.
Drag the image handles inward or outward to enlarge or reduce the object.
You can still use the rotation handle to rotate the image clockwise or counterclockwise, but it's much more convenient to use the volumetric rotation control we discussed above.
Adding 3D models from our online library
To select a 3D model from our online library, select 3D models > from internet sources... In the dialog box that appears, you can browse 3D images from the catalog or search for them.
Select one or more images and click the button Insert.
Note: Microsoft is canceling Remix3D com for January 10, 2020. Read Permissions: Remix 3D FAQ.
Change the look of 3D models in Office
After inserting the 3D model into the Office file, you will see a contextual tab Format on the ribbon tab 3D Model Tools... The Format tab contains convenient controls for customizing the appearance of 3D images.
Collection 3D models contains thumbnails that can be used in the image. For example, you can quickly select "Heading" or "Top-Down" mode.
If you have multiple 3D models but are having trouble choosing the one you want to use, open selection area to include a list of objects (tab home > Location > excretion). Then you can easily select one or more images.
With the alignment tool, you can position an image on a page or on a slide - for example, at the top or side.
Panorama & Zoom allows you to control how the 3D image fits into the frame. Click the button panorama & zoom, and then click and drag the object within the frame to move it. To enlarge or reduce an object within the frame, use the zoom arrow to the right of the frame.
After you add the 3D images, you can do all the pretty cool things, like using the Transform Blend to make the object appear to rotate or rotate.
Adding 3D models
To insert 3D models into Word, Excel, or PowerPoint for Windows Mobile, go to the " Insert"tapes and select" 3D models".
The area will open. Select one or more images and click the button Insert.
Change the look of 3D models in Office
Select any 3D model pasted in Office for Windows Mobile and a tab will appear on the ribbon 3D model... Here you will find tools that will allow you to rotate the model as a standard amount (you can simply use your mouse to rotate manually) or make other changes.

Below are some of the changes you can make.
Wrap text defines how text flows around the 3D model on the page. Perhaps you want your model to be isolated and the text larger or below it? Perhaps you want the 3D model to only take up part of the screen, and also for text to flow around it together? This tool allows you to select the options you want.
Shipment and back allows you to arrange other objects on the page using a 3D model. For example, if you want to add an arrow shape and position it over the model by hovering over something, you can send it backward and move the arrow shape forward so that the arrow appears at the top of the 3D model. Back and forth. Allow that you have multiple layers of images or objects.
Size and location provide some tools to accurately resize a 3D model. If you want the 3D model to be 4.12 inches tall, which can be difficult with drag and drop, but in the size and position tool, you can enter the exact height and width. You can also use this tool to rotate the model around any or all three axes to change the level precisely.
By using alternative text you can ask short description 3D model for visually impaired people who use a screen reader to use the file.
After making changes to the model, you may decide that you want to discard the changes you made. Using the button " Reset"on the right side of the tab 3D Model you will be able to revert the model so that it was at the beginning of its modification.
New collection of pictures
Office 365 doesn't have a traditional clip art collection, but 3D models are a new set of clip art: In the online library of ready-to-use 3D images, you can choose from elements that you can use as is or adapt.
Feedback
This article has been updated by Ben on July 10, 2019... If you found it helpful, and especially if you don’t know, please use the feedback controls below and let us know how we can do it better.
Natalia Vorushilo
How to draw a 3D object (ball) in the program Microsoft Office Power point(step by step algorithm and presentation)
modern technologies are in a hurry to help educators, I present to you another development in, with step by step algorithm fulfillment, the colorful presentation below will help you overcome the difficulties!
How draw a 3D object(ball) v Microsoft program Office Power Point?
Step-by-step execution algorithm:
1. On the desktop, right-click, select "Create presentation Power point»
2. We call it whatever you want!
3. Double click on this icon and the presentation will open.
4. In the "Insert" tab, select the tool "Oval" and draw a shape on the slide. (it will be blue by default)
5. The next step is to remove the contour figures: click on the oval itself, at the top, a window will appear on the control panel "Drawing tools. Format" choose Shape Outline - No Outline, after which the outline will disappear.
6. Similarly, select the fill of the shape. (optional).
7. On the slide itself, press the right mouse button and select the section Shape Format .
8. In the window that appears, click on the line "The size"
9. Install (for the ball) the same width and height dimensions.
10. The next step is to go to the line in the same window "format volumetric figure»
11. On top of the relief, select the button "Circle"
12. Below the relief, select the button "Circle"
13. The next step will require two simple arithmetic operations and I recommend using the calculator! The size of the circle we created is required (in my case it is 9cm) divide by 2.54 cm and multiply by 36 (9 :2,54*36=127,56) round up and enter this figure in all windows. The resulting number must be entered into each of the lines the width and height of the top and bottom, you should get four identical lines.
14. Close the window Shape Format.
15. Here's the bottom line it will turn out:
16. This figure can be animated by assigning it different kinds animations for entering, increasing and moving, according to your imagination (maybe it will be multi-colored balls for counting and fixing colors, or a nicely designed presentation title, and so on.)
17. If you want to give it a shadow, then follow the steps below. instructions:
18.Choosing a shape "oval", remove the outline of the shape (we already know how, I made the fill of the shape with a gradient.
19. Similarly, open the window Shape Format. (see p. 7).
20. In the window that opens, open the item "Fill" further in the menu "Gradient" choose the name of the blank "Moss"
21. Change the fill type to "Way"
22. Delete the third point of the gradient (click on it and delete it, look - there is a button with a red cross next to it).
23. Click on the first point of the gradient and change the color to black.
24. Click on the second point and change 50% to 100%.
25. Set the transparency to 100%.
26. Close the window Shape Format
27. Move our shadow to the shape and now we need to check that the ball is in the foreground, for this we click on the ball itself, then in the control panel select "Move Forward".
28. Our next task is to make the ball and its shadow a single whole, for this we hold down the button "Shift" on the keyboard and press, highlighting the ball and shadow, after that right-click on the ball, select the line "group" and choose "group".
29. Creative successes!
Go for it! I hope that we will continue our cooperation in the field of information novelties!
Chubaeva Natalia Nikolaevna,
after-school teacher
first qualification category
MOU "S (K) OSHI No. 4"
the city of Magnitogorsk
Chelyabinsk region, 2016
Master Class
Topic: "Drawing a 3D object (ball) in Microsoft Office Power Point"
Using the capabilities and options of the Microsoft Office Power Point program, you can draw a 3D object. A 3D object is a three-dimensional geometric figure. In my case, it is a ball. Having mastered the step-by-step actions to add volume to the figure, you can add volume to any other figure in the same way.
Target: introduce step by step drawing a 3 D object in Microsoft Office Power Point.
Tasks:
-
Expand the knowledge of colleagues about how to draw volumetric shapes in Microsoft Office Power Point;
- Hand over personal experience colleagues on the proposed topic;
- Promote the formation creativity colleagues.
Intended product of the activity
Stages of drawing a 3D object (ball) in Microsoft Office Power Point
»
Step 1
On the desktop, by clicking the right mouse button, launch Power Point. "

Step 2
In the menu item "Insert" select the command "Shapes" - "Oval" and draw a shape on the slide.

Step 3
We remove the outline of the shape using the command: click on the oval itself. Above, on the control panel, the Drawing Tools window will appear. Select the button "Shape outline - no outline", after which the outline will disappear.

Step 4
Using the "Fill" button in the same way as in the previous step, change the background of the shape through the "Drawing Tools".

Step 5
Right-click on the image on the slide and select the "Shape Format" section.

Step 6
After executing the "Format Shape" command, the "List of Values" will appear. Click the "Size" section and set (for the ball) the same width and height dimensions. In my case, it turned out 9 cm.


Step 8
We execute the command: "Top" - "Relief" - select the "Circle" button.
We are trying to improve our design skills for PowerPoint templates and it aims us to constantly look for new ways to make graphics and shapes using PowerPoint. Today we will show you how to make realistic 3D - cone in PowerPoint using perspective and 3D options - format.
The previous version of this 3d cone was very simple, but today we will make a more realistic cone.
For this purpose, we will use basic geometry shapes and then apply some interesting 3D graphics and perspective options in PowerPoint. Creating 3D objects in PowerPoint like this realistic cone will easily apply multiple 3D properties.
First, let's start drawing a simple 2D circle shape.

Then right click on the Format and Access Form options. Look at the 3D Rotation menu and click on perspectives are relaxed. This will help add a simple perspective view to your subject.

We are now ready to make it more realistic. Switch to 3D format and add more depth to the object. In this case, we used 1500 pt instead of zero, but you can try with different amounts of depth.

Finally, we got this beautiful 3D cone in PowerPoint. You can repeat the steps to make other large charts, for example to use as a funnel chart for your business presentations, requiring some nice 3d charts. Don't be afraid to test with shapes other than a circle, you can achieve other great results, especially if you are testing with a heart shape, cloud shape, etc.
Without any special experience, I made this picture-avatar without exaggeration in 5 minutes. I'm sure you will notice how simple and fast everything is done. This is especially important in conditions of chronic time pressure and information overload. Of course, there are now a fair number of different free services, one of which is described in. But here I wanted to show the truly limitless possibilities of one of my favorite programs. PowerPoint - standard program included with any package Microsoft Office... So, step-by-step instruction... I'm sure the next volumetric figure it will get even better!
Let's create volumetric geometric figure for packaging an information product with lessons, for example, using the Skype program or some other program you are familiar with. I have Office 2010 installed, but I think that the technology given is not very different for previous versions PowerPoint.
1. We go into the PowerPoint program. Next: File - Create - New presentation- Create. Don't be confused by the word presentation. We will work with only one slide and in the end we will not even save it, but the ready-made volumetric figure we need.
2. So that we have a completely clean slide without any markup, go to the Home-Create Slide-Blank Slide section, or simply select the markup we don't need by clicking on the border and pressing the Delete key on the keyboard.
3. In the same Home section, find the Shapes tab and select the most common rectangle in the Rectangles section. We click on it, a cross appears on the slide.
4. Hold down the left mouse button and stretch the borders of the rectangle to a size convenient for work. Then go to the Express Styles tab and select the appropriate color option for our cover.
5. Now click exactly along the border our rectangle right mouse button and in the drop-down menu select Size and Position.
6. In turn, in the new drop-down menu, select the Rotation of the volumetric figure - Blanks and click on the sample we need. I chose the option shown in the screenshot. You can move the menu window aside to see if we are satisfied with this option.
7. Without closing the menu window, just go to the 3D Shape Format menu item located just above. Here we first set the Depth, which actually determines the volume of the figure. And then you can experiment with Color, Outline, Relief, and of course, Material and Lighting. I will not dwell on these details, since you will see all the changes you create on your masterpiece with every mouse click. Having received the desired result, close the drop-down menu. Now we need to insert a picture and write the appropriate text on our cover.
8. I scored in the search bar Google Images - the Skype logo and a sea of different logos appeared in front of me. I saved the picture I liked to my computer and now I will insert it into our three-dimensional shape in PowerPoint.
9. From the Home section of the top menu, go to the Insert section, then Picture and in the window that appears, find the picture you just saved. We click first on it, then on the virtual button Insert, and now the picture is already on our working field.
10. You will automatically be taken to the Work with Picture tab. Therefore, before turning your picture, as we did in step 6, I suggest practicing with the options marked in the screenshot in blurred yellow. I used Artistic Effects and Express Styles for my drawing, and then did everything as in step 6. Size and Position - Volumetric Shape Rotation - Presets. If you would like to unfold the picture a little differently, you can rotate it using the green circle marked in the screenshot.
11. Now the task is to insert the text on the cover. I'll show you how to insert horizontal and vertical text. Go to the already familiar Insert section and select the WordArt tab. There we choose any style we like and write the text suitable for the cover. You can work with the size, color, type of font by clicking on the text itself with the right mouse button and selecting the desired parameters in the drop-down menu. You need to rotate the text in the same way as we did in paragraphs 6 and 10.
12. But in order to unfold the text vertically at the end of the cover, you must first write desired text as in step 11 and then click on working boundary text with the right mouse button, as we did with the picture in step 5. In the drop-down menu, select the Size and position and in the next drop-down window Label, then from all the Text Direction options select the desired vertical spread, as shown in the screenshot.
13. Now it remains for us to group all the elements of our volumetric image and save as a separate drawing. Our "info product box" is ready!
P.S. The technique of grouping and saving was described in detail in my article on the header in paragraphs 4 and 5.
I would be grateful for any possible comments or questions.
How to create 3D shapes in PowerPoint?
Earlier it seemed to me that it was not realistic to create such a PowerPoint, but it turns out that it is very possible. 3D Shapes make it possible to make presentations at the professional level, it looks clearer and, of course, pleasant to yourself when you see your masterpiece. Well, let's start creating ball in 3D format, why exactly Sharik? Yes, just like it. You will see how a real ball will turn out from a simple Oval shape.
Go to the "Menu" section and here we find the "Shapes" button, or you can find it in the "Insert" section on the "Home"


Click on "Oval" and make such a circle.

You need to click on it and another "Format" section will appear and open it, that is, this section appears only when the shape itself is activated.
Fast and very handy button for creating 3D shapes.
Here, of course, you can choose other styles of shapes, add only lines, or fill from lines, but since we have a different theme, we choose only the themes of the last row.
And we got this option.
And if we need other colors, then click on "Other theme fills" or simply on "Shape fill".
And if we want to select other reliefs, click on "Effects for Shapes" and then on "Relief" and choose the option you like.
I don’t know about you, but I don’t really like what it turned out, when you are in a hurry, you need to finish the presentation quickly, you can of course leave it that way, but when you have time and you like to suffer and see a beautiful masterpiece in the end, then we go the other way. Click on our circle and right-click to open the window and click on "Shape Format ..."
And such a window appears. To look more realistic, we need a shadow, we click on this, then on “Blanks” and from “Perspective” we select one of the options.
Then you can play with the “transparency”, “size”, “angle”, “distance” of the shadow.
Played with the shadow, now click on "Volumetric Shape Format" and insert these numbers:
"Top": width-100
"Bottom": width-100
Click on “Material” and from “Standard” click on option 3, you can have 4 option and from “Translucent” you can try all options. Why these options? It is these, in my opinion, the most beautiful, but as you wish.
Now, with each of these options individually, try each option from “Lighting” and you will see the effect for yourself.
Where it says "Angle" select the angle of illumination.
We have everything ready, but if there are circumstances that force you to change the shape with the same format. How are we to be? It's very simple. Click on our ball and then on the button "Change shape"
Just select and see what other shapes look like with the same format.
About PowerPoint and 3d objects
Glad to greet everyone who is reading this post right now!
Today is another utility that we will create in PowerPoint. Not many people know that in this program it is quite easy to create 3d objects.
It can be any figures that may be needed in our activity: for all kinds of postcards, presentations, landing pages, our products etc.
Let's get started. Remove the title and text from the slide, in the "Insert", "Shapes" tab and select the shape we like. In our case, it will be a heart.
We do right size, go to "Picture Effects", "Volume Rotation" and select "Volume Options".
In the window that opens, in the "Rotation of the volumetric figure" tab, we rotate our heart; for this, you can use the "Blank" tab or simply by setting your parameters.
In the "Line Color" tab, we can choose the color of the line that will run along the contour of our heart.
And in the "Format of the volumetric shape" tab, we alternately increase the pixels, starting with the relief - at the top - the width and height, and at the bottom as well. As the numbers change, so will the volume of our figure.
Now you need to set the depth. As you can see in the screenshot, we get a raised heart, not rounded. I intentionally left it like this to show how the line we chose would look like.
Therefore, we return to the "Line color" tab and select the "No line" function. Now we have a real heart.
If we are not satisfied with the angle, then we can play a little with the turns to see how it will look from different angles.
And we got such a heart. Quite a real 3d object to which you can add various effects.
As you can see the opportunities for PowerPoint programs much more than you might think. Although we have already done both the presentation and the cover for our freebie and even created book in pdf format everything is in the same program, but that's not all. And for those who want to professionally learn how to create information products and make money on them, there is a demanded video course on this topic.
I would be glad if my usefulness is useful to you, but I have everything for today. Good luck and good mood!
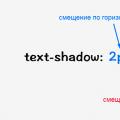 Creating Text Effects Using CSS3 Decoration Line Style: The text-decoration-style property
 Railway waybill reverse side Filling in the railway waybill
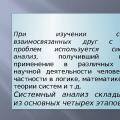 Systems analysis in modern management