Convenient knot for tying and undoing plastic bags. Freshwater fish How to tie bags to untie bags easily
When I was learning to tie a tie knot, I knew absolutely nothing about this science. My father was a masterly master of this skill, and not only me, but also numerous neighbors came to him with a request. Slowly, clearly following certain movements, he quickly enough gave out the finished product a knotted tie. Later, by chance, I came across an article in the newspaper about tie knots, their names and step-by-step tying technology. I found out that my father knitted "double windsor" and there are a lot of different knots. Today, once again packing a bag with fish, I catch myself thinking that I am doing it automatically. Each movement has been worked out and precisely verified. When buying fish from time to time in a store or at the market, you often have to observe awkward movements with the bag and rubber band, which are made by the seller or the buyers themselves. Everyone knows that there is a technology for transporting fish in special plastic bags. This is a dense and sealed plastic bag with an aspect ratio of 1: 3. It is filled with water less than 1/3, slightly less than 2/3 of the bag is left for air. Then the bag is tied with a rubber band and ready to travel.
Rubber gum
The most common gum in our country is a colored Chinese gum, although we had to work with pure rubber (it is more elastic), but it is less common on sale.
Rubber gum
You will need one such elastic band; it is quite enough. If you want to play it safe and double (triple) the reliability of the knot, you can take two, three or more rubber bands.
Before tying the knot, stretch the elastic several times as shown in the photo above. This procedure will give elasticity to the elastic and it will not often tear in the hands, offensively clicking on the fingers.
Knot
I'll start with the one I don't like. I call him "dead". In my opinion, putting on such a knot on a bag is extremely inconvenient. But it is this tying method that many practitioners resort to. "Dead" is because it does not fall off itself when untiing the package and this, in my opinion, is inconvenient. I drew an analogy from the laces on the shoes: you can tie them with a bow, or you can tie them with a "dead knot". To untie such a knot, you need to suffer.
Dead node mortgage
The knot I am using is a noose knot.
It is tied as follows: the center is very approximately determined, the elastic is gathered at the edges and pressed against the base.
Then one end is threaded through the loop of the other end. The result is a stranglehold knot.
Grasping the free end, we begin rotational, tightening movements around the bag, in the direction from the bottom elastic.
As a rule, four turns are sufficient.
And three final turns on the package header.
Three turns and release the gum. Done, the impromptu package is tied. If you look closely at the details, then the whole knot is divided into three parts: the first knot is a stranglehold, this part allows you to fix on the package; the second part is a turn of the cross to go to the third part; and the third part is three collars for fixing the folded part of the bag.
Having studied the materiel, we take a bag in our hands, fill it with water and try to tie it ourselves.
All kinds of additives to water, designed to provide more comfortable conditions of transportation, is a topic for a separate conversation. These additives include Activated carbon, all kinds of conditioners from simple ones like methylene blue to complex ones, such as conditioners from Tetra, Sera and others, widely found in pet stores. There are also anti-stress drugs in the arsenal of aquarists.
It is important to ventilate the bag: to do this, squeeze out all the air that is already in it and unfold the bag again. Avoid the temptation to blow into the bag. Together with the air, carbon dioxide will also get there, the solubility in water of which is much higher than the solubility of oxygen. Grab the bag with your free hand at the very top.
While holding the bag on top, wrap the bottom around its axis. With the first twist, you will close the air in the bag. You just need to secure the bag knot by wrapping the bag a couple more times. As a result, the package is closed. It remains to tie an elastic band, which must be kneaded beforehand, as mentioned above.
We put an elastic band on two fingers, make a loop, tighten it and twist it.
Three or four turns of the rubber band are enough. Next, we twist the remaining strap of the package to the end, bend it and press it against the main pillar.
I want to clarify that the air in the bag is not held by an elastic band, but by a hermetically twisted bag. The elastic band only fixes the tied in the desired position.
Twist the elastic and three turns around the fold. Everything. You can go.
The knot on the package can be seen in the photo above. In such a package, fish can be kept for 20-60 minutes, depending on the size of the fish, the amount of it in the package, and the air temperature. environment, type of fish, etc. If the road is not over, and the fish are visually bad, they should be repackaged. Packages are different sizes, manufacturers and firms. But this does not change the essence of the matter.
There is nowhere easier to untie the packet. The knot was pulled by the tail, and the knot was free itself and in front of my eyes there was a loose strap, which is much easier to untie than the “dead knot”.
Some difficulties may arise during the packing of the package. For example, you cannot intercept a packet so that there is air in it.
It doesn't matter either. Take the hose from the compressor (the one that blows air bubbles in your aquarium) and inflate the bag with this air. It's okay if you spend a little more time packing, but your fish will have a better chance of arriving at their destination safe and sound. If the fish need to endure a journey lasting more than 20-60 minutes, then just tying the bag is not enough. The bag needs to be filled with oxygen. Oxygen refueling the best option anyway. Sometimes there are problems with the delivery of fish even in Minsk. A package with two liters of water for 25-30 individuals is enough for only 30-35 minutes, and then the fish fall asleep, just lie on the bottom and die.
Oxygen is not a problem. The main thing is to know where to look. In my practice, there was a case when the fish had to move the road for about 12-14 hours. Oxygen in 1 liter and 2 liter cylinders is sold in Zhdanovichi. But I was looking for a place where I could fill the bag with oxygen, since it seemed to me inexpedient to buy a whole cylinder of oil-explosive gas in the volume of two liters for $ 40 for a one-time refueling of the bag. Then the method "Lexx Ball" was born. Oxygen is widely used, including in gas cutting. At any service station, you can ask to fill an ordinary balloon with oxygen, and when packing a bag with fish, fill it not with ordinary air, but with oxygen from the balloon when it is convenient. This is just a thought, the scope of oxygen is much wider. And storage of oil explosive gas (oxygen) at home is not always advisable.
Before a long journey, it is advisable not to feed the fish for at least a day. If an adult copy is possible and more. Nothing bad will happen if an adult fish sits on a diet for a couple of days.
I hope that my story will be useful to someone.
Do you think that plastic bags left over from purchases will soon fill the entire space in the drawer under the sink? They take up a lot of space and create so much rubbish that they are beginning to be banned in many parts of our planet. However, it is not uncommon for people to choose to reuse and store packages instead of throwing them away. If you want to preserve your bags and get rid of the clutter they create at the same time, it is best to learn how to fold them neatly so that they take up less space. This article will introduce you to the most best practices, with which you will give your packages a compact form. And when the packages are needed, you can easily deploy them.
Steps
Fold the bag into a triangle
Spread the bag flat. If you are folding a T-shirt bag, make sure the handles are parallel to each other. Try to straighten the handles as much as possible, as they will also play an important role when you fold the bag into a triangle.
- The easiest thing to do is to spread the bag on a hard, flat surface, such as a kitchen countertop.
- With enough dexterity, you can try to spread the bag on the weight, and not on a flat surface. Keep in mind that this is not easy, so don't be discouraged if you fail. In any case, you can try to do it again later when you have a little more experience.
- Try to expel excess air from the bag as much as possible. To do this, slide your hands along it in the direction from the bottom up.
Start by aligning the sides of the bag (if folding a T-shirt, line up the handles). Fold the bag again, now aligning the previous fold with the sides of the bag. Continue to fold the bag further, folding it in half lengthwise each time (if folding the T-shirt bag, stop when the resulting strip is approximately equal in width to the bag handles). You should have a narrow rectangular strip.
- Remember to flatten the bag and blow out excess air after each additional fold. The flatter it becomes, the easier it will be for you to fold it into a triangle.
- The number of longitudinal folds will depend on the size of the bag and the shape of its handles. Usually only two or three folds are required.
Fold the bottom corner of the rectangular strip diagonally. Select the bottom corner through which the last longitudinal fold passes. Fold it diagonally, pulling it towards the opposite side of the strip to form a triangle.
- Smooth and straighten the resulting triangle.
- At this stage, the package will look like a rectangle with one adjacent side with an isosceles triangle (on the smaller side).
Fold the resulting triangle up onto the strip to create a new triangle. Take the free bottom corner of the triangle and fold it up into a rectangular strip, converting the adjacent line between the old triangle and the rectangle to a new fold.
- The outer contours of the polyethylene strip will again take the shape of a narrow rectangle.
- The technique used here is similar to the triangle folding of the American flag.
Continue to fold the strip along the adjacent sides of the triangle. Repeat the last two steps, gradually winding the strip around the triangle. Work all the way to the very end of the strip (or bag handles). Remember to leave a small tip of the strip for the finishing fold.
- With each new fold, you will have new isosceles triangles stacked on top of each other.
- Remember to unfold and flatten the bag after each fold. If the triangle turns out to be too chubby, it will not hold its folded shape well.
Tuck the remaining end of the strip into the folded triangle. Make the last fold by wrapping the tip of the strip around the triangle. Slip it into the pocket formed by the previous triangles. As always, flatten the bag after the next fold so that it looks neat and holds its shape well.
Repeat the procedure with the rest of the bags and store them. Fold all other bags into triangles. They now take up significantly less space and are easier to store. They can be stowed away anywhere, for example, beautifully placed in a basket on the kitchen countertop or simply tossed in a drawer under the sink. It's up to you to make the decision.
To use the package, simply expand it. As cute as the triangular bags are, they cannot be used as they are. If you need a bag, take a triangle and release the end of the folded strip from it. Grasp this edge and simply shake the bag to unfold it completely. Depending on how tightly you folded the bag, you may have to try a little to flatten it.
Tie the bag in a knot
Fold the bag into a longitudinal strip. To tie a bag in a knot, you must first roll it into a narrow strip. In this case, it doesn't matter how you orient the handles of the T-shirt bag in front of you. To collapse a package, simply follow the steps below.
- Spread the bag out on a hard, flat surface. Run your hands over the bag to expel excess air from it as much as possible. The flatter the package becomes, the smaller the finished knot will turn out from it.
- Fold the bag in half lengthwise to form an elongated rectangle. As before, unfold and flatten the bag.
- Fold the bag in half lengthwise again. This time it will become an even narrower rectangle. Continue folding the bag in half lengthwise until the layers of polyethylene begin to offer some resistance to your hands. Remember to smooth every fold.
Fold the resulting strip across in half. Fold the strip in half to make it shorter. You should now have a narrow rectangle in your hands that is half the original length of the bag.
- Check the plasticity of the strip obtained by wrapping it around your finger. If the strip is too elastic for this, then it is too elastic in order to tie it in a knot. In this case, unfold the cross fold and unfold one or two longitudinal folds. Then fold the strip in half again and test for ductility.
Form a small loop from the shortened strip. Place the loop about 1 inch (2.5 cm) from the last fold on the strip. The loop should be large enough to fit two of your fingers. Make sure the folded end is on top and the longer (and possibly uneven due to the handles) underneath.
Hello to all homemade lovers!
The fact is that in our everyday life, we literally deal with various plastic bags every day. I mean the usual thin, transparent plastic bags.
We constantly have to clean and store some things in them at home. In addition, when shopping in stores and markets, many products (especially those sold by weight), such as vegetables, fruits, sweets, cookies, etc., are also packed in plastic bags.
But the most important thing is that when tying these packages, we basically all use a simple knot as one.
The photo below shows an example of tying a simple knot. And for clarity, a simple knot tied at the end of a string is shown on the left, and a knot tied to a plastic bag on the right. Moreover, in this photo, the nodes are shown in a loose form.
So, the fact is that a simple knot has one very big advantage - it fits very simply. This is perhaps the simplest knot among all (hence, by the way, its name) and it is easy to tie it, maybe even the smallest child.
However, this is literally the only advantage of a simple knot, because everything else is its disadvantage.
And one of its biggest drawbacks is that a simple knot is very tightly tightened, so that it becomes very difficult to untie it later.
The photo below shows the same simple knots in a tightened form.

And really, it probably won't be an exaggeration to say that there is probably not a single person in the entire world who, at least once, did not have to suffer a lot by untiing a tightly tightened simple knot on some rope.
But in reality, literally each of us in our entire life has to suffer, undoing a simple knot more than a dozen times.
And moreover, we, ordinary people, who very rarely deal with ropes, mainly have to deal with simple knots tied precisely on plastic bags.
And indeed, who of us has not had to bring food packed in plastic bags from the store for several minutes, swearing and breaking nails to suffer, trying to untie a simple knot at the neck of the bag, tied and tightly tightened by a "caring" seller.
That is why, I want to advise everyone to use not a simple knot for tying packets, but a knot called the "eight".
The photo below shows an example of a figure-eight knot tied (but not tightened), at the end of the rope and at the neck of a plastic bag.

I must say that this knot has been known to mankind since ancient times. He is also one of the so-called " nautical knots", Since ancient times it has been used in maritime business.
The "figure eight" knot is tied, it is also quite simple. At first, it is knitted in the same way as a simple one, with the only difference that the tip of the rope or bag is not immediately threaded into the loop, but once again wraps around the loop itself and after that is already threaded into it. At the same time, in a loose form, this knot really resembles the number 8 (see the photo above), which is why the name of the knot actually came about.
Learning to tie this knot is quite simple, just a few practice sessions with its knitting at the end of the rope is enough.
So, the fact is that the "eight" knot has one remarkable feature. Even when tightly tightened, it comes loose very easily.
The photo below shows this knot in a tightened form.

And here it will be tightened even more.

Nevertheless, even with a very strong tightening, this knot is always easy to untie in just a couple of seconds.
That is why, I recommend everyone to use not a simple knot, but a "eight" knot for tying plastic bags.
Suffice it to say that I personally have been using the figure eight for tying bags for about twenty years, and during all this time, not only have I never regretted, but I never stop admiring this knot.
So tie the bags with a figure eight, and I assure you that you will not regret it!
I just have one dream, but it seems to be unrealizable. If only we could teach all the sellers who tie plastic bags to use the G8 knot too!
Well, that's all! Goodbye to everyone!
 The fastest boat in the world!
 The history of the Off-White brand
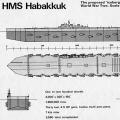 Habakkuk: how the British tried to build an aircraft carrier out of ice Why the project was curtailed