Diy a4 notebook. Designing a notebook: interesting ideas for a notebook. Methods for fixing pages
Despite advances in technology, notebooks have not lost their popularity. They are actively used as business people, so schoolchildren or just children who use sheets for drawing. Of course, such things can simply be purchased in stores, but many are interested in how to make a notebook with their own hands.
The finished product can have a wide variety appearance... It all depends on how complex the scheme the person has chosen. Of course, the more time and effort you spend on preparing sheets and covers, the more presentable your notebook will be. If the notebook acts as a gift, then you need to choose complex schemes, but simple options are also suitable for children's play.
Simple notepad for kids
Making your own notebook is always divided into two main steps:
- Preparing pages,
- Cover creation.
If everything is clear with the first point, and the process requires plain paper, then with the second everything is much more complicated. A wide variety of materials are used to create the cover, but ordinary cardboard is suitable for a fairly simple craft.
It can be decorated with a special film or you can choose a beautiful option in advance. For example, boxes for sweet gifts already have a fancy pattern, and they do not need to be decorated additionally.

To make more interesting pages for your child, you can print special notebook templates for them in the OQ copy center. As a result, the kid will be able to easily write on ready-made lines, and a variety of animals will make viewing the book more interesting.

- The resulting pages are folded in half to make a fold line.
- They are placed on the finished cardboard cover and sewn in the center.
- The easiest way to do this is with a sewing machine.

That's all. All that remains is to trim the excess threads and, if desired, add others decorative elements... This is how you can easily make a small notebook for your child.
Slim notepad with clasp
Let's consider another variant of the notebook. Its complexity, like presentability, is somewhat higher, but it still belongs to fairly simple. You can make such a notebook in about an hour, while she will be soft and beautiful cover ... Of course, the work will require much more materials than a bundle of sheets, threads and pasted cardboard.
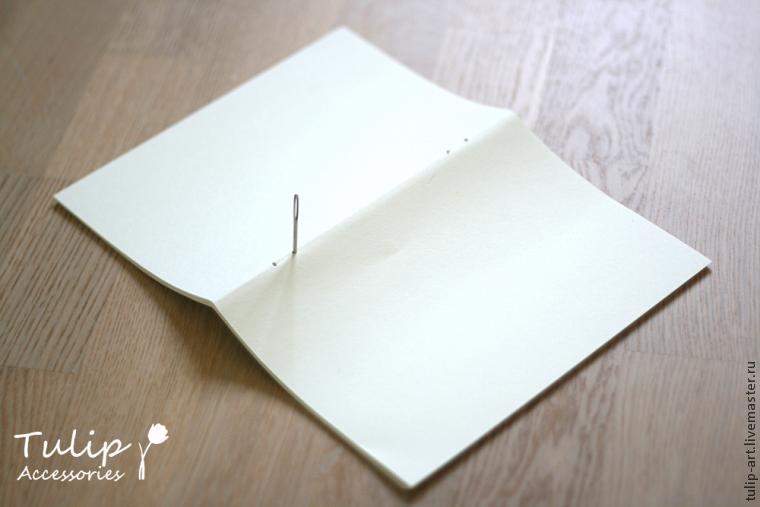
- First you need to prepare the pages. The required amount is folded in half.
- Four relatively large holes are made in the fold, a pair in the lower and upper parts. A large enough needle should pass through the resulting holes.
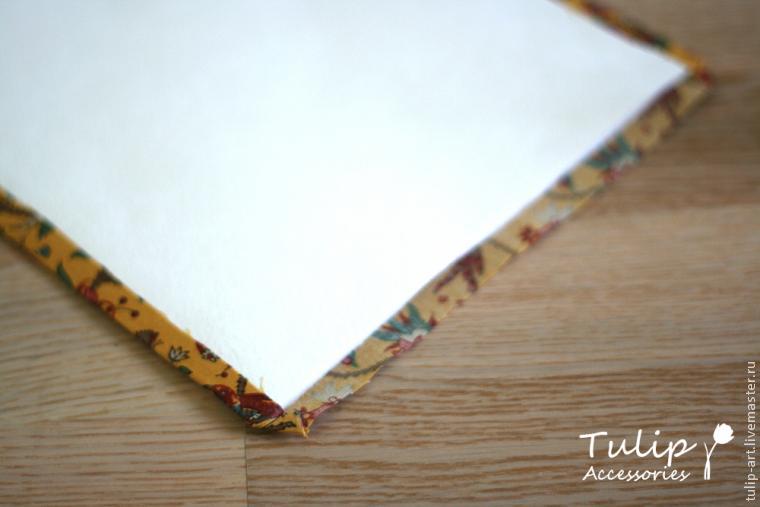
- In addition to the cardboard base, the cover will require a beautiful fabric and fleece.
- The fleece should be the same size as the cardboard. They stick together evenly.

- You need to cut off a piece of fabric, a couple of centimeters more cardboard.
- The base is glued to the fabric, the excess part is wrapped inward, and the corners are fastened as follows.
- The fasteners can now be prepared. To do this, take squares of cardboard or thick paper with a side of 4 centimeters. They are also pasted over with fleece.

- The fasteners are then fabricated in the same way as the rest of the cover.
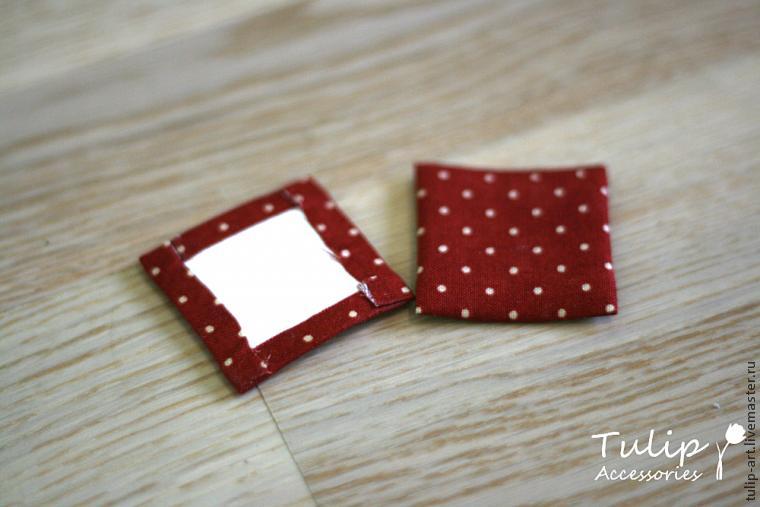
- A button is sewn to one of the squares.

- A loop is glued to the second on the back. It fits on the back of the future notebook.

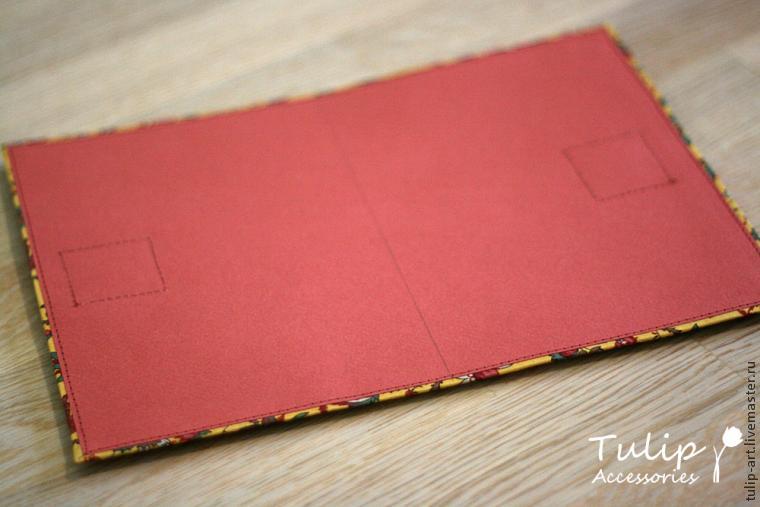
- Both squares are sewn with a machine.

- After that, the endpaper fabric is sewn to the inside of the cover.
Now you can start working with pages. They are evenly placed on the finished cover, after which they are sewn with a large needle through the holes prepared in advance. The knot can be hidden between the flyleaf and the pages. In conclusion, it is worth attaching special metal elements to the corners.

How to make a notebook with your own hands?
If you want to make a full-fledged notebook like those that are sold in stores, then you will have to spend more than one hour, and even more than one day, on work. But in such a notebook there will be much more pages, it will acquire a full-fledged hardcover. From additional materials here you need:
- Stationery Clips,
- Silicone sealant,
- Pieces of sponge,
- File,
- Glue gun.
You also need to have on hand different kinds fabrics, including plain colors such as fleece, cardboard, decorations and standard tools like a ruler with a pencil. Some of the list can be replaced with other elements, but this will be discussed later.
First you need to prepare the pages. They can be empty, they can actually be printed on special templates, go the stitches and decorations are displayed independently in graphic editors... After that, they need to be bent in half. In order for a notebook to turn out to be no worse than a store one, it is important to make the folds very carefully and neatly.
- You need to create several sets of leaflets, five in each. The result will be a large stack.

- Since there are a lot of pages, it takes time for them to take shape. To do this, they must lie under a large press for about a night, fastened with clamps.

- Then it remains to trim them, move the clamps to the top and bottom, and now you can start processing the spine.

The side must be measured and divided into seven equal parts. A cut must be made on each measurement. The easiest way is with the help of a file, but it will be replaced by a clerical knife or other suitable improvised means.

How does sewing work?
After the cuts are ready, it's time to staple the pages. This will require lightweight fabric strips, about three centimeters wide (as the distance between the cuts). You also need strong threads. Linen is the best choice, since they are also quite thin.
- The fabric is located on two sections adjacent to the central one. Two more will remain on either side of them.

- One linen thread is inserted into the needle. Its length directly depends on the number of future pages, since one should be enough for everything at once.

- Through the first hole, you need to bring the needle straight into the middle of the future book, and then pull it out through the second. She goes on in the same way, but it is very important that the thread goes over the fabric. These members come in handy for further grip.

- Now it's time to attach the second to the first five sheets. For this, it was necessary to leave the thread on top of the fabric strip. First, the needle simply enters the first hole of the new stack, exits through the second and passes through the thread left on the fabric, as in the photo.

- Make a knot in the last hole. Starting from the third stack, you can use a sewing knot to hold the pieces together more tightly

All other pages are worked through in the same way. This is one of the most difficult steps in making your own notebook. The result should be something like the photo.

Endpaper making
When all pages are tightly bound, you can start gluing the spine. At this stage, silicone sealant will show itself best, as it will result in a tight, but elastic fastening. In order to smear everything, a sponge is useful, you can cut off a piece from the kitchen. Do not use a brush, as it will have to be thrown away as a result.

After the spine is completely processed (you need to grease all the cracks well), it is again fixed with clamps and left for several hours. It is best to give him a whole night, but this is not necessary. Now you can move on to the flyleaf.
For preparation, you will need two even sheets of good double-sided cardboard. These should be fairly large pieces - each in A4 format. You will also need slightly smaller kraft paper. It can be replaced with landscape.

- On kraft paper, a small strip is bent on one wide side, about half a centimeter, as shown in the photo.

- Using a toothpick, glue is applied to this strip from the outside.

- Then the strip is coated on top, a sheet of cardboard is glued to it. From the outside, fabric strips are attached.

The finished flyleaf, vaguely reminiscent of the future cover, should dry for about half an hour. After that, you can proceed to another rather laborious process - the manufacture of a captal.

How to make a captal?
To weave a captal, you need a fairly thick rope thread, thin linen, a needle and a paper clip. The needle is needed for sewing fine thread.
- In the first five sheets, you need to find the middle and fix a paper clip there. A rope is threaded into it from the side of the cover.

- The needle with the finer thread enters the top puncture of the first stack.

- Then it is wrapped around the rope as in the photo.


- All other piles are worked through in the same way.
- It remains only to secure the thread with a sewing knot.

It is very convenient to attach the tails remaining in free flight with a glue gun. In the absence of it, you can try to cope with ordinary glue.

Cover work
Making a cover is one of the most creative steps in making your own notebook. It will require two types of cardboard - one more dense, the other less. From the first, blanks are made that are 3 mm higher than the notebook. Strips about half the width of the sheet are cut from the second.
- You need to measure the thickness of the resulting spine.
- Add about 4 mm to this size.
- With the help of an awl, you need to squeeze out the stripes at such a distance from each other. Inside, a few more stripes are made in the same way. It should look like the photo below. This is to ensure that the notebook folds easily.

- On the side of the resulting scoring, dense sheets of cardboard are placed. They are glued to the Moment glue.

- Fleece is glued to the finished base (from the outside).
- It remains to trim the edges, cutting off the excess, and you can proceed to the decoration, that is, processing with fabric.

- If you want, you can add almost anything to it, like lace, ribbons or beads. Just a beautiful fabric canvas will do.
The selected material is ironed and placed under the cover, face down. Then it is glued, carefully processing the corners. If you wish, you can now add a bookmark to the central part. Then all that remains is to attach the pages to the cover.


To do this, first the bottom side is coated, glued to the cardboard, then the top is coated and glued. That's all. Now it is clear how to make a notebook with your own hands, which you can be proud of.


Video instruction
My dear girls and boys (if any) !!!
Do not be alarmed that the article comes out today, MK starts tomorrow, on Monday, on September 8 !!!
So, we are starting the first stage of our joint project "Notepad from scratch", which will last from September 8 to September 14 inclusive. You can join us at any stage.
Remember that at the end of the stage (September 14), each of you must create an entry in your diary called "Results of the 1st stage of the joint venture" Notepad from scratch ", where photos of what happened to you will be posted .. And I will check your homework and give marks !!! Kidding! I'll just see what you get))). I will answer your questions throughout the week. If suddenly I delayed with the answer, you can find me in my blog, or in contact, or in classmates. Who needs links to them - write to the LAN.
TIME
Stage 1. Formation of the diary block and creation of the binding - from 08.09 to 14.09
Stage 2. Weaving the capital - from 15.09 to 18.09.
Stage 3. Paperback design - from 19.09 to 25.09
Stage 4. Collecting a notebook together - from 26.09 to 30.09
Well, sir !!! Ready?!!! Getting started!
So, for the first stage we need

1. A4 paper.
2. Scissors
3. Large needle
4. Strong threads - "Iris" or nylon
5. Creasing stick or plastic card (optional)
6. Ruler
7. Pencil
8. "Moment-Crystal" glue or transparent silicone sealant
9.4-5 stationery clips
10. Pieces of cardboard
About paper. I decided to make a notebook with children's pages. Like a "Diary for Mom". Therefore, I printed the pages in advance on the printer. You can find on the Internet any you like and suitable for what exactly you will be doing - a diary, a cookbook, a children's notebook ... Or you can just take colored office paper and you will have a bright, cheerful notebook!
The leaves need to be folded in half! For this you need a creasing stick or a plastic card. Well, or just fold them with your fingers)))

Finished sheets need to be folded into the so-called "notebooks", that is, combine 5 pieces. When choosing the number of pages in your notebook, for convenience, take the number that is a multiple of 5. For example, I took 50 sheets. When folded, I have a 100-sheet notebook. And so, we fold the leaves in batches of 5 pieces.

Next, we need to mark up our future binding. To do this, we align our leaves, carefully put them in a pile and fasten them on the sides with clamps. So that there are no traces of the clamps, we put cardboard under them.

Now we make the marks. The height of the sheets came out 21 cm. I usually make marks at a distance of 3 cm from each other. The result is 6 marks - 7 equal parts. We draw lines along the entire spine so that the marks remain on each notebook.

Now we take the remaining clamps and fasten them along the entire length of the spine. And we leave it in this form for a day. We need our notebooks to be compressed, packed.

The day is over! Now we need to make holes in our notebooks according to the marks that we made. To do this, I take a needle and carefully, making sure that the leaves do not move, I pierce all 5 leaves in the notebook.

Now comes the fun part. BINDING!
We will weave a Coptic binding. At first it seems very difficult. Look at the photo several times, do everything in stages. And everything will work out! The hardest part is connecting the first two notebooks! The rest is easy!
In my photos, I schematically showed you how the thread runs inside.
So, let's take the first notebook! Attention! If your notebook has a beginning and an end, that is, the arrangement of the pages is important, then we take the notebook that will be the last in your notebook first! And then - the second notebook - this is the penultimate, the third - the penultimate, etc. In general, shift your notebooks from end to beginning, so as not to get confused.
We insert a needle with a long thread into the far right hole and pull it out through the left extreme. Single thread. We do not tie the knot, we leave the tail.

Now we take the second notebook, put it on top, align the holes, align the leaves. Insert the needle into the leftmost hole of the second notebook

We open the second notebook, stretch the entire thread and insert the needle into the adjacent hole.

We take out the needle and insert it into the second hole of the first notebook

We take out the needle inside the first notebook on one side of the thread

And we insert it into the same hole, only on the other side of the thread. how it turns out that we are hooked on the thread inside the first notebook.

We remove the thread from the first notebook and insert it again into the second hole of the second notebook.

We take out the needle

And we insert it into the third hole of the second notebook

We put the needle into the third hole of the first (lower) notebook

Again we withdraw the needle from one side of the thread, and we start it into the same hole, clasping the thread in the first notebook with a loop

We remove the needle from the first (lower) notebook, and again insert it into the third hole of the second notebook. And we insert it into the fourth hole .. And then everything goes according to plan - we put it back into the lower notebook, grab the thread and back into the fourth hole of the upper notebook.
And here it is, the last hole in the upper notebook. We bring the thread out ...

.. it should look like this

We are tying a strong knot !!! And that's it! Your first two notebooks are connected !!! Do not cut the thread! Let's continue!

Then we take the third notebook and put it on top. Align and insert the needle into the far right hole of the third notebook. The thread was not torn off, so your third notebook is "sewn" to the second.

Pull out the thread and insert into the adjacent hole

We pull the thread out and the needle hooks onto the loop that connects our first two notebooks. We insert the needle under it and draw out the thread.

Insert the needle back into the penultimate hole.

Pull out the thread and insert it into the next hole.

We bring the thread out again, pull it under the loop that connects the previous notebooks and insert it back into the hole. And so we do it with all the notebooks. As a result, you will have such a strong and beautiful binding.

Girls, it only seems that everything is confusing and very complicated! Just don't drop it and look carefully at the photo. And you will be happy !!!
Well, the final step. We take our stitched block, align it and fasten it again on the sides using cardboard and stationery clamps. We take glue or sealant and squeeze it onto the spine of the block. We do not regret it, but we do not get excited either)))

Then we take a piece of cardboard and level our glue / sealant along the entire length and width of the spine, we try to rub the glue between the notebooks so that it saturates our entire spine!

We take the remaining clamps and fix, press the block along its entire length. From the sides we move the clamps to the spine. Leave the glue to dry completely. It is possible for a day or before the start of the next stage - the stage where we will give free rein to our imagination!

If everything is not very clear, I have a video. Write, I'll throw off the links!
Addition: At this stage, you can align the leaves along the cuts. I do this in the nearest printing house. And it costs me 15-20 rubles. Check with your printing houses! Of course, you can try it yourself with can. a knife and a metal ruler, but I just can't do it perfectly! Therefore, I trust this action to professionals))))))
If you decide to age your diary, then the sheets do not need to be aligned - it looks more vintage)
For those who are too lazy to look for pages on the Internet.


Stationery stores offer a wide variety of different notebooks. However, it is much more interesting to make a notebook for notes with your own hands, because hand-made creativity allows you to get an absolutely exclusive thing the right size, color and thickness.
By the way, if a loved one is planning a holiday, then a diary made with soul and originally designed handmade will be a great memorable gift.
About, how to make a stylish notebook from scratch from paper, glue and other materials at hand, we will tell in this article.
Step-by-step instructions - we make a notebook with our own hands from paper and glue
Adhesive notebooks, that is, made using the technology of seamless binding of pages, are the most popular in scrapbooking.
Such a notebook can be easily made with your own hands, while if you approach the creative process responsibly, then a homemade diary will in no way be inferior to industrial products in its durability.
To make a notebook, you will need the following materials and tools:
- Watercolor paper... It is better to choose just this one, since it is thicker and more pleasant to the touch compared to ordinary office paper;
Gauze or regular medical bandage; - PVA glue - the best option for creativity. This inexpensive, environmentally friendly glue perfectly glues paper and cardboard, sets quickly, does not shrink when drying, perfectly fills gaps and gaps, and ensures high strength of the glue seam. If PVA is not at hand, you can use ordinary silicate stationery glue for paper and cardboard.
- Stationery clips, clamps, or regular clothespins;
- Glue brush;
- Colored paper;
- Thick cardboard for the cover(ordinary packing cardboard from an unnecessary box will do);
- Ruler;
- Pencil;
- Stationery knife;
- Double sided tape.
 Bend A4 sheets in half and put them in a pile
 We clamp the sheets and glue
 We make a cover from any sheets
 The procedure for making a homemade notebook is as follows:
- Fold sheets of watercolor paper in half. We choose their number depending on the desired thickness of the notebook;
- We put the resulting blanks in an even pile, clamp them with clothespins or other improvised devices;
- We put a bandage or gauze on the junction of the sheets, coat with PVA glue, leave to dry for several hours;
- When the first layer of glue dries up, glue the joint again, reinforcing the joint with gauze, and leave it to dry again;
- The basis of the future notebook is ready, it remains to check the quality of gluing the pages and, if necessary, strengthen the connection with glue;
- Let's start preparing the cover. To do this, from a sheet of cardboard using stationery knife cut out blanks, the size of which on each side should exceed the page size by 5 millimeters. We glue the resulting blanks with double-sided tape on a sheet of thick paper;
- We decorate the inner side of the cover using colored paper. You can glue it on both PVA glue and double-sided tape. The second option is more convenient and takes less time;
- We glue a block of pages with a cover - our notebook is ready! All that remains is to decorate the cover to your liking.
VIDEO INSTRUCTION
We offer you a selection of ideas and methods for the original design of notebooks and diaries.
The scrapbooking technique allows you to use for decoration not only scrap paper and napkins for decoupage, but also everything that is at hand: magazine clippings, ribbons, rhinestones, beads, buttons, memorable items, etc.
How to make a notebook out of paper without stitching and glue
You can also do it yourself mini notebook without glue and stitching.
This quick way simply irreplaceable when you urgently need a notebook for notes.
To make a cute origami notebook without glue, you will need:
- one sheet of A4 paper (preferably colored);
- scissors;
- stationery knife.
The process of making a mini-notebook itself is quite simple:
- We bend a sheet of paper in half along the length;
- We unfold the sheet and again bend each of the two halves in half to the center;
- Turn the sheet over and repeat the same folds, but already across the width of the sheet;
- We cut the sheet at the bend in such a way that we get 8 identical rectangles, bent in the middle;
- Divide the resulting rectangles (future pages of the mini-notebook) into 2 parts;
- We take one rectangle from the first pile and measure 2.5 centimeters at the bend on each side. We put the whole stack together and make neat cuts on both sides according to the marking;
- We take one rectangle from the second pile and measure 2 centimeters at the bend on each side, put points in these places and connect them into a segment. We put the entire second pile together, iron it along the fold and make a neat cut with a clerical knife along the marked line;
- We take the first stack of rectangles, twist one side of the future pages into a tube and push it into the hole of the second stack;
- Straighten the pages - our mini-notebook without glue and stitching is ready. It remains only to arrange the original origami notebook to your liking!
VIDEO REVIEW
As one of the most widespread hobbies of American women, scrapbooking is gaining more and more popularity in our country. site we will tell and show you how to make a notebook with your own hands using fabric, felt and tea leaves! Custom scrap kit?
To create a textile notebook, prepare:
- white A4 paper - 10 sheets
- scrap paper A4 - 1 sheet
- tea leaves
- thread with a needle
- thick cardboard 11.5 × 15 cm - 2 parts, 0.7 × 15 cm - 1 part
- fabric (felt) 20 × 28 cm
- decor - satin ribbons, lace, plait, flowers, buttons, stickers
- scissors
- PVA glue
- glue "Moment-gel"

Paper block
Cut all 10 sheets of paper in half. We brew cool tea in a container of a suitable size and immerse white sheets in the cooled tea leaves (one on top of each other). After half an hour, take out the paper and lay it out to dry.

It turns out homemade aged paper!

Now iron each sheet to make the paper smoother and more even.

We fold each sheet in half and collect 5 blocks of 4 spreads. As a result, we get 40 sheets (paper for 4 notebooks is prepared in the photo):

We sew each block of 4 turns with a thread in several places.

We connect 5 stitched blocks into one, sew and thickly coat with PVA glue. We leave to dry.

Cover for notebook
Making a cover for a notebook with your own hands is quite simple. To do this, cut out 2 pieces of 11.5 × 15 cm in size and 1 piece of 0.7 × 15 cm from thick cardboard.

We spread the cardboard parts on the fabric, as shown in the photo.

With the help of Moment gel-glue, we glue the edges of the fabric to the cardboard parts. Only on the inside of the notebook!

We glue a 5 cm wide satin ribbon on the cover.

On the inside of the notebook, glue the tape-bookmark.

We return to paper. The glued block must be completely dry. We glue it on the "Moment-Gel" to the cover and leave to dry.

Endpaper for notebook
Cut A4 scrap paper into 2 equal parts.

Fold each piece in half.

We retreat 1 cm from the place of the fold and fold it again.

We glue the resulting "border" to the inner edge of the paper block on both sides of the notebook.

We glue the second part of the flyleaf to the cover along the entire perimeter.

Cover decor
For a felt pad we glue a tourniquet in the color of the cover and a locomotive button, as well as a "Нand made" sticker. We decorate the fabric notebook with lace, paper roses and a sticker.

Not so long ago I came across the word "moleskin". The definition was unfamiliar to me. And what was my surprise that this - trademark the company that makes the most commonplace notebooks.
I have been finishing all my notebooks since school. Glued pockets with separate leaves for quick lists, created multi-bookmarks, tinted the edges of the sheets. Later, I got electronic notebooks, but that's another story.
I met in the open spaces of the Russian Internet detailed lesson for making an unusual notebook. Making a notebook yourself is not difficult. In the master class, a detailed photo report was collected with the author's comments. I am presenting the article “as is”.
A technique similar to classic book binding is described. First, we need regular office paper. You can match colors, sew in dividers, etc. I used 80 g / m2 A4 paper in vanilla beige and designer color tracing paper 90 g / m2.
We select sheets of paper in a notebook. If the paper weight is about 80 g / m2, then it is optimal to select 5 sheets. If the paper is denser, then it is better to make notebooks of 2-3 sheets.
Fold the notebook in half:
And so several times, until the desired thickness of the future block is reached. I have 13 notebooks here, i.e. the notebook will contain 130 sheets of A5 format.
We lay the future block at the spine with two pieces of binding cardboard (this is done so that there are no dents from the staples on the paper, and it is compressed evenly) and fix the spine with stationery clips, as shown below:
The block usually lies under the press for about 3 hours, but I often leave it overnight.
While the paper is being pressed, you can look out the window and have a cup of coffee :)
When our notebooks are packed, we open the clips and align the spine by knocking them on the table. We fix the perfectly flat spine again with clips, like this:
Next, we have to cut 6 holes at an equal distance on the spine. I use an already prepared leaflet with markup, for the A5 notebook format, this one can be downloaded from this link and printed. If the format is non-standard, I think you can easily mark the block with a pencil and a ruler :)
We saw through these holes on the spine (as one of the options, you can draw marks on the spine itself, and then pierce the holes in each of the notebooks with an awl, but in my opinion it takes longer):
I used a small file with three edges, bought in Auchan :)
When our holes are ready, we can sew the block easily and masterly. We need two fabric ribbons. I am using cotton. The ribbons must be wide enough to fit between the two sawn holes:
Sewing is convenient for me, putting the block on the edge of the table, facing me. There may be variations, but the main thing is to try not to wrinkle or stain the paper in the process. Often, at first, not everyone succeeds. For sewing I use leather needles and Iris thread for crocheting. We put one of the notebooks in front of us, as indicated in the photo.
Sew the first notebook with a needle-forward seam, a single thread, leaving the ponytail outside. We do not pierce the fabric tapes, but simply bend around with a thread:
We put the second notebook on the first from above, while we do not confuse the right and left edges of the notebooks, i.e. do not turn them over. We insert our needle into the hole of the second notebook:
And we stitch it in the same way as the first, clinging the thread to the thread of the previous notebook in the place where we go around the ribbons:
When we have reached the edge, we tie the working thread and our left tail into two or three knots, having previously pulled them well:
We put the third notebook on top and do the same:
In the places where our tapes are located, we cling to the working thread only for one previous one:
Sew on the third notebook:
And now we must tie a knot, connecting the third notebook with the previous ones. To do this, thread a needle through a thread between the 1st and 2nd notebooks:
We withdraw the needle, leaving a loop:
And we thread the needle with the resulting loop like this:
We press the notebooks together to make our knot tight:
In fact, this is a simple sewing knot, it is often tied when sewing is finished. Now we boldly report from above all subsequent notebooks, sewing them to the block and tying knots along the edges
If you run out of thread, then it is convenient to tie it on at the moment when we are above the ribbon. In this case, the knot is guaranteed to remain on the spine, and it will not be visible on the finished product.
When all the notebooks are sewn, we tie not one, but two or three sewing knots on the side.
Put the block again between the cardboard boxes, paying special attention to the even spine. Notebooks should lie side by side:
And we fasten our impromptu press at the top and bottom:
Now you need to glue the spine. I use Moment Silicone Sealant. It holds the notebooks together quite firmly, while remaining elastic even after drying, as a result of which the notebook opens and scrolls perfectly. Also, after using it, you do not need to additionally glue the gaps between the notebooks.
Apply sealant to the spine:
And spread along it with a sponge, paying attention to the filling of each gap.
When all the gaps are filled, you can remove the excess and level the layer.
We again fasten the clips along the spine, trying to get as close to it as possible with their "pressing" part.
Usually the block dries from an hour, but if possible, it is better to leave it under the press for a longer time. I also often leave it overnight.
In the meantime, we can prepare future endpapers. For them, we need two sheets of thick paper (in our case A4 format), preferably from 180 g / m2, you can use scrapbooking paper. We make big balls in the middle:
And we fold them in half, with the "beautiful" side inward:
As it dries, we take out our block from under the press:
I glue on a couple of kraft paper before sticking on the flyleaf. It will trim the ribbons under the endpaper and add strength to the garment.
I glue with UHU glue stick like this:
And I stick the tapes on top of the craft:
Next, we glue the endpapers. I love making durable and solid notebooks, so I use Moment crystal glue. To evenly apply a strip of glue, we protect with a sheet of paper that part of the block, on which the glue should not fall:
We remove the sheet, glue the flyleaf. We glue a piece of craft with ribbons on the flyleaf from above:
Now we have to align the edges of the resulting block, there are 4 ways:
1. Purchase a simple guillotine cutter. It justifies itself in the event that you are going to make notebooks often and in large quantities.
2. Try to cut by hand with a construction knife. The knife can be bought in Auchan, Leroy Merlin, etc. Choose an expensive, heavy knife and good replacement blades. Break the blades as often as possible. At first glance, this method seems impossible, but in my master classes, many people manage to cut the block quite adequately the first time. And with certain workouts, it often turns out not far from the ideal.
We put a metal ruler at the edge and press it strongly against the block with our left hand. You shouldn't cut less than 5mm, it is very difficult. We cut with the right hand with a knife, keeping the hand strictly perpendicular to the working surface. We carry out the knife many times without pressing hard on it. Better to let there be more "passes", but almost without pressure. As a result, the cut can be processed with fine sandpaper.
Photo from my MK:
3. You can take the block to a printing house near your home or work. Often they will not refuse to trim the block, and it costs around 5-15 rubles. per block. If there is only one block, they often cut it for free :)
4. Leave as is :) The shaggy edge emphasizes that the product is handmade.
I am using a cutter:
As a result, we get a ready-made block.
I already once wrote how to make a notepad from a block, but some of the things there are outdated, despite the fact that general principle stayed. I promised to update the information for a long time - and now :)
We need two binding cards slightly larger than the block size and 300 g / m2 cardboard for the spine.
We cut the cardboard so that when applied to the block from 3 sides, 5 mm remain through, and the spine has 5-7 mm less:
On cardboard for the spine (I have 10 cm x the height of the cover), we make several creases 7 at a distance of 2-3 mm from each other. This is done so that the spine is nicely rounded during use. The distance from the first to the last scoring should be 3-4 mm more than the height of the block spine.
This is how the cardboard spine should sit on the block:
Now we glue the spine with the cardboard cover. I glue on the Moment Crystal glue. Do not forget to retreat those 5-8 mm from the extreme creases on the spine, which we laid when we cut the cardboard.
I want a softer notebook, so I glued an extra layer of fleece on top :)


 Musical instruments in kindergarten presentation on the topic Presentation on the topic: children's musical instruments
 Feathered friends Why birds are called feathered
 Our Feathered Friends, Nature Exploration Lesson Outline Why We Call Birds Feathered Friends